Tutorials

Texture pixelization

The simplest way to pixelate texture, procedural or not – get the color from the single pixel and fill the region with required width and height (resolution) with this color.

Here is the gradient texture with red – green – blue colors:

To pixelate it with the first step of resolution we can make some vectors manipulations.

How to protect your add-on from downloading through aggregators

With the Blender popularity growing, the number of add-ons created for it by third-party developers is growing too. A lot of high-quality professional add-ons are written for Blender now. Over time, the number of add-ons is becoming more and more. And on this wave aggregators appeared – programs and services independently searching for add-ons and allowing Blender users to install add-ons quickly, many at once, and bypassing add-on distribution channels selected by their authors. What caused a negative reaction of add-on developers.

Changing objects visibility in the viewport and while rendering

The easiest way to hide and show rendering objects is to assign animation keys to them. To do this, move the cursor over the eye icon (visibility in the viewport) or camera (visibility when rendering) in the Outliner window, press the “i” key and then manage the created condition in the Graph Editor like the ordinary animation keys.

But this method is not always available. For example, we cannot assign visibility animation keys for collections, Blender will generate errors like:

“hide_viewport” property cannot be animated

or

“hide_render” property can not be animated

However, using the Blender Python API, we can control the visibility of such objects.

Add-on preferences panel

When developing add-ons it is often necessary to give an ability to set a number of parameters that affect the whole add-on work to the user. For example, the user can specify a directory for saving/loading files, set some default variables or switch between add-on modes. Of course, the interface for setting such parameters can be placed in the add-on panel, but it is better to place it in a separate add-on preferences panel, which is located in the “Preferences” window under the add-on installation panel.

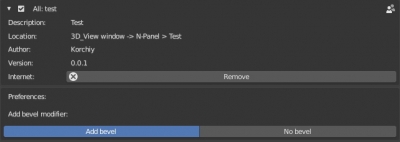
The main advantage of the add-on preferences is that they don’t reset when Blender restarts. The user does not need to configure the add-on preferences each time, it’s enough to set the necessary parameters once, personalizing the add-on for convenient work.

Let’s create an add-on and define a parameter, placing it in the add-on preferences panel.

Porting add-on from Blender 2.7 to Blender 2.8

In the latest version 2.8 of Blender developers have made many changes in API, so all the scripts and add-ons written for earlier Blender versions (2.7 and below) have stopped working. To run your add-ons in the new Blender 2.8, you need to port them – correct their code to work properly with the new Blender API.

To enable your add-on in Blender 2.80 you have to make the following changes in code:

Using Microsoft Visual Studio Code as external IDE for writing Blender scripts/add-ons

Blender has its own built-in text editor for writing scripts and add-ons, but it’s much convenient to develop them in external IDEs that provide the user with more features such as autocomplete, syntax highlighting, integration with version control systems and other tools that make development faster and easier.

One of these IDEs is Visual Studio Code from Microsoft. This is a free universal environment that supports development with various programming languages, including the Blender API language – Python.

Tiling procedural textures in Blender

Creating separate elements of procedural textures in Blender is quite simply – find the desired formula, rebuilt it using mathematical nodes, and as a result, get the desired shape. However, textures created this way have one feature – no tiling. Tiling – a cyclic texture duplication, most time is considered harmful, and professional 3D artists try to avoid texture tiling. But sometimes tiling is necessary, for example, when creating patterns or ornaments.

The procedural texture element is always created in a single instance. This is because all the mathematics that forms the actual procedural image is based on the initial data – coordinates that start from 0, spread out to infinity and not repeat. However, the same mathematics helps us to solve this problem.

Creating procedural textures in Blender

All procedural textures in Blender are based on math. Even such irregular structures as “Voronoi” and “Noise” are actually generated according to the mathematical formulas. An exact mathematical algorithm is sewed up into each base material node to obtain the desired image as a result.

We can not specify such algorithms in Blender in the usual mathematical format. However, among other nodes, Blender provides us the “Math” nodes – the wrap over simple mathematical operations. Using these nodes we can build complex mathematical algorithms yourself, generating interesting textures.