Storing data in a remote database has become common practice in the development of software products. Blender is no exception. Writing scripts and add-ons, the developer may need to access the database to retrieve from it or write to it the necessary information. MySQL today is one of the most common and widely available databases and is well suited for working with Blender.

The interaction between Blender and MySQL database through the Blender Python API is not difficult, but it needs some preparation before stating:
There is no MySQL database connection module (MySQL Connector) in the default Blender package. So it needs to be installed:
- Download the MySQL Connector for Python from the official MySQL site:
- Follow the link: https://dev.mysql.com/downloads/connector/python/
- In Select Operating System dialog:
- Select Platform Independent
- Download MySQL Connector module archive: Platform Independent (Architecture Independent), ZIP Archive Python
- Unpack downloaded archive to the temporary directory, for example, to the root of drive D:/
- From the unpacked distributive from D:/mysql-connector-python-2.1.5/lib/ copy the mysql directory to the Blender lib directory. If Blender is located in C:/Program Files, you need to copy the mysql directory to C:/Program Files/blender-2.78c-windows64/2.78/python/lib/
The module for Blender connection to MySQL is installed, now we can work directly with the database.
Using external IDE PyCharm to work with Blender API or simply in the built-in text editor let’s write some code to access the MySQL database:
- Import the necessary modules at first: bpy – to interact with the scene, mysql.connector – to work with the database:
|
1 2 |
import bpy import mysql.connector |
- Define parameters for the database connection:
|
1 2 3 4 5 |
user = 'root' password = '_PASSWORD_' host = 'localhost' database = 'blender' table = 'test' |
user – the user of the MySQL database. You can specify the administrator – root, or another specially created user.
password – the database user password. Replace _PASSWORD_ with a proper user password.
host – the database location. It can be specified as an address (www.test.ru), ip (192.168.0.1) or localhost (the database is hosted on the local computer).
database and table – the name of the database and the table in it.
- Create the connection to MySQL and the cursor to execute queries:
|
1 2 |
db = mysql.connector.connect(user=user, password=password, host=host) cursor = db.cursor() |
- Create the database with the specified name (‘blender’) and select it:
|
1 2 |
cursor.execute("CREATE DATABASE IF NOT EXISTS %s DEFAULT CHARACTER SET 'utf8'" % database) db.database = database |
- Create the table in the selected database:
|
1 |
cursor.execute('create table if not exists %s (`name` varchar(50) NULL) engine=InnoDB' % table) |
The table structure consists of one text field “name” with 50 characters length.
- Add several different meshes to the scene (UV Sphere, Cube, etc.)
- Shift+a – Mesh – …
- Add to our script a query which adds the name of the selected mesh to the table created above:
|
1 2 |
cursor.execute("insert into {} (name) values ('%s')".format(table) % bpy.context.selected_objects[0].name) db.commit() |
By default, the auto-commit in the mysql connector is disabled, so after performing insert, update, and the same queries we must manually commit them with the commit() command.
If you first enable auto-commit,
|
1 |
db.autocommit = True |
you do not need to complete queries with the commit().
- To confirm that the name of the selected object correctly stored in the table of our database, we can execute a query that returns the table content:
|
1 2 3 |
cursor.execute('SELECT name FROM {}'.format(table)) for row in cursor: print(row[0]) |
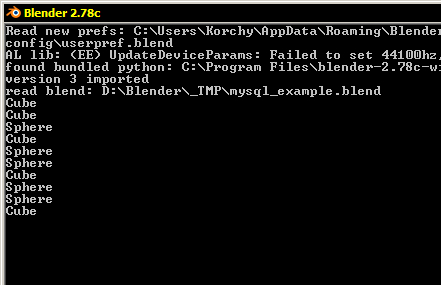
After this code execution, the contents of the “name” field of the created table will be listed in the Blender system console.
- To finish working with MySQL we need to close the cursor and the connection:
|
1 2 |
cursor.close() db.close() |
The completed text of our script:
|
1 2 3 4 5 6 7 8 9 10 11 12 13 14 15 16 17 18 19 20 21 22 23 24 25 26 |
import bpy import mysql.connector user = 'root' password = '111' host = 'localhost' database = 'blender' table = 'test' db = mysql.connector.connect(user=user, password=password, host=host) cursor = db.cursor() cursor.execute("CREATE DATABASE IF NOT EXISTS %s DEFAULT CHARACTER SET 'utf8'" % database) db.database = database cursor.execute('create table if not exists %s (`name` varchar(50) NULL) engine=InnoDB' % table) cursor.execute("insert into {} (name) values ('%s')".format(table) % bpy.context.selected_objects[0].name) db.commit() cursor.execute('SELECT name FROM {}'.format(table)) for row in cursor: print(row[0]) cursor.close() db.close() |
To test it, you can consistently select added to the scene meshes, each time after the selection running the script. As a result, the database with the name “blender” will be created, with the table named “test” within, into which several mesh names will be stored. The final output to the Blender system console will look like this: