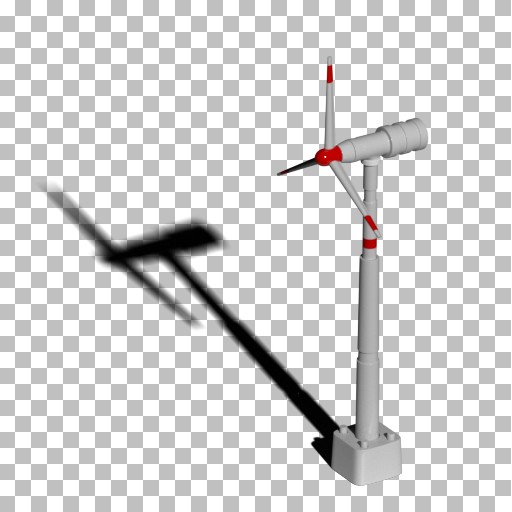
Sometimes it is necessary to create a render of an object with shadows on a transparent background. This occurs when you need to realistically embed a 3D into the photo or when creating an image to use it as a sprite in a computer game.
There is no special shader in Blender, like “Shadow catcher” in 3D Studio Max, which remains transparent display shadows. However, it is possible to achieve the desired result.
Let’s consider how we can get a shadow render on a transparent background using Blender:
To start let’s create a simple scene with the object, which needs to be rendered together with shadows, the plane on which objects shadows fall and the small and sufficiently remote light source (meshlight) to make clear, precise shadows.
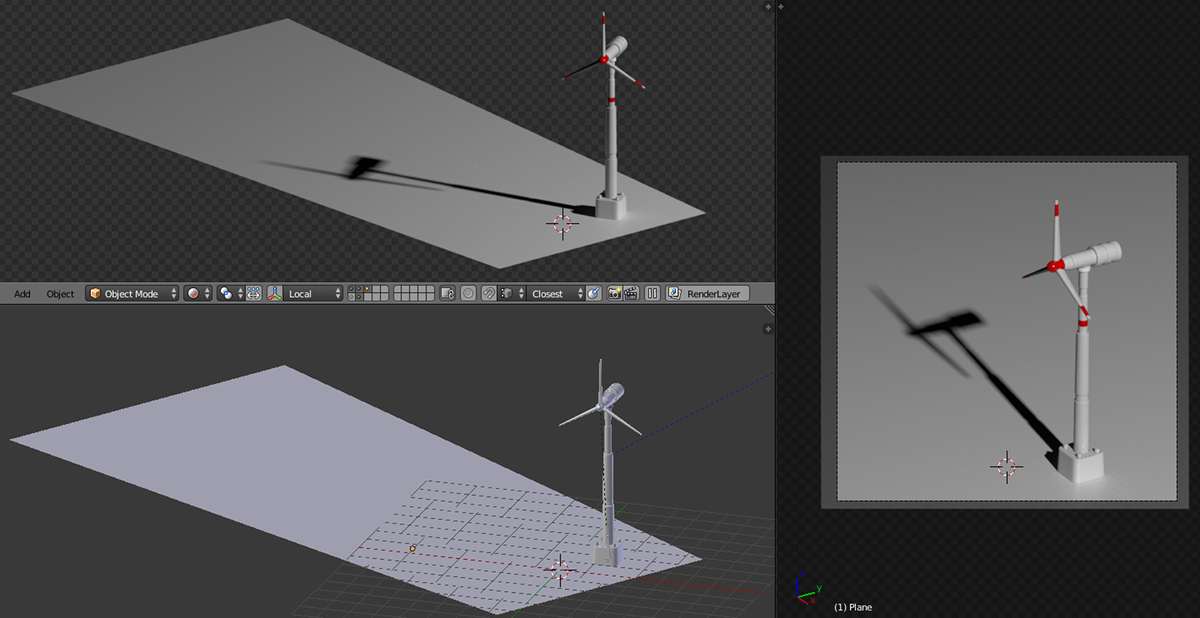
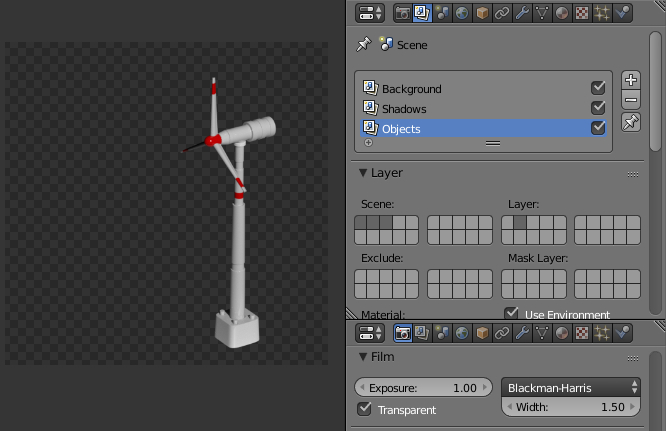
There is a model of the wind turbine on the plane serving as the basis for its shadow. All the scene lights by another plane with the Emission shader. It locates right and above the model. Instead of a wind generator, any other mesh can be used, for example, “Suzanne”, or the default cube.
For work convenience, all objects need to distribute into different layers of the scene. On the first layer of the scene let’s place the plane for the shadow, transfer the wind generator model to the second scene layer, and place the meshlight on the third scene layer.
- Select the wind generator model and the meshlight
- m – 2 – Enter
- Switch to the second layer of the scene
- 2
- Select the meshlight
- m – 3 – Enter
- Select all three layers of the scene to access all the objects.
In order to get the desired result – a wind generator with a shadow on a transparent background, we need to divide the whole render to 3 render layers:
- Render layer with a background without the wind generator and without its shadow;
- Render layer with a background and a shadow falling on it but without the wind generator;
- Render layer with the wind generator without any background and shadow
Let’s create the necessary render layers:
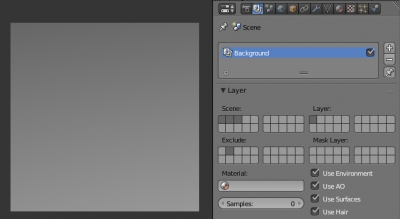
- In the Properties window, the Render Layers tab, the Scene panel:
- Rename the default render layer to “Background”
- In the Layer subpanel
- Scene
- Check all three layers of the scene
- Layer
- Check only the first scene layer – only the objects located on the first layer of the scene will render on the current render layer – the background plane.
- Exclude
- Check the second scene layer – selected scene layer with the wind generator will be excluded from the rendering process, so its shadow will not render on the background plane.
“Background” Render layer
- Check the second scene layer – selected scene layer with the wind generator will be excluded from the rendering process, so its shadow will not render on the background plane.
- Scene
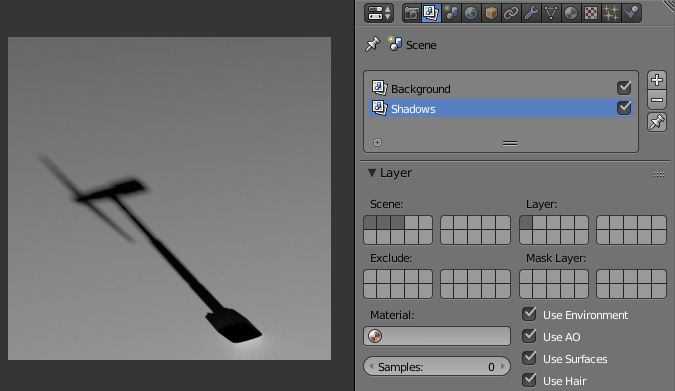
- Click on “+” to create a second render layer and name it “Shadows”
- In the Layer subpanel
- Scene
- Check all three layers of the scene
- Layer
- Check only the first layer
- The layer of the scene with the wind generator is not excluded now, so we have a render layer with the background plane and shadow falling on it.

“Shadows” Render layer
- Scene
- In the Layer subpanel
- Click on “+” to create a third render layer and name it “Objects”
- In the Layer subpanel
- Scene
- Check all three layers of the scene
- Layer
- Check only the second scene layer – only the wind generator will be rendered
- Scene
- In the Properties window, the Render tab, the Film panel
- Check the checkbox “Transparent” to render the wind generator on a transparent background

“Objects” Render layer
- Check the checkbox “Transparent” to render the wind generator on a transparent background
- In the Layer subpanel
- In the Layer subpanel
- Rename the default render layer to “Background”

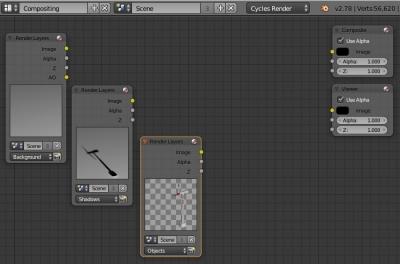
After creating all the necessary render layers, it remains to correctly connect them in compositing to get the desired result.
To see the immediate result let’s launch the render by pressing the f12 key.
- In the main menu switch to the Compositing mode
- Check the following checkboxes:
- Use Nodes
- Backdrop
- Add the Composite node (if it was not added by default)
- shift+a – Output – Composite
- Add the Viewer node. Connecting the outputs of any node with the Image input of the Viewer node, we can display the intermediate results against the background of the compositing window.
- shift+a – Output – Viewer
- Add three Render Layers nodes – one for each created render layer
- shift+a – Input – Render Layers
- Specify “Background” render layer in this node
- shift+a – Input – Render Layers
- Specify “Shadows” render layer in this node
- shift+a – Input – Render Layers
- Specify “Objects” render layer in this node
- Specify “Objects” render layer in this node
- shift+a – Input – Render Layers
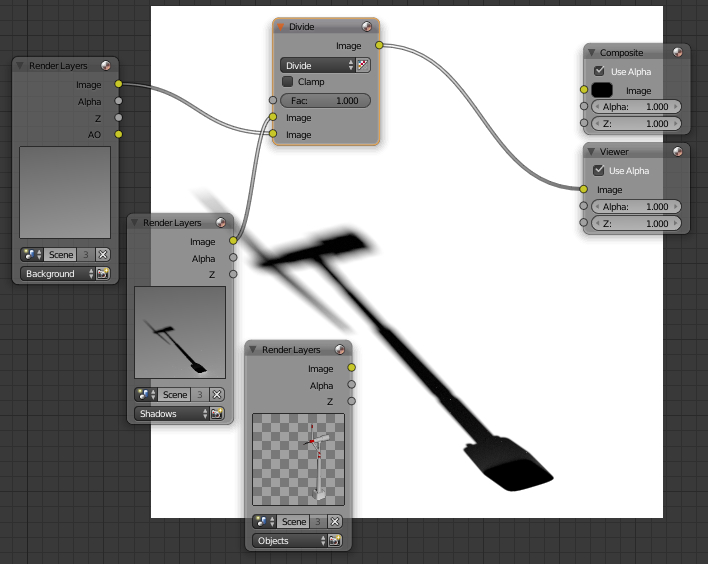
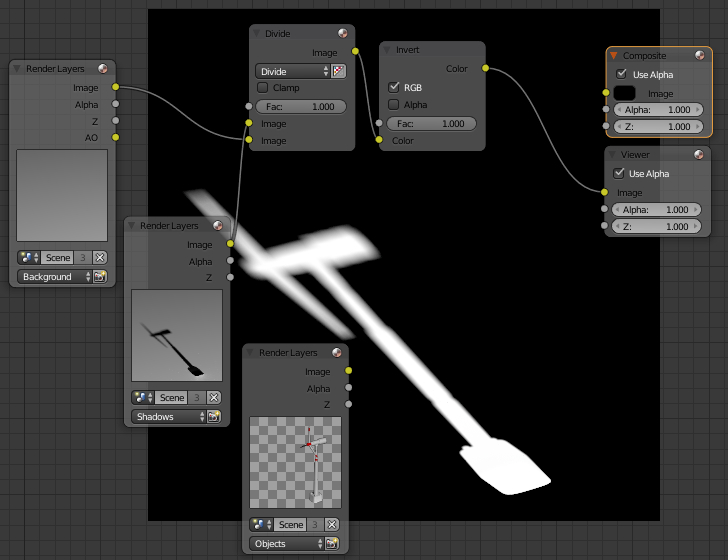
- Add the Color Mix node
- shift+a – Color – Mix
- Switch it to Divide mode
- Connect the Image output of the Render Layers node (Background) with the second input of the Image of the Divide node
- Connect the Image output of the Render Layers node (Shadows) with the first input of the Image of the Divide node

- shift+a – Color – Mix
- Add the Invert node
- shift+a – Color – Invert
- Connect the Image output of the Divide node with the Color input of the Invert node

- Add the Set Alpha node
- shift+a – Converter – Set Alpha
- Connect the Color output of the Invert node with the Alpha input of the Set Alpha node

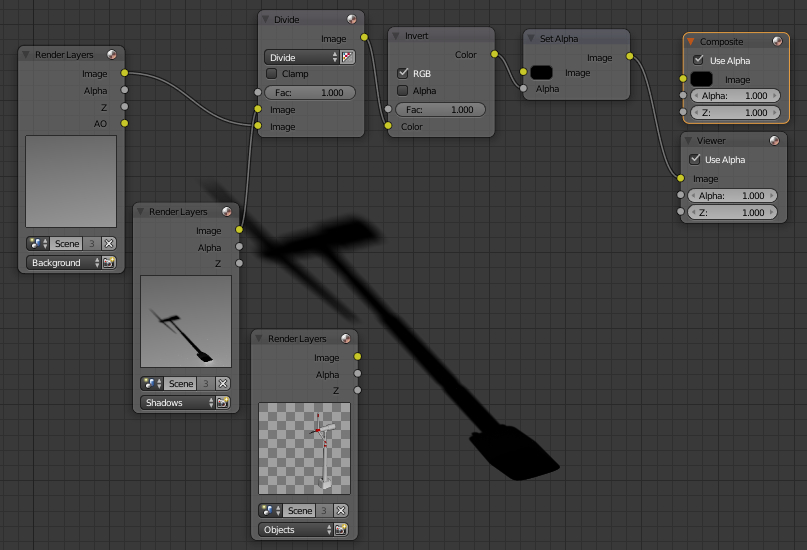
- The wind generator shadow on a transparent background is obtained. It remains to combine it with the wind generator itself.
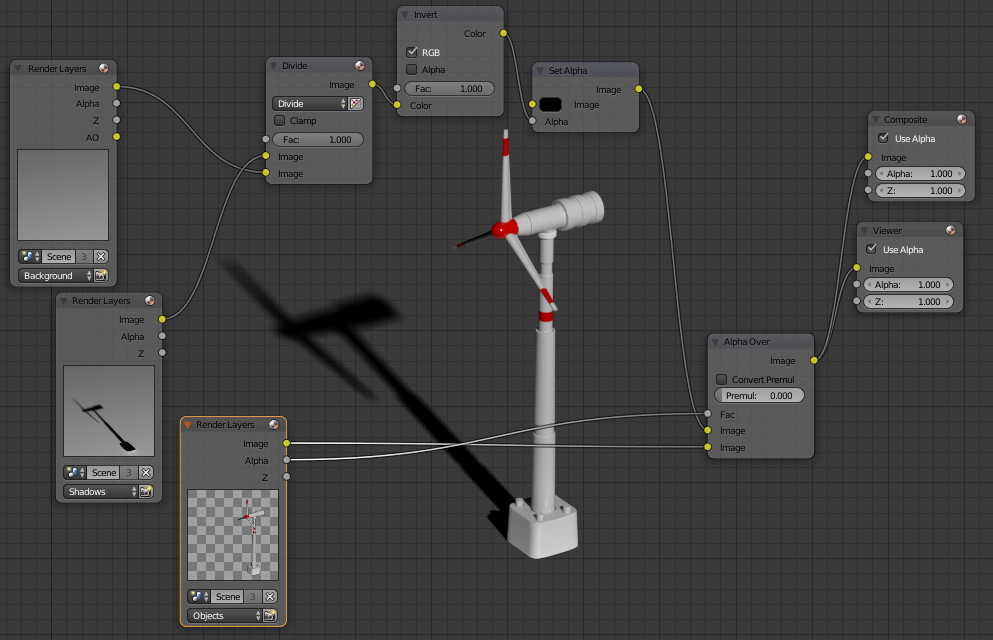
- Add the Alpha Over node
- shift+a – Color – Alpha Over
- Connect the Image output of the Set Alpha node with the first Image input of the Alpha Over node
- Connect the Image output of the Render Layers node (Objects) with the second Image input of the Alpha Over node
- Connect the Alpha output of the Render Layers node (Objects) with the Factor Input of the Alpha Over node

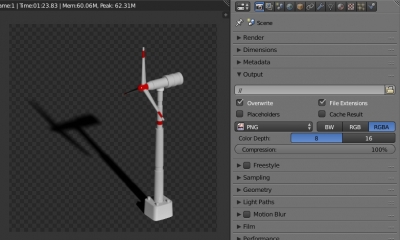
- The node tree is finished, it remains to save the result.
- Connect the Image output of the Alpha Over node with the Image input of the Composite node
- In the Properties window, the Render tab, the Output panel
- Set the file format which supports transparency, for example, PNG.
- Enable transparency support – check RGBA
- Set the file format which supports transparency, for example, PNG.
- Switch the main window to UV/Image Editor
- Select the Render Result
- Save finished image
- f3
- f3
- Check the following checkboxes:


Bonus: using the Shadow path
If the is no meshlights in the scene and only standard Lamp-type lighting sources are used, we can slightly simplify the process by reducing the number of render layers and simplifying the compositing node tree.
- To explore this, let’s remove the meshlight plane from the scene and put in its place the standard light source (Sun)
- shift+a – Lamp – Sun
- Adjust its brightness, dimensions, and direction so that the wind generator falls a clearly visible shadow
- In the Properties window, the Render Layers tab, the Scene panel
- Delete the first two render layers (Background and Shadows)
- The Objects render layer does not need to be changed
- Click on “+” to create a new render layer and name it “All”
- In the Layer subpanel
- Scene
- Check all three layers of the scene
- Layer
- Check all layers of the scene
- Scene
- In the Passes subpanel
- On the Shadow checkbox
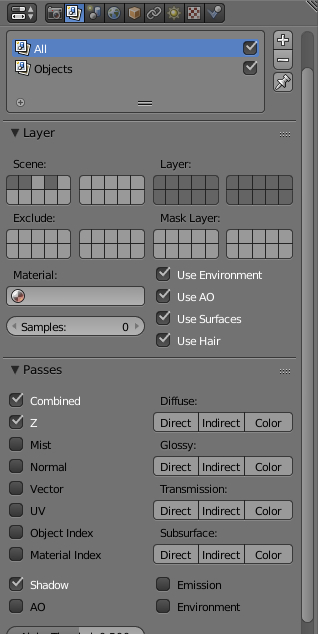
- On the Shadow checkbox
- In the Layer subpanel
- In the main menu switch to the Compositing mode
- Correct the node tree as follows:
- Delete the Render Layers node (Shadows)
- The Render Layers node (Background) switch to the render layer All
- Delete the Divide node
- Connect the Image output of the Render Layers node (All) with the Color input of the Invert node

- Correct the node tree as follows:
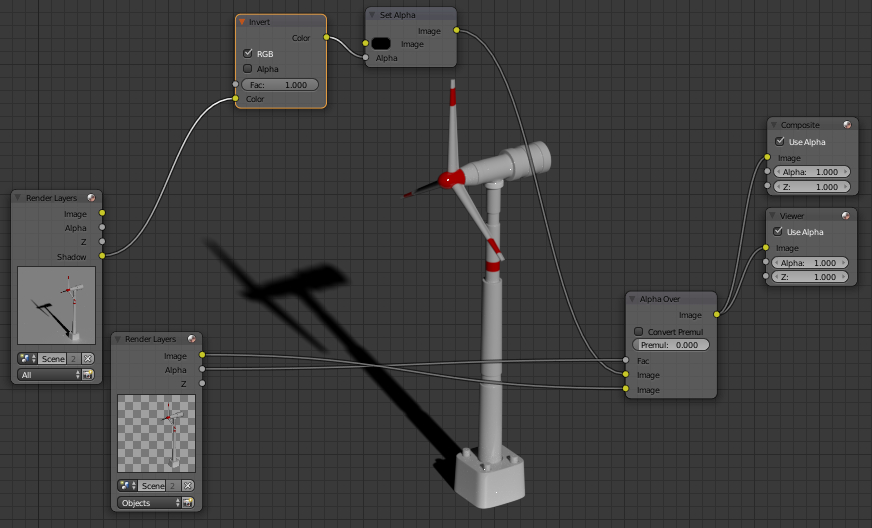
The desired result is obtained. There are only two render layers and the node tree is easier, so the overall render will be faster. However, the Shadow pass is calculated only for standard light sources and is not considered for the meshlights, therefore, if any meshlights are used in the scene, this method will not give proper result.