To set an icon to a button when creating the custom user UI panel in Blender, we look for the text identifier of the desired icon (usually using the built-in Icon Viewer add-on) and set its value to the “icon” parameter when binding the desired operator to the button. However, the icons used in the tools panel are not existed in the common Blender icons list.
 .blend file on Patreon
Even though tool icons are not in the standard set, we can still get their identifiers and then use them in custom panels.
To get the icon id, we need to get the id of the tool with the desired icon, and then use the ToolSelectPanelHelper class to get the actual icon id.
The id of the required tool can be obtained using the following script.
Let’s take the “Annotate” tool as an example. Its id is “ops.gpencil.draw”.
Now we need to import the ToolSelectPanelHelper class and use the “_icon_value_from_icon_handle” method to get the identifier of the icon.
|
1 2 3 4 5 6 |
from bl_ui.space_toolsystem_common import ToolSelectPanelHelper icon_id = ToolSelectPanelHelper._icon_value_from_icon_handle('ops.gpencil.draw') print(icon_id) # 1003 |
Note that this method is not documented and is private; its correct work is not guaranteed by the developers!
Having an icon identifier, we can use it when designing buttons in a custom UI panel.
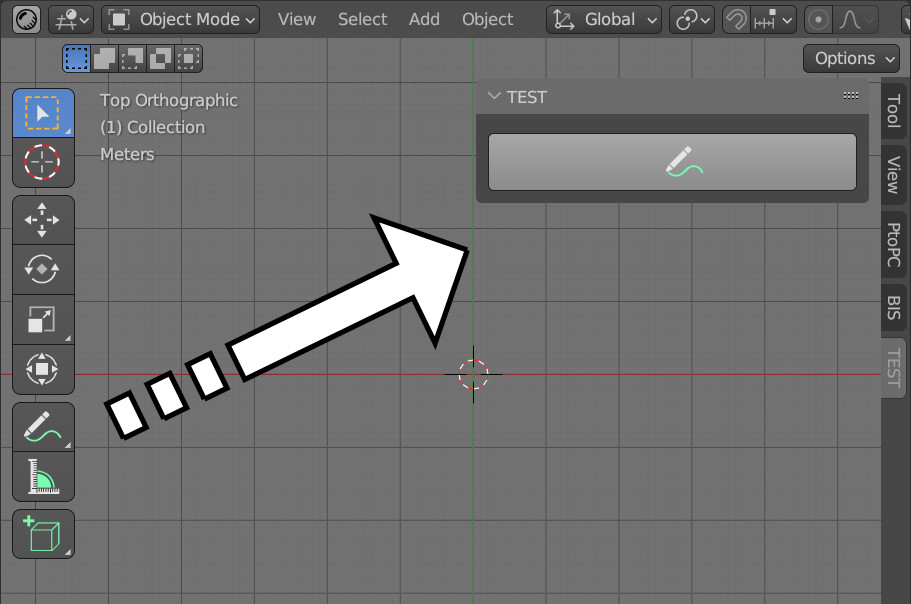
Let’s create a test panel class with single button.
|
1 2 3 4 5 6 7 8 9 10 11 12 13 14 15 16 17 18 19 20 21 22 23 |
import bpy from bpy.types import Panel from bpy.utils import register_class from bl_ui.space_toolsystem_common import ToolSelectPanelHelper class TEST_PT_panel(Panel): bl_idname = 'TEST_PT_panel' bl_label = 'TEST' bl_space_type = 'VIEW_3D' bl_region_type = 'UI' bl_category = 'TEST' def draw(self, context): icon_id = ToolSelectPanelHelper._icon_value_from_icon_handle('ops.gpencil.draw') layout = self.layout layout.scale_y = 2 layout.operator( operator='mesh.primitive_cube_add', icon_value=icon_id, text='' ) register_class(TEST_PT_panel) |
In the draw() function, which is responsible for displaying the UI, we create one button. We bind the adding the default cube to the scene operator “mesh.primitive_cube_add” to this button.
Before this, we got the identifier of the tool icon, and then set the received value in the “icon_value” parameter when assigning an operator to the button.
Since the tool icons are larger than standard icons, we doubled the size of the buttons on our panel by setting the scale_y = 2.
nice work, is there a way to shrink the icon size to 16×16 px?
I don’t think so. If you find a way, please share it here.