The classic way of localizing a Blender add-on (translating it into different languages) is convenient because requires just a single Blender Python API call – to get the currently used locale. This way is maximum universal, but Blender would not be Blender if it did not provide users an ability to localize add-ons through its own API.
 The principle of creating multilingual add-ons using the Blender Python API is not much different from the classical one – we need to create a dictionary with all the variants of translations for all text strings from our add-on and use this dictionary in the localization.
Let’s take the same code of the simple add-on and localize it with the Blender Python API usage.
|
1 2 3 4 5 6 7 8 9 10 11 12 13 14 15 16 17 18 19 20 21 22 23 24 25 26 27 28 29 30 31 32 33 34 35 36 37 38 39 40 41 42 43 44 |
from bpy.types import Panel, Operator from bpy.utils import register_class, unregister_class bl_info = { 'name': 'Localizatoin Test', 'category': 'All', 'version': (1, 0, 0), 'blender': (2, 91, 0), } class LOCALIZATION_TEST_OT_test(Operator): bl_idname = 'localization_test.test' bl_label = 'Operator name' def execute(self, context): print('Test text for printing in system console') return {'FINISHED'} class LOCALIZATION_TEST_PT_panel(Panel): bl_idname = 'LOCALIZATION_TEST_PT_panel' bl_label = 'Panel Header' bl_space_type = 'VIEW_3D' bl_region_type = 'UI' bl_category = 'Localization test' def draw(self, context): layout = self.layout layout.label(text='Test text in Blender UI') layout.operator('localization_test.test', icon='BLENDER') def register(): register_class(LOCALIZATION_TEST_OT_test) register_class(LOCALIZATION_TEST_PT_panel) def unregister(): unregister_class(LOCALIZATION_TEST_PT_panel) unregister_class(LOCALIZATION_TEST_OT_test) if __name__ == '__main__': register() |
First, let’s define a dictionary with the translation variants for text strings used in our add-on.
Unlike the classical method, where we can define the dictionary as we like, the dictionary that we will use with the Blender API must have a certain structure.
Locales must be used as first keys. And there is no need to specify a separate translation into the default language used in our add-on (English).
The internal dictionary for each locale must use a tuple with two items as keys.
The first item is the “context” of the current translation. It needs to be specified if the same string has different translations depending on where it is used. For example, the same string, if it is used as an operator name, can have one translation, and completely different if it is used in shader nodes. If the translation is independent of the context – “*” must be specified as the value.
The second element is the original text string in the default language (usually English). This string and exactly in this language you will have to use in the add-on code.
The value of the dictionary item (with this complex key) should be the translation of the text string into the language of the locale specified in the first key.
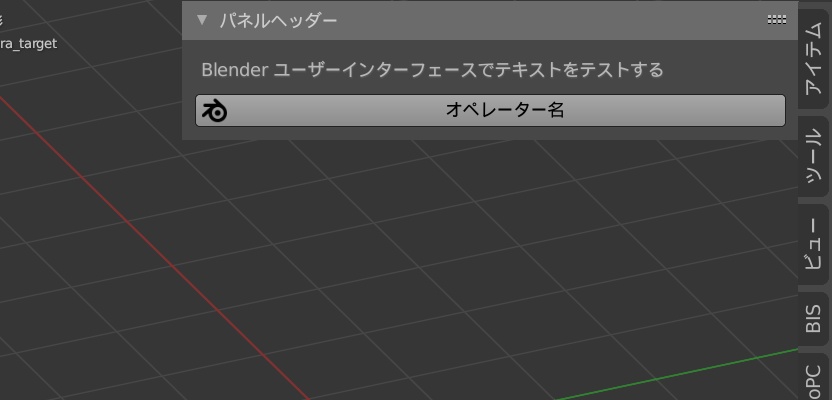
For example, the translation dictionary “langs” for the single text string “Test text in Blender UI” into Spanish and Japanese will look like this:
|
1 2 3 4 5 6 7 8 |
langs = { 'es': { ('*', 'Test text in Blender UI'): 'Prueba de texto en la interfaz de usuario de Blender' }, 'ja_JP': { ('*', 'Test text in Blender UI'): 'Blender ユーザーインターフェースでテキストをテストする' } } |
If we want to access this translation directly, as in the classical localization method, we would write something like this:
|
1 2 |
langs['ja_JP'][('*', 'Test text in Blender UI')] # Blender ユーザーインターフェースでテキストをテストする |
However, the Blender API doesn’t need to access the translation dictionary directly.
To allow Blender Python API to access our dictionary and use it for translations, we need to register it in the API.
To do this, in the “register” function, where we register all classes of our add-on, we need to add the registration of our dictionary with the following command:
|
1 2 3 4 |
import bpy def register(): bpy.app.translations.register(__name__, langs) |
where “langs” is the name of the translation dictionary we created.
For proper work the dictionary must also be unregistered in the “unregister” function:
|
1 2 |
def unregister(): bpy.app.translations.unregister(__name__) |
Now, when the user switches the language, all text strings in our add-on that have a translation into the selected language will be automatically translated. And in most cases, you don’t need to change the add-on source code!
You do not need to call a function, as in the classical method, to translate the interface, the original strings must be left in their original form of simple assignment.
|
1 |
bl_label = 'Panel Header' |
But in some expressions, for example, in the “print” function, or for translating the formatted strings, we need to replace the text assignment with a call of a special API function – “pgettext”.
For example, the text string in the “print” function:
|
1 |
print('Test text for printing in system console') |
should be replaced with a function call:
|
1 |
print(bpy.app.translations.pgettext('Test text for printing in system console')) |
Let’s add translations for each text string of our add-on to the dictionary made earlier with the API requirements:
|
1 2 3 4 5 6 7 8 9 10 11 12 13 14 15 16 |
langs = { 'es': { ('*', 'Test text in Blender UI'): 'Prueba de texto en la interfaz de usuario de Blender', ('Operator', 'Operator name'): 'Nombre del operador', ('*', 'Test text for printing in system console'): 'Prueba de texto para imprimir en la consola del sistema', ('*', 'Panel Header'): 'Encabezado del panel', ('*', 'Localization test'): 'Prueba de localización' }, 'ja_JP': { ('*', 'Test text in Blender UI'): 'Blender ユーザーインターフェースでテキストをテストする', ('Operator', 'Operator name'): 'オペレーター名', ('*', 'Test text for printing in system console'): 'システムコンソールで印刷するためのテストテキスト', ('*', 'Panel Header'): 'パネルヘッダー', ('*', 'Localization test'): 'ローカリゼーションテスト' } } |
Let’s also replace text strings assignment to a function call, only if necessary.
And now Blender displays the interface of our add-on in accordance with the current user’s language.
 The final code:
|
1 2 3 4 5 6 7 8 9 10 11 12 13 14 15 16 17 18 19 20 21 22 23 24 25 26 27 28 29 30 31 32 33 34 35 36 37 38 39 40 41 42 43 44 45 46 47 48 49 50 51 52 53 54 55 56 57 58 59 60 61 62 63 64 |
import bpy from bpy.types import Panel, Operator from bpy.utils import register_class, unregister_class bl_info = { 'name': 'Localizatoin Test', 'category': 'All', 'version': (1, 0, 0), 'blender': (2, 91, 0), } langs = { 'es': { ('*', 'Test text in Blender UI'): 'Prueba de texto en la interfaz de usuario de Blender', ('Operator', 'Operator name'): 'Nombre del operador', ('*', 'Test text for printing in system console'): 'Prueba de texto para imprimir en la consola del sistema', ('*', 'Panel Header'): 'Encabezado del panel', ('*', 'Localization test'): 'Prueba de localización' }, 'ja_JP': { ('*', 'Test text in Blender UI'): 'Blender ユーザーインターフェースでテキストをテストする', ('Operator', 'Operator name'): 'オペレーター名', ('*', 'Test text for printing in system console'): 'システムコンソールで印刷するためのテストテキスト', ('*', 'Panel Header'): 'パネルヘッダー', ('*', 'Localization test'): 'ローカリゼーションテスト' } } class LOCALIZATION_TEST_OT_test(Operator): bl_idname = 'localization_test.test' bl_label = 'Operator name' def execute(self, context): print(bpy.app.translations.pgettext('Test text for printing in system console')) return {'FINISHED'} class LOCALIZATION_TEST_PT_panel(Panel): bl_idname = 'LOCALIZATION_TEST_PT_panel' bl_label = 'Panel Header' bl_space_type = 'VIEW_3D' bl_region_type = 'UI' bl_category = 'Localization test' def draw(self, context): layout = self.layout layout.label(text='Test text in Blender UI') layout.operator('localization_test.test', icon='BLENDER') def register(): bpy.app.translations.register(__name__, langs) register_class(LOCALIZATION_TEST_OT_test) register_class(LOCALIZATION_TEST_PT_panel) def unregister(): unregister_class(LOCALIZATION_TEST_PT_panel) unregister_class(LOCALIZATION_TEST_OT_test) bpy.app.translations.unregister(__name__) if __name__ == '__main__': register() |
Unlike the classical localization way, this method has stricter requirements for defining the translation dictionary and more API calls, but in some cases, it is more convenient because it is not always necessary to replace strings with a function call, and the entire interface is now translated “on the fly”, including operator names and panel headers.
You can download source files for this tutorial on Patreon.