If you want your add-on to be available for all Blender users around the world, you need to make the localization – translation of its interface into different languages.

The simplest way to make your add-on multilingual is the classic way, it is used in many other programs and requires the minimal usage of the Blender Python API.
In a few words, it consists of creating a dictionary in which all translations are entered, and a function that, depending on the current locale (the language selected by the user), by code, returns the text string from the dictionary in the required language.
Let’s make the localization of the simple add-on in practice.
First, let’s create and register classes for our add-on in the Blender Python API.
|
1 2 3 4 5 6 7 8 9 10 11 12 13 14 15 16 17 18 19 20 21 22 23 24 25 26 27 28 29 30 31 32 33 34 35 36 37 38 39 40 41 42 43 44 |
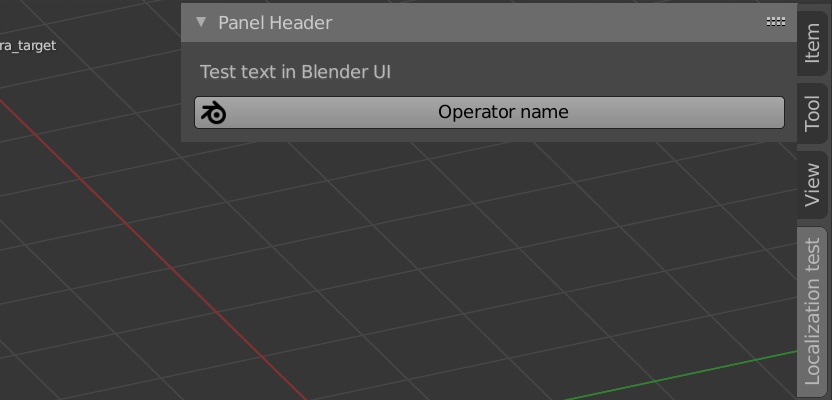
from bpy.types import Panel, Operator from bpy.utils import register_class, unregister_class bl_info = { 'name': 'Localizatoin Test', 'category': 'All', 'version': (1, 0, 0), 'blender': (2, 91, 0), } class LOCALIZATION_TEST_OT_test(Operator): bl_idname = 'localization_test.test' bl_label = 'Operator name' def execute(self, context): print('Test text for printing in system console') return {'FINISHED'} class LOCALIZATION_TEST_PT_panel(Panel): bl_idname = 'LOCALIZATION_TEST_PT_panel' bl_label = 'Panel Header' bl_space_type = 'VIEW_3D' bl_region_type = 'UI' bl_category = 'Localization test' def draw(self, context): layout = self.layout layout.label(text='Test text in Blender UI') layout.operator('localization_test.test', icon='BLENDER') def register(): register_class(LOCALIZATION_TEST_OT_test) register_class(LOCALIZATION_TEST_PT_panel) def unregister(): unregister_class(LOCALIZATION_TEST_PT_panel) unregister_class(LOCALIZATION_TEST_OT_test) if __name__ == '__main__': register() |
We have defined two classes:
LOCALIZATION_TEST_OT_test – an operator that prints a test text string to the console.
LOCALIZATION_TEST_PT_panel – the add-on interface class. It creates a tab in the N-panel of the 3D Viewport window with a text label and a button for calling the operator.
And registered them in the Blender API, as a result, we got a simple add-on. We can install it or execute the code from the “Text Editor” window.
Now we can start to localize it.
First, let’s create a dictionary with translations of text strings that we use in our add-on into different languages.
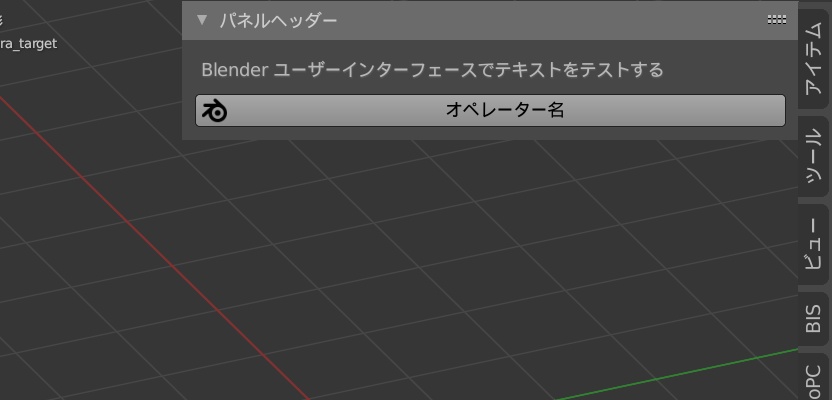
Let’s define a dictionary, name it “langs”, and for the “Test text in Blender UI” string add translation variants into English, Spanish and Japanese.
|
1 2 3 4 5 6 7 |
langs = { 'test_text_in_bl_ui': { 'en_US': 'Test text in Blender UI', 'es': 'Prueba de texto en la interfaz de usuario de Blender', 'ja_JP': 'Blender ユーザーインターフェースでテキストをテストする' } } |
We will store all translation variants in an inner dictionary “test_text_in_bl_ui”. Its name is the key to refer to it Usually, for convenience, keys are simplified and shortened compilations of the source text – shortcodes. This adds clarity and readability to the add-on code.
Inside the dictionary with translation variants, the locales are used as keys, and the translation into the language corresponding to the locale – as values.
Now we can get the translation of the string by simply calling the dictionary with the required keys.
|
1 2 |
langs['test_text_in_bl_ui']['ja_JP'] # Blender ユーザーインターフェースでテキストをテストする |
Having a dictionary with translations, we can define a function that, based on two keys (shortcode and locale), will return the text in the desired language.
|
1 2 3 4 5 6 7 8 9 10 11 |
import bpy def loc_str(str_key, def_locale_key='en_US'): if str_key in langs: locale_key = bpy.app.translations.locale if locale_key in langs[str_key]: return langs[str_key][locale_key] else: return langs[str_key][def_locale_key] else: return 'ERR: no such string in localization' |
The “loc_str” function takes one required and one optional argument in parameters.
The required argument “str_key” gets the shortcode for searching in the “langs” dictionary we created earlier. If the specified shortcode is not found in the “langs” dictionary, the function will return the following error string: “ERR: no such string in localization”.
Having received the inner dictionary with the translations of the desired string, we can receive the translation into the required language using the locale key.
The currently used locale in Blender can be retrieved through its API:
|
1 2 |
bpy.app.translations.locale # 'en_US' |
Since we use text values of the locale as keys, we can easily get the desired translation with the current locale.
|
1 |
return langs[str_key][locale_key] |
If we have no defined translation for the current locale (have not added this locale key with translation to the string dictionary), our function will return the “default” translation, specified in the second, optional, “def_locale_key” parameter. The value for this parameter, of course, must be exactly in the dictionary with string translations. To avoid specifying it every time the function is called, we can set the default value for this parameter to “en_US” in the function definition.
Now we can call this function to get the translation of the required string based on the current locale.
For example:
|
1 2 3 4 5 6 7 8 9 10 11 |
bpy.app.translations.locale # 'es' print(loc_str('test_text_in_bl_ui')) # Prueba de texto en la interfaz de usuario de Blender bpy.app.translations.locale # 'it_IT' print(loc_str('test_text_in_bl_ui')) # Test text in Blender UI |
In the second case, when using the Italian language, the function returned the text in English, since there is no translation to Italian in the dictionary, and English is the default.
Now let’s fill the “langs” dictionary with shortcodes and translation variants to the required languages for each text string used in our add-on.
|
1 2 3 4 5 6 7 8 9 10 11 12 13 14 15 16 17 18 19 20 21 22 23 24 25 26 27 |
langs = { 'test_text_in_bl_ui': { 'en_US': 'Test text in Blender UI', 'es': 'Prueba de texto en la interfaz de usuario de Blender', 'ja_JP': 'Blender ユーザーインターフェースでテキストをテストする' }, 'op_name': { 'en_US': 'Operator name', 'es': 'Nombre del operador', 'ja_JP': 'オペレーター名' }, 'test_str_cons': { 'en_US': 'Test text for printing in system console', 'es': 'Prueba de texto para imprimir en la consola del sistema', 'ja_JP': 'システムコンソールで印刷するためのテストテキスト' }, 'panel_head': { 'en_US': 'Panel Header', 'es': 'Encabezado del panel', 'ja_JP': 'パネルヘッダー' }, 'loc_test': { 'en_US': 'Localization test', 'es': 'Prueba de localización', 'ja_JP': 'ローカリゼーションテスト' }, } |
And replace all the text constants defined in our add-on with a call of the “loc_str” function with the necessary keys.
For example, this string value definition:
|
1 |
layout.label(text='Test text in Blender UI') |
should be replaced with a function call:
|
1 |
layout.label(text=loc_str('test_text_in_bl_ui')) |
Blender will now display the add-on interface according to the language selected by the user.
The final code:
|
1 2 3 4 5 6 7 8 9 10 11 12 13 14 15 16 17 18 19 20 21 22 23 24 25 26 27 28 29 30 31 32 33 34 35 36 37 38 39 40 41 42 43 44 45 46 47 48 49 50 51 52 53 54 55 56 57 58 59 60 61 62 63 64 65 66 67 68 69 70 71 72 73 74 75 76 77 78 79 80 81 82 83 84 85 86 87 88 |
import bpy from bpy.types import Panel, Operator from bpy.utils import register_class, unregister_class bl_info = { 'name': 'Localizatoin Test', 'category': 'All', 'version': (1, 0, 0), 'blender': (2, 91, 0), } langs = { 'test_text_in_bl_ui': { 'en_US': 'Test text in Blender UI', 'es': 'Prueba de texto en la interfaz de usuario de Blender', 'ja_JP': 'Blender ユーザーインターフェースでテキストをテストする' }, 'op_name': { 'en_US': 'Operator name', 'es': 'Nombre del operador', 'ja_JP': 'オペレーター名' }, 'test_str_cons': { 'en_US': 'Test text for printing in system console', 'es': 'Prueba de texto para imprimir en la consola del sistema', 'ja_JP': 'システムコンソールで印刷するためのテストテキスト' }, 'panel_head': { 'en_US': 'Panel Header', 'es': 'Encabezado del panel', 'ja_JP': 'パネルヘッダー' }, 'loc_test': { 'en_US': 'Localization test', 'es': 'Prueba de localización', 'ja_JP': 'ローカリゼーションテスト' }, } def loc_str(str_key, def_locale_key='en_US'): if str_key in langs: locale_key = bpy.app.translations.locale if locale_key in langs[str_key]: return langs[str_key][locale_key] else: return langs[str_key][def_locale_key] else: return 'ERR: no such string in localization' # --- OPS --- class LOCALIZATION_TEST_OT_test(Operator): bl_idname = 'localization_test.test' bl_label = loc_str('op_name') def execute(self, context): # execute test operator print(loc_str('test_str_cons')) return {'FINISHED'} # --- UI --- class LOCALIZATION_TEST_PT_panel(Panel): bl_idname = 'LOCALIZATION_TEST_PT_panel' bl_label = loc_str('panel_head') bl_space_type = 'VIEW_3D' bl_region_type = 'UI' bl_category = loc_str('loc_test') def draw(self, context): layout = self.layout layout.label(text=loc_str('test_text_in_bl_ui')) layout.operator('localization_test.test', icon='BLENDER') def register(): register_class(LOCALIZATION_TEST_OT_test) register_class(LOCALIZATION_TEST_PT_panel) def unregister(): unregister_class(LOCALIZATION_TEST_PT_panel) unregister_class(LOCALIZATION_TEST_OT_test) if __name__ == '__main__': register() |
The classical localization way is simple and convenient, but it has some drawbacks. For example, you can see that our add-on dynamically updates the language of interface elements, but not for operator name and panel header when switching language in Blender settings. Their translation will only change after restarting Blender. However, in most cases, this is not critical.
You can download source files for this tutorial on Patreon.