In general, the “loop” is usually a sequential selection of several points, edges or polygons of a mesh.
However, there is an element in the mesh structure, which is also called a “loop”. It is a combination of one vertex with one edge of the mesh. Let’s try to learn what these “loops” are for.

Let’s consider a separate polygon with 4 vertices and 4 edges.
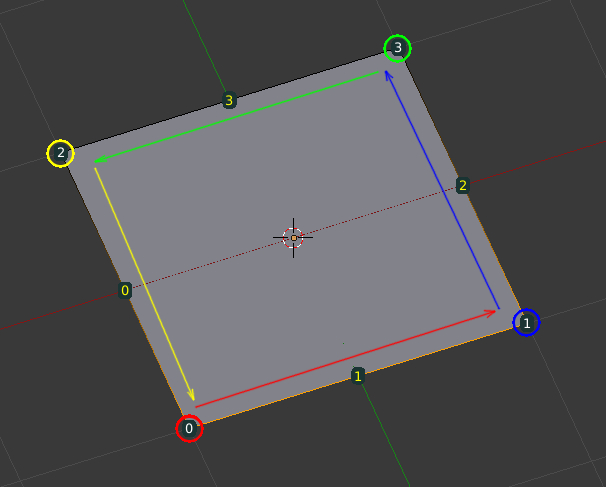
The polygon has 4 loops:
- Vertex 0 + edge 1
- Vertex 1 + edge 2
- Vertex 3 + edge 3
- Vertex 2 + edge 0
Loops are not sorted according to indices of vertexes or edges. What loop is considered to be conditionally first is possible to identify using the polygon property “loop_start”, which returns the index of the edge which takes as the starting point:
|
1 2 |
bpy.context.object.data.polygons[0].loop_start # 0 |
Loops are always counterclockwise directed in the right-sided coordinate system (the polygon normal is directed upwards). The loop always comes out of the vertex and runs along the edge.
In our example, the first loop leaves the vertex with the index 2 and goes along the edge with the index 0.
The total number of polygon loops can be obtained using the “loop_total” polygon property:
|
1 2 |
bpy.context.object.data.polygons[0].loop_total # 4 |
And the list of the polygon loop indices – through the range property “loop_indices”:
|
1 2 |
[i for i in bpy.context.object.data.polygons[0].loop_indices] # [0, 1, 2, 3] |
The mesh object has the list of all meshes loops:
|
1 2 |
bpy.context.object.data.loops[:] # [bpy.data.meshes['Plane'].loops[0], bpy.data.meshes['Plane'].loops[1], bpy.data.meshes['Plane'].loops[2], bpy.data.meshes['Plane'].loops[3] |
If the polygon loop is just a vertex – edge combination, the loop in the mesh structure has its own type:
|
1 |
<class 'bpy.types.MeshLoop'> |
From “MeshLoop”, we can get the vertex and the edge indices owned by this loop:
|
1 2 3 4 |
bpy.context.object.data.loops[0].vertex_index # 0 bpy.context.object.data.loops[0].edge_index # 1 |
It seems that the loops in the mesh structure do not carry much value, but it’s not. For example, in order to match the mesh polygons with the polygons of its unwrap (UV) structure, loops mechanisms is used.
From the polygon loop we can access to the corresponding loop on the mesh UV:
|
1 2 |
type(bpy.context.object.data.uv_layers.active.data[bpy.context.object.data.polygons[0].loop_start]) # <class 'bpy.types.MeshUVLoop'> |
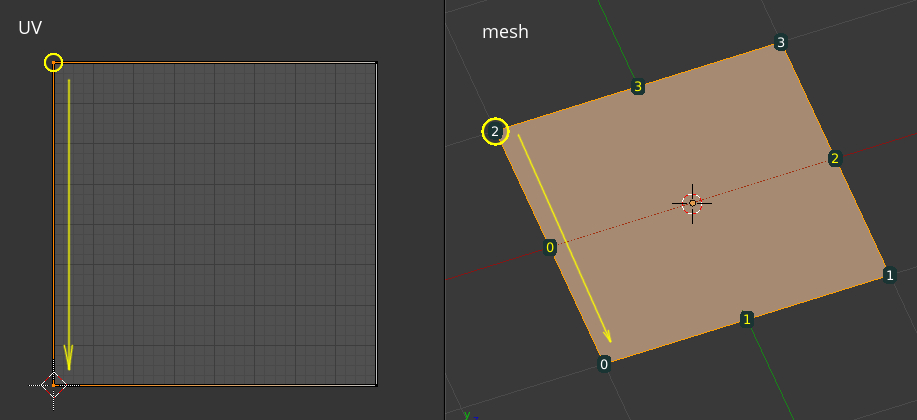
And from the UV-loop – get the vertex UV-coordinates:
|
1 2 |
bpy.context.object.data.uv_layers.active.data[bpy.context.object.data.polygons[0].loop_start].uv # Vector((0.00010003960051108152, 9.998001041822135e-05)) |
So we can correlate the mesh vertex with its coordinates on the mesh UV, which makes us possible to manipulate the texture superimposition.
The loops mechanism is also implemented in the internal Blender mesh format – “BMesh”. Here it provides match more opportunities.
The BMesh loop has its own type:
|
1 |
<class 'bmesh.types.BMLoop'> |
and a large set of properties and methods. But the principle remains unchanged: the loop is a combination of a vertex and an edge.
To get all polygon loops, let’s execute the following code:
|
1 2 3 4 5 6 7 8 9 10 11 |
import bmesh bpy.ops.object.mode_set(mode='OBJECT') meshdata = bpy.context.object.data # active mesh data b_mesh = bmesh.new() b_mesh.from_mesh(meshdata) b_mesh.faces.ensure_lookup_table() print(b_mesh.faces[0].loops[:]) b_mesh.free() bpy.ops.object.mode_set(mode='EDIT') # [<BMLoop(0x0000020234E24E30), index=0, vert=0x0000020234C07450/0, edge=0x0000020234C2ED30/1, face=0x0000020234BAF410/0>, <BMLoop(0x0000020234E24E78), index=1, vert=0x0000020234C07488/1, edge=0x0000020234C2ED80/2, face=0x0000020234BAF410/0>, <BMLoop(0x0000020234E24EC0), index=2, vert=0x0000020234C074F8/3, edge=0x0000020234C2EDD0/3, face=0x0000020234BAF410/0>, <BMLoop(0x0000020234E24F08), index=3, vert=0x0000020234C074C0/2, edge=0x0000020234C2ECE0/0, face=0x0000020234BAF410/0>] |
For each loop, it is easy to get the polygon to which the loop owns, the edge along which it goes, and the vertex from which the loop starts.
|
1 2 3 4 5 6 7 |
loop = b_mesh.faces[0].loops[0] loop.face # <BMFace(0x000000000BD28EA0), index=0, totverts=4> loop.edge # <BMEdge(0x000000000BCC8ED0), index=1, verts=(0x000000000BCC0E70/0, 0x000000000BCC0EA8/1)> loop.vert # <BMVert(0x000000000BCC0E70), index=0> |
The second vertex (the loop comes in) we can get using the “other_vert()” method of the BMesh edge:
|
1 2 |
loop.edge.other_vert(loop.vert) # <BMVert(0x000000000BCC0EA8), index=1> |
For BMesh edges and vertexes, it is also available to get the loops owned to them with the “link_loops” property.
|
1 2 3 4 5 6 |
b_mesh.edges.ensure_lookup_table() b_mesh.edges[0].link_loops[:] # [<BMLoop(0x000000000BCE8F68), index=3, vert=0x000000000BCC0EE0/2, edge=0x000000000BCC8E80/0, face=0x000000000BD28EA0/0>] b_mesh.verts.ensure_lookup_table() b_mesh.verts[0].link_loops[:] # [<BMLoop(0x000000000BCE8E90), index=0, vert=0x000000000BCC0E70/0, edge=0x000000000BCC8ED0/1, face=0x000000000BD28EA0/0>] |
The method:
|
1 |
ensure_lookup_table() |
is called for each set of BMesh polygons, edges, and vertexes to rebuild the index tables for these elements.
In addition to simple loops access, BMesh provides a simple mechanism for switching between neighboring loops.
For a separate polygon loop the:
|
1 |
link_loop_prev |
property always return the previous loop of this polygon.
The
|
1 |
link_loop_next |
property returns the next polygon loop.
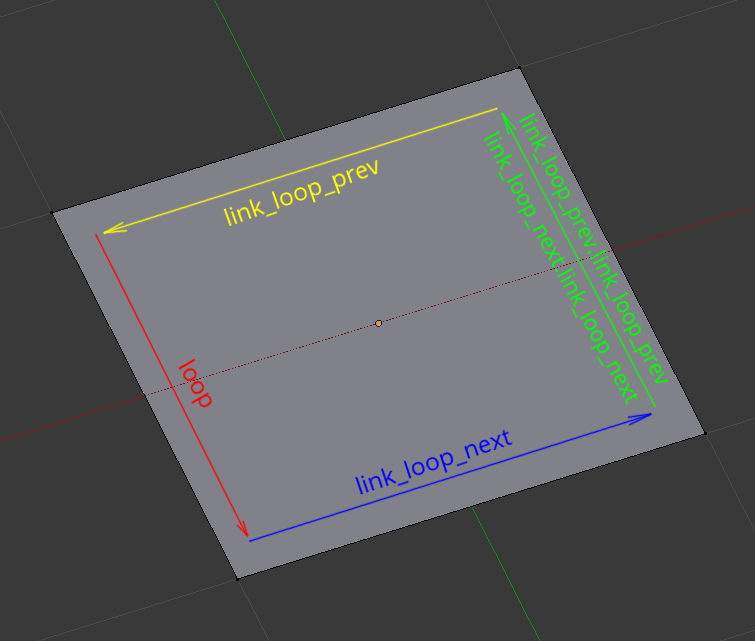
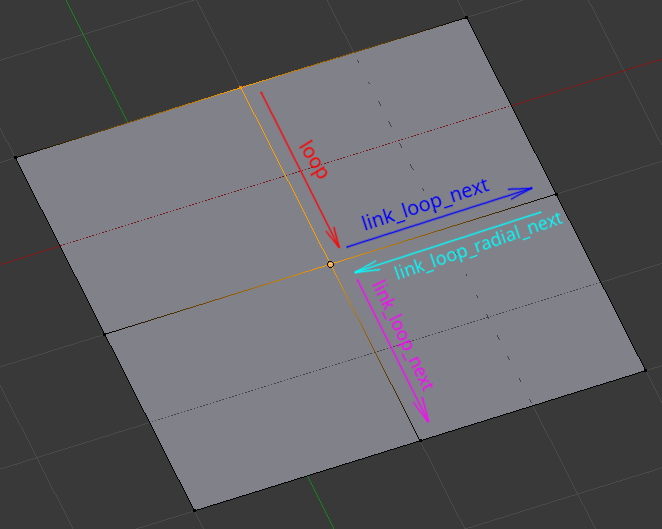
Calling the same properties “link_loop_prev” or “link_loop_next” from the received loop we can, for example, get the polygon opposite side loop:
|
1 |
link_loop_next.link_loop_next |
or
|
1 |
link_loop_prev.link_loop_prev |
Other useful properties for switching between BMesh loops are:
|
1 |
link_loop_radial_prev |
and
|
1 |
link_loop_radial_next |
Calling them allows us to move from the current loop to the loop on the same edge but on the neighboring polygon and directed in the opposite direction.
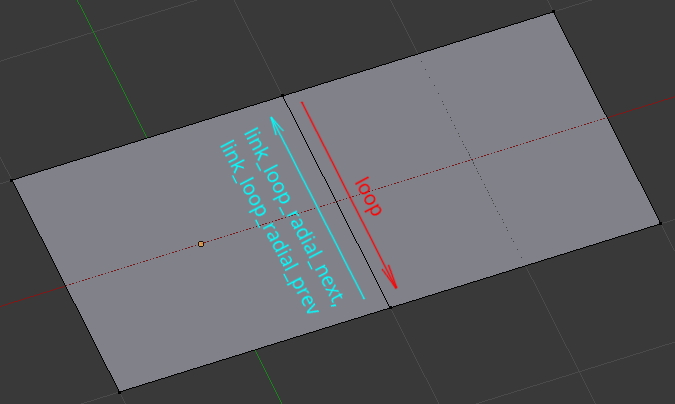
In most cases, for the usual mesh geometry, the “link_loop_radial_next” and “link_loop_radial_prev” properties points to the same loop.
They will point to different loops only if more than two polygons converge into one edge. This case, each next call “link_loop_radial_next” will point to the loop owned by the next polygon with the same edge, and “link_loop_radial_prev” – to the previous one.
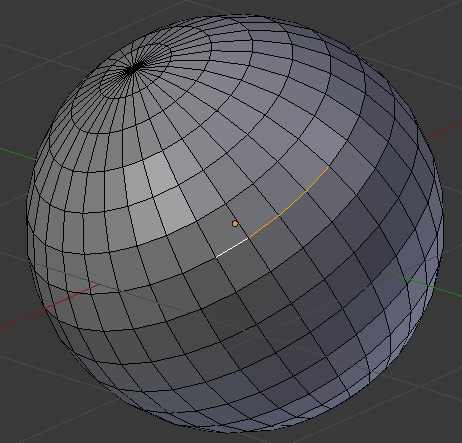
To demonstrate this let’s mark selected several edges one by one (similar by clicking with the alt key pressed) by code. We will start from one selected edge of the mesh and add to the selection another 3 edges, lying the same direction.
To move from the current edge to the next one, we need to execute a chain of loops transitions:
|
1 |
link_loop_next.link_loop_radial_next.link_loop_next |
and mark selected the edge owned to the received loop.
Repeating that transitions between loops and marking received edges as selected let’s make the required selection.
The complete script code that selects the next 3 edges, starting with the selected one:
|
1 2 3 4 5 6 7 8 9 10 11 12 13 14 15 16 17 |
import bpy import bmesh bpy.ops.object.mode_set(mode='OBJECT') meshdata = bpy.context.object.data # active mesh data b_mesh = bmesh.new() b_mesh.from_mesh(meshdata) b_mesh.edges.ensure_lookup_table() selected_edge = [edge for edge in b_mesh.edges if edge.select][0] start_loop = selected_edge.link_loops[0] for i in range(3): next_loop = start_loop.link_loop_next.link_loop_radial_next.link_loop_next next_loop.edge.select = True start_loop = next_loop b_mesh.to_mesh(meshdata) b_mesh.free() bpy.ops.object.mode_set(mode='EDIT') |
The loops mechanism is clear, but sometimes not predictably.
For example, on a mesh cut, if the polygon does not have a neighboring polygon, the properties “link_loop_radial_next” (“link_loop_radial_prev”) and “link_loop_next” (“link_loop_prev”) will point to the same loop.
Therefore, executing the following code:
|
1 |
link_loop_next.link_loop_radial_next.link_loop_next |
in the case of a mesh cut will point to the same polygon opposite edge loop, but not to the perpendicular edge of the neighboring polygon, as might be expected.
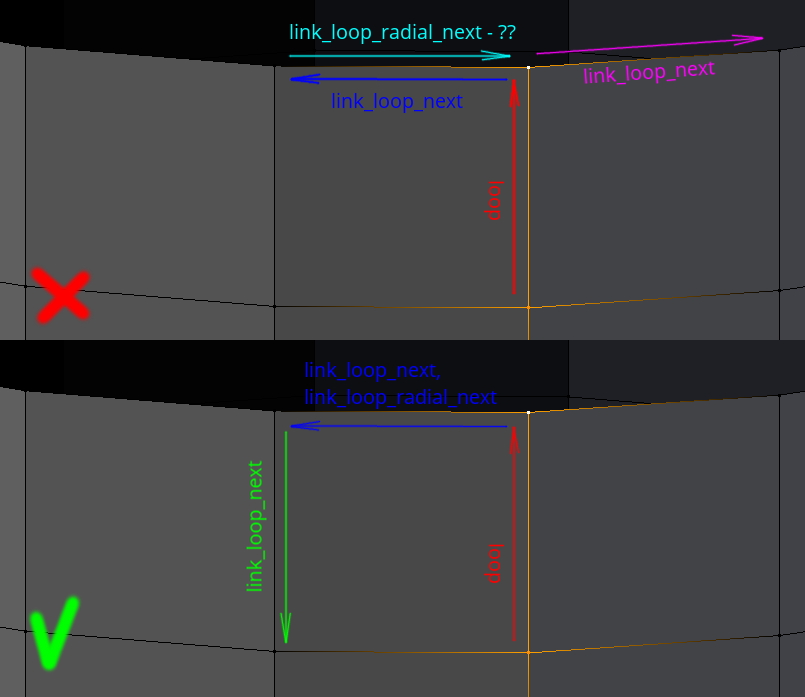
At the same time, if the cut is filled with an n-gone, the same combination of loop transitions will return the expected perpendicular edge loop of the neighboring polygon.
Thank you for the explanation, the official documentation is way too laconic.