With Blender Geometry Nodes, we can fill the curve with the required number of objects. We can also make the fill a little more interesting by changing the size of the fill objects randomly.

 .blend file on Patreon
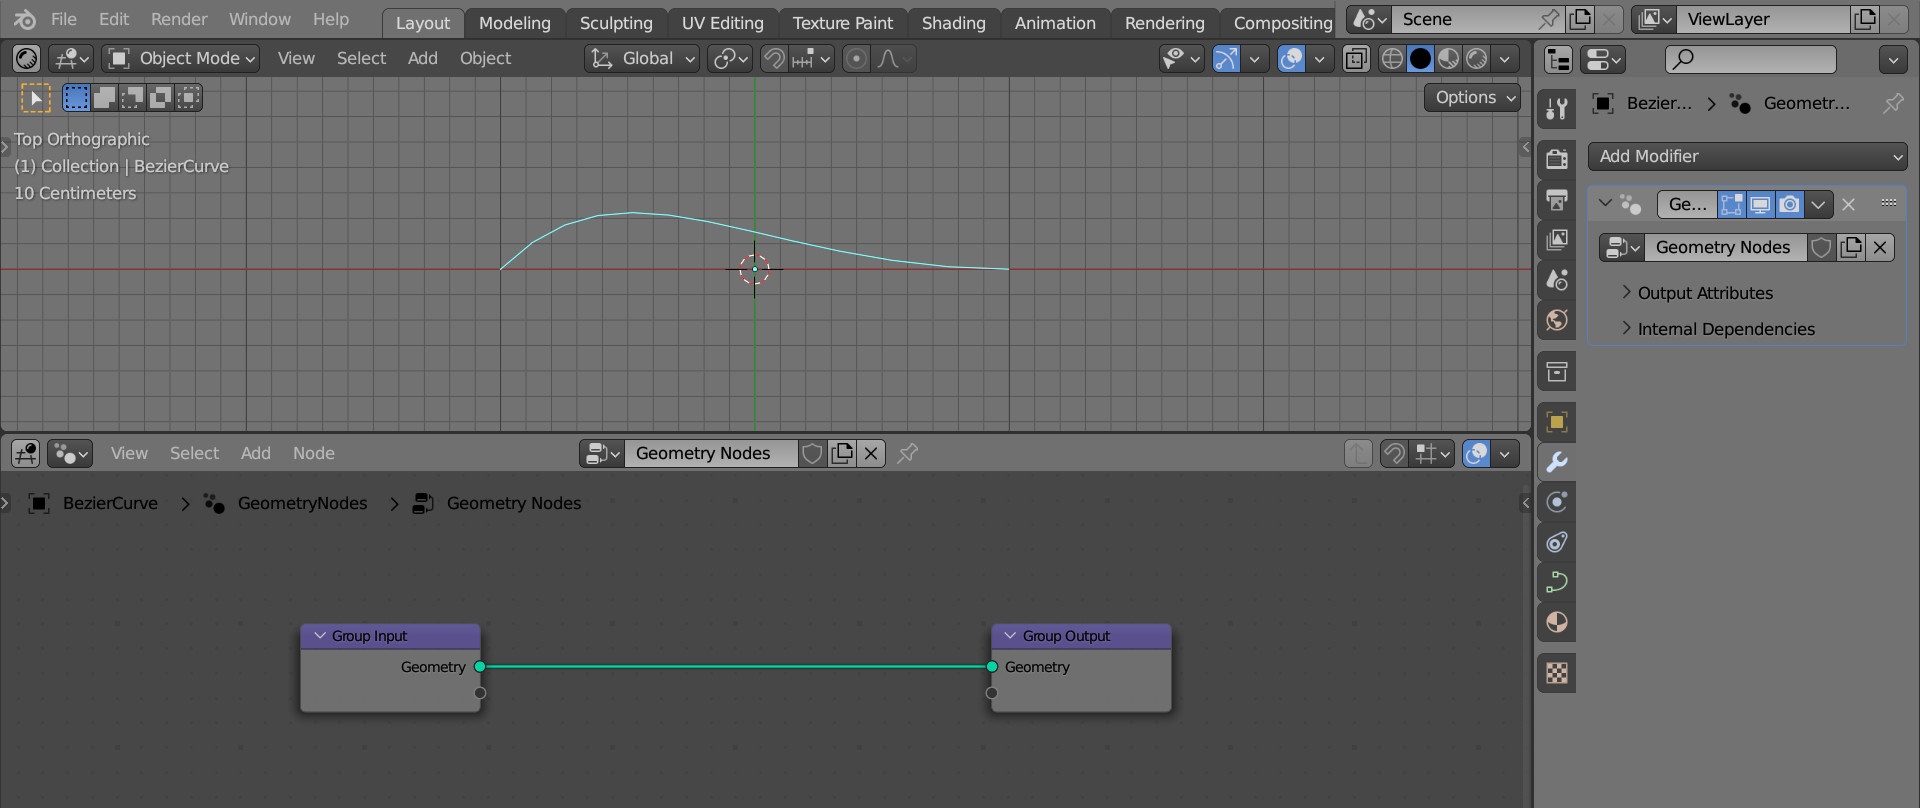
Add a curve to the initial scene (shift + a – Curve – Bezier). Assign a Geometry Nodes modifier to it and initialize the node tree.
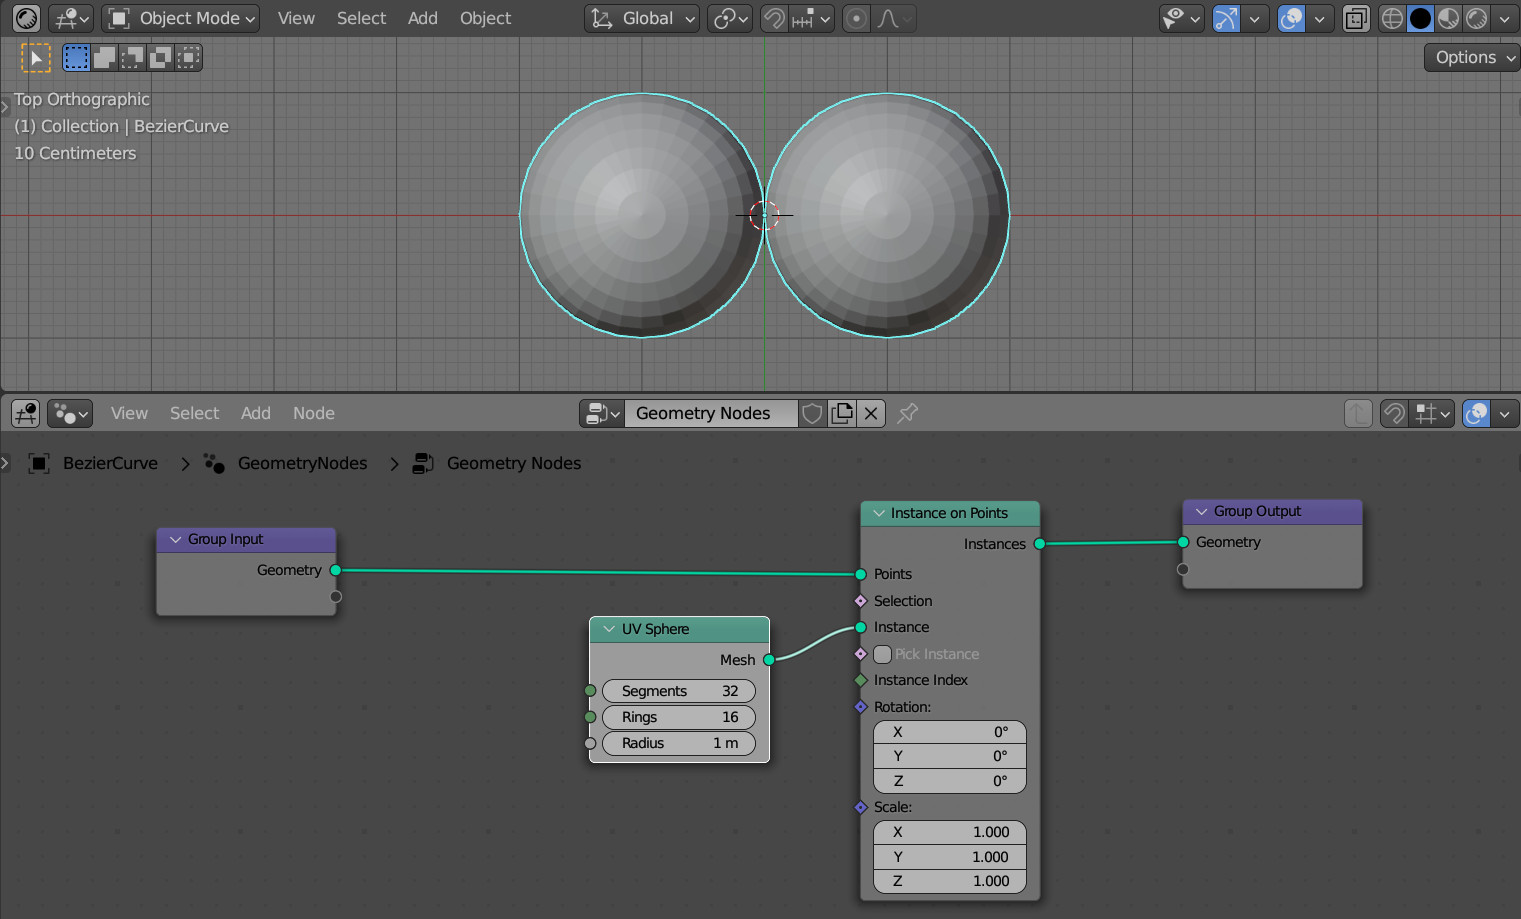
Add the Instance On Points node (shift + a – Instance – Instance On Points) and the UV Sphere node (shift + a – Mesh Primitives – UV Sphere) to the main branch of the node tree to distribute objects (spheres) on the points of the curve.
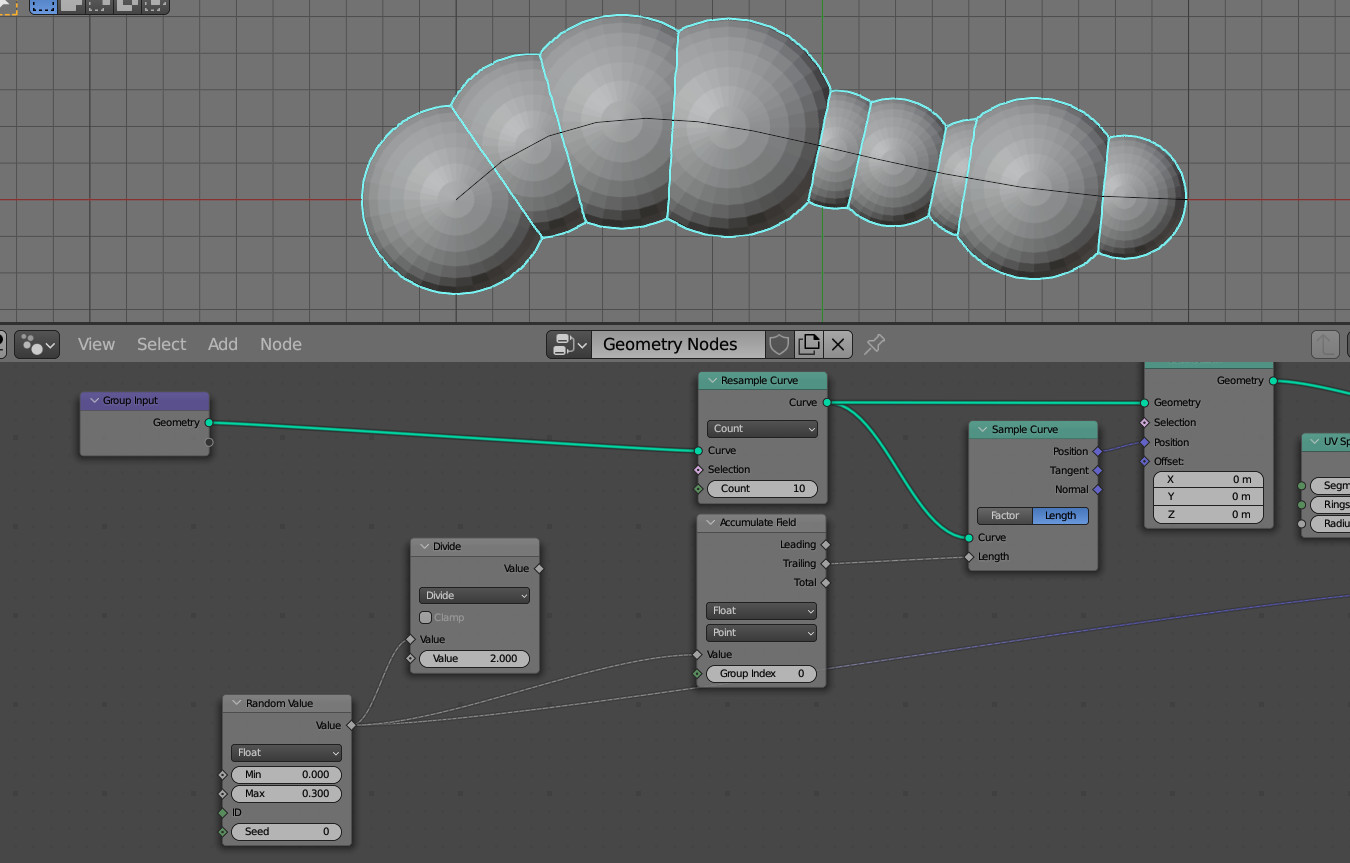
Add the Resample Curve node (shift + a – Curve – Resample Curve) to increase the number of points on the curve. Set the number of points to 10.

Let’s make each sphere on the curve have a random size. To generate a random value, add the Random Value node (shift + a – Utilities – Random Value) and link its “Value” output with the “Scale” input of the Instance on Points node.
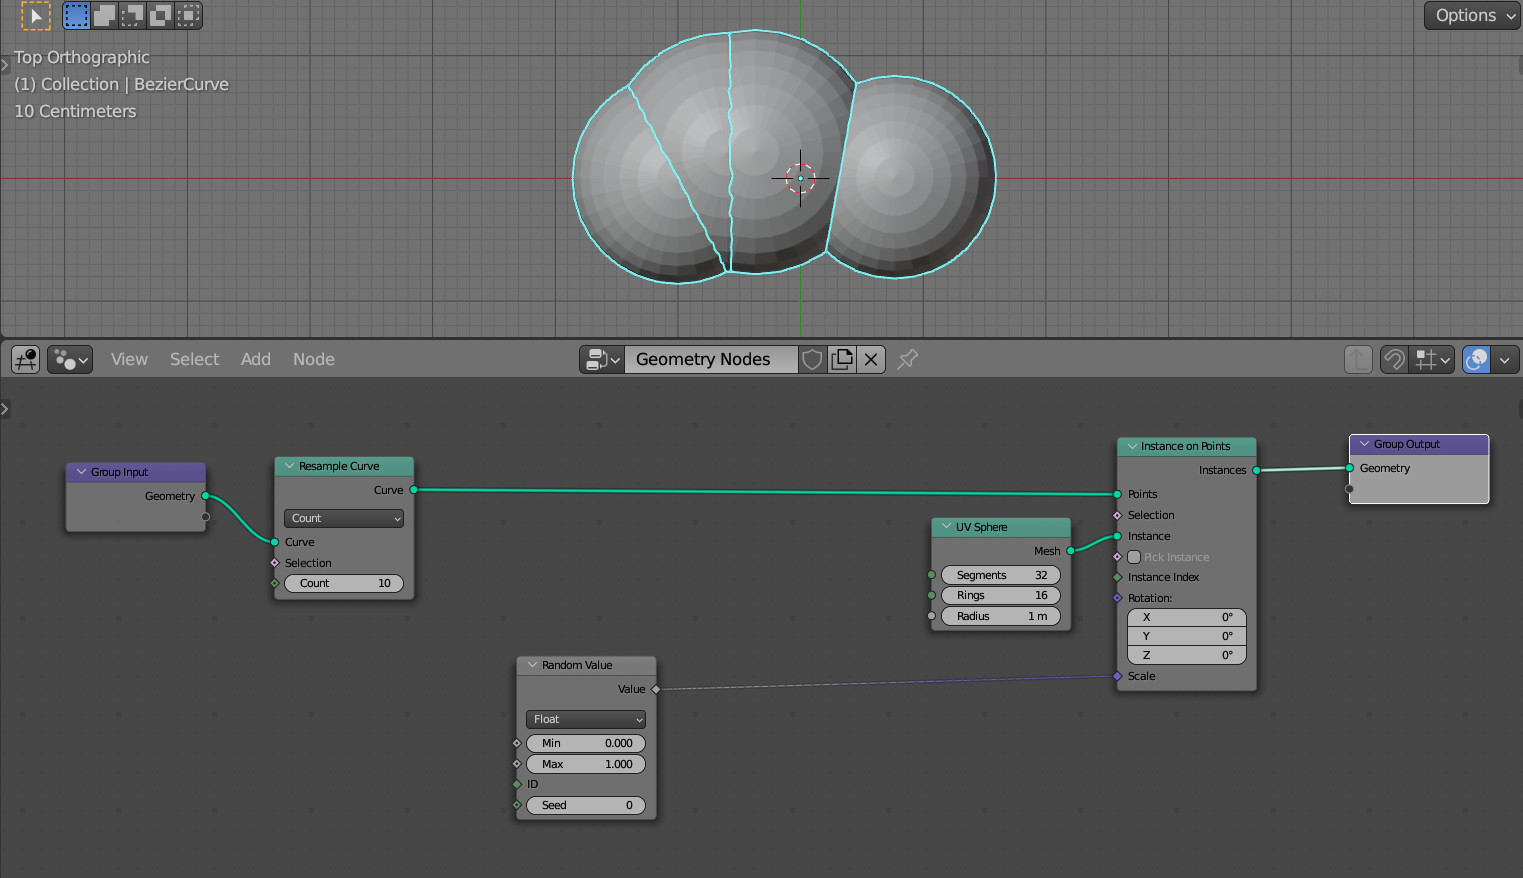
The size of each sphere changed by a random value. However, this is clearly not enough. In addition to changing the scale of the spheres themselves, their location on the curve must also be changed accordingly.
To redistribute the points of the curve, on which the spheres are located, add the Sample Curve node (shift + a – Curve – Sample Curve) and the Set Position node (shift + a – Geometry – Set Position) to the node tree. Append them to the main branch of the node tree, and link the “Position” output of the Sample Curve node with the “Position” input of the Set Position node.
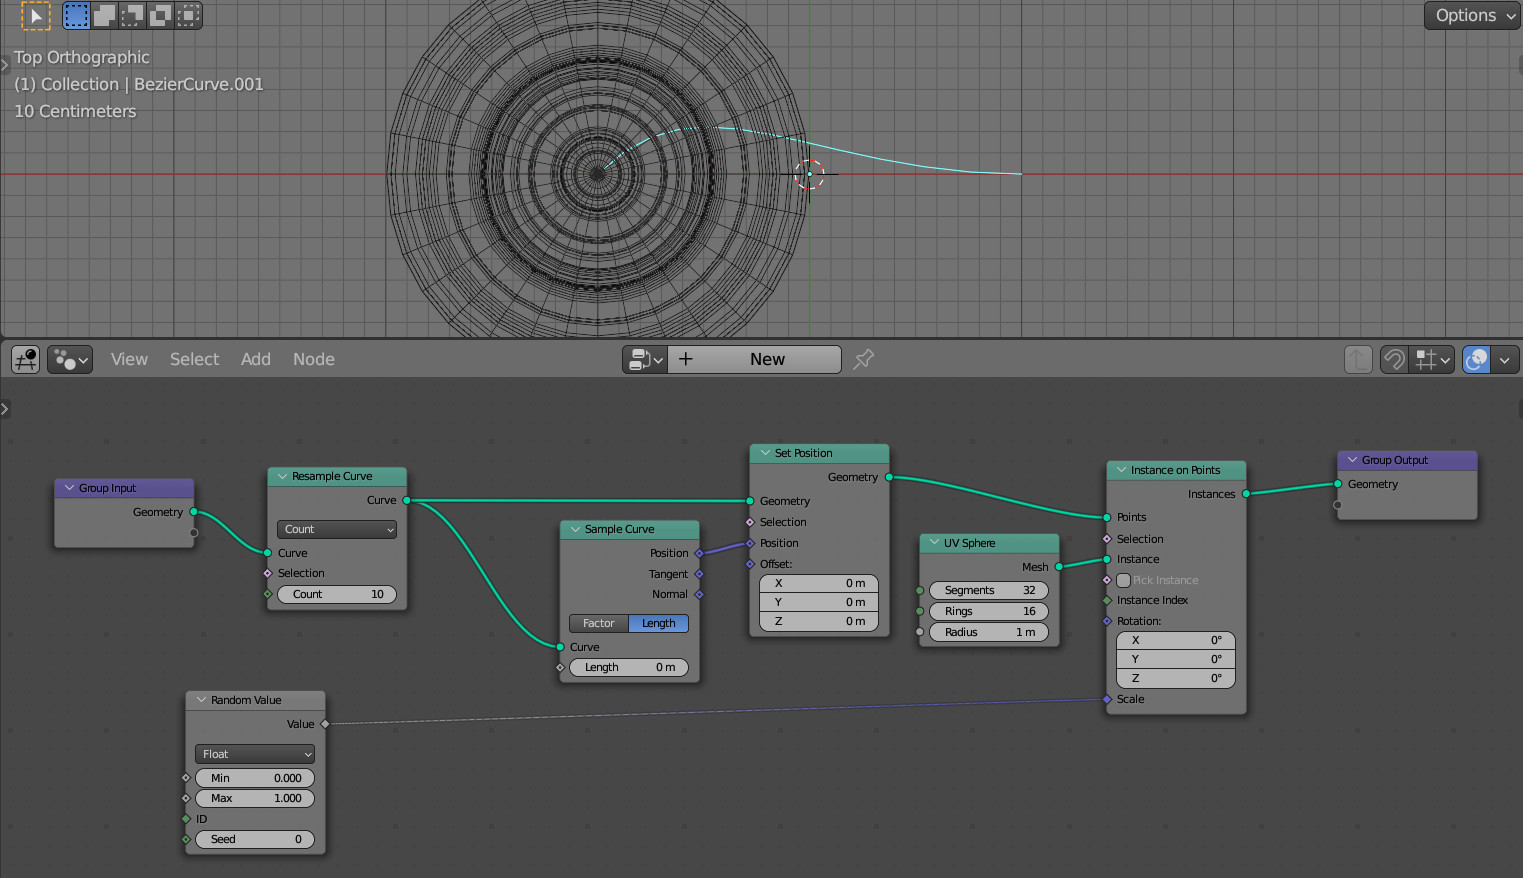
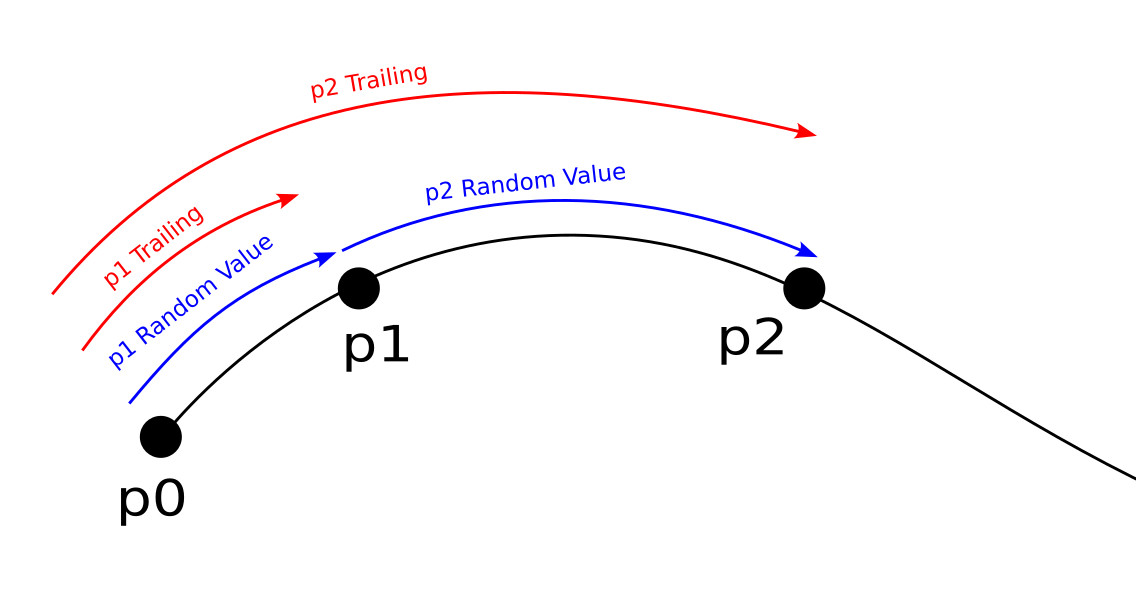
The Sample Curve node sets each point of the curve proportionally to the value from its “Length” input, starting from the beginning of the curve. Since the “Length” input value is now 0.0, all spheres are located at the first point of the curve.
We will shift each point of the curve by a random distance obtained from the Random Value node. In order for offsets to be accumulated for each subsequent point, we can use the Accumulate Field node (shift + a – Utilities – Accumulate Field). Link its “Trailing” output with the “Length” input of the Sample Curve node. And the “Value” input with the “Value” output of the Random Value node.
The “Trailing” output gives us a running total from the set. In our case, we get for each point of the curve the sum of the random offsets of this point with the previous sum of all offsets for all previous points.
For clarity, slightly reduce the value of the “Max” input of the Random Value node.

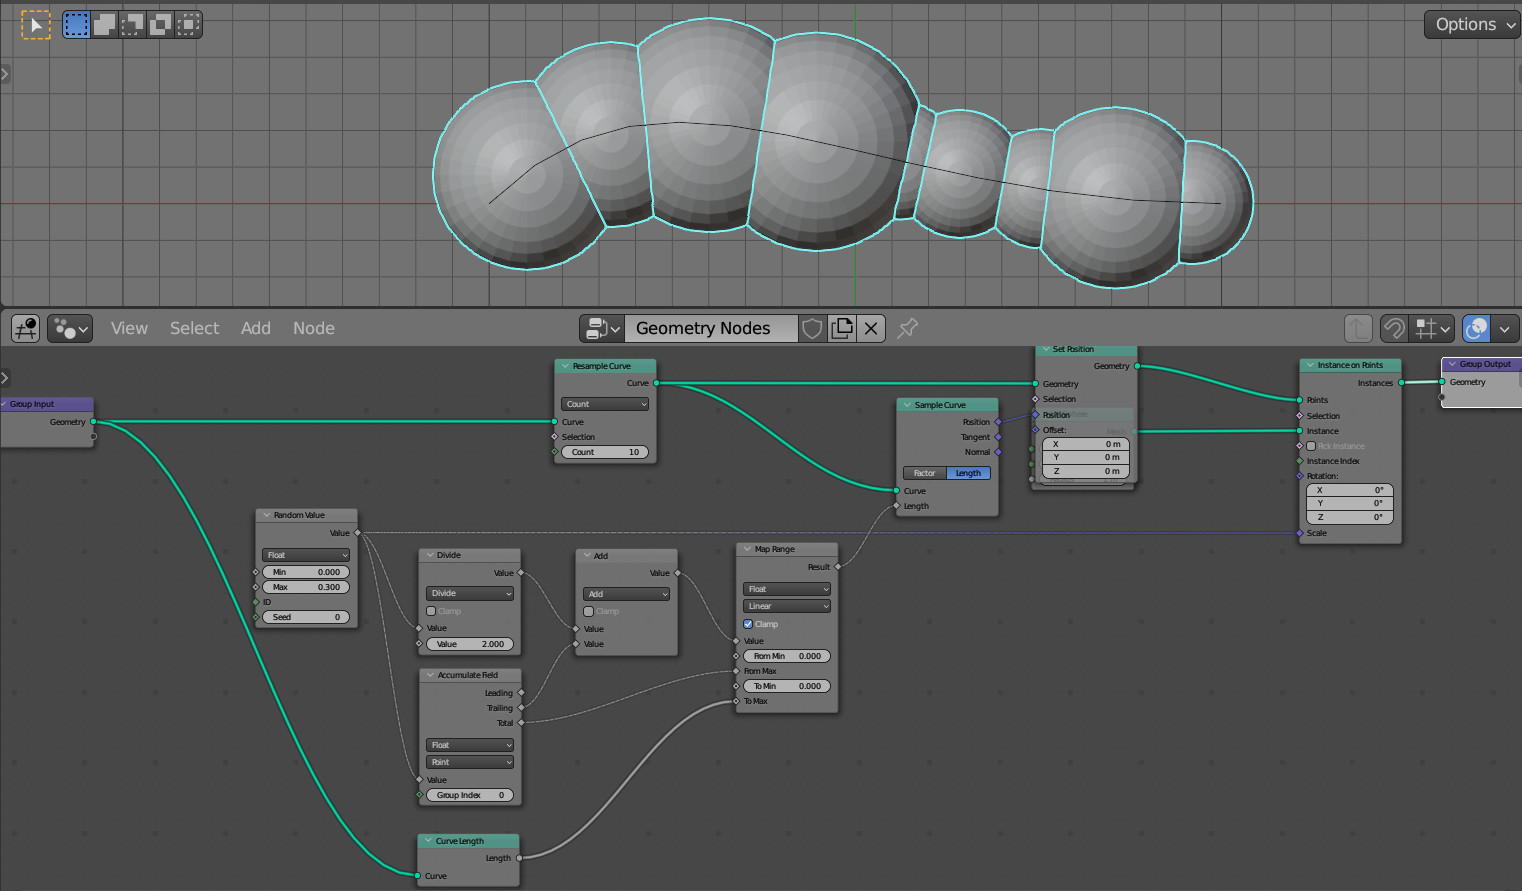
Now each sphere is located at each point of the curve. This works in the case of spheres of the same size, since the distance from the point of the curve to the neighboring points on the left and on the right is the same.
In our case, the distance between the points on the curve is different, and placing the sphere at the point itself, if its radius reaches the neighboring point on the left, it will not touch the neighboring point on the right.
Therefore, in order for the size of the sphere to correspond to the distance between the points, we need to place the spheres not at the points of the curve themselves, but at the center of the gaps between these points.
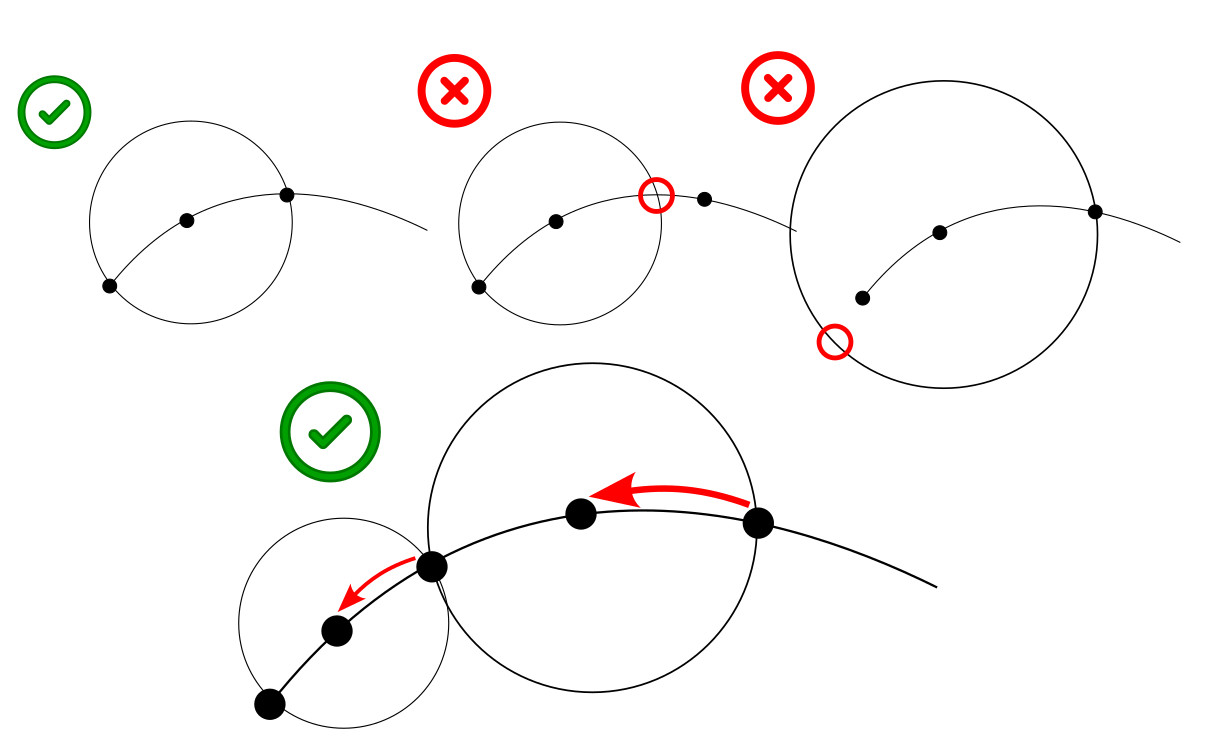
To shift the position of the center of the sphere to the right place, we need to subtract half of the offset received from the “Trailing” output from its full offset.
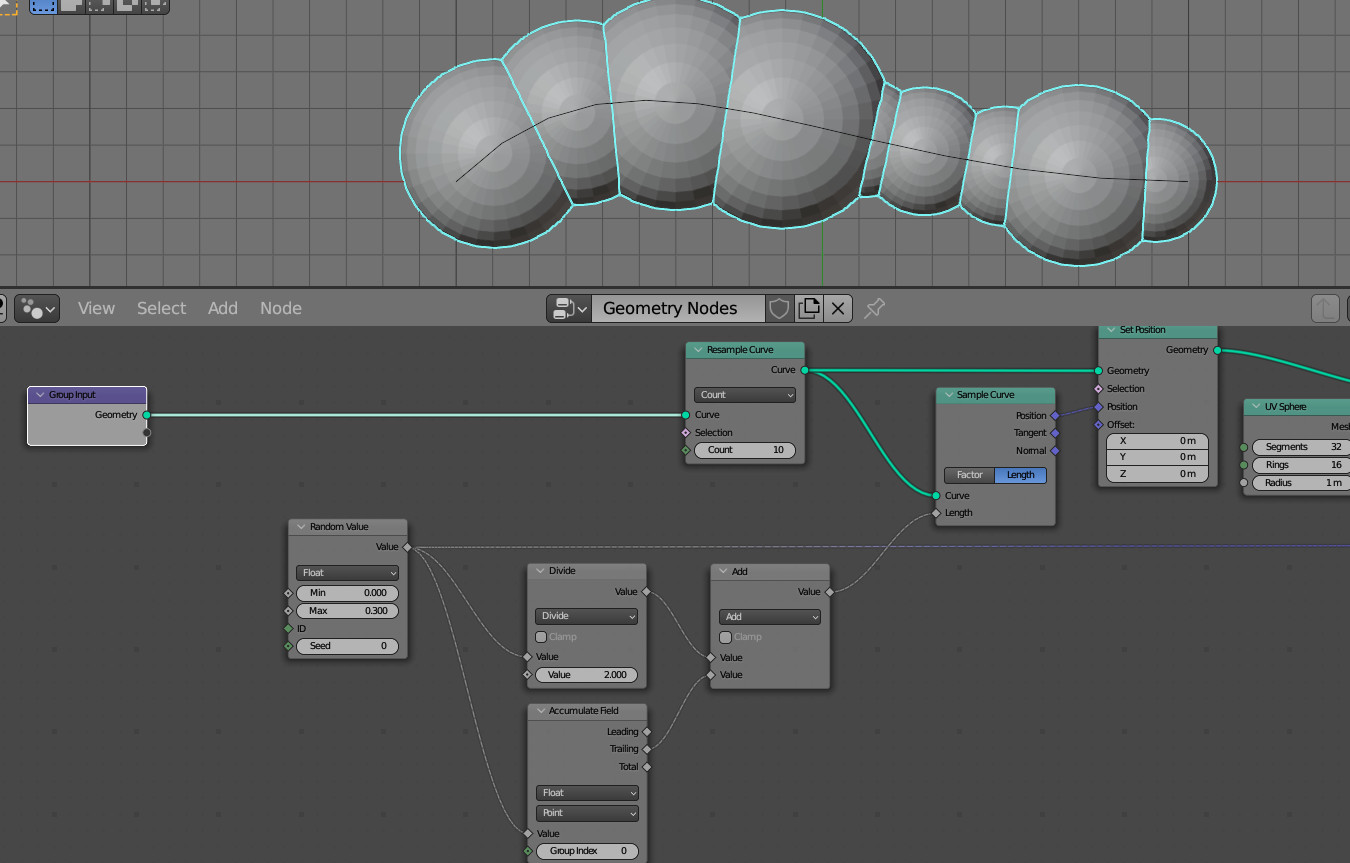
Add the Math node (shift + a – Utilities – Math) and switch it to the “Divide” mode. Put the value from the “Value” output of the Random Value node on its upper input, and set the value equal to 2 in its lower input.
But the half of the offset for each point must still be added to the total sum of the offsets of all previous points.
Add another Math node (shift + a – Utilities – Math), switch it to the “Add” mode. Link the upper “Value” input with the “Value” output of the division node, and the lower input with the “Trailing” output of the Accumulate Attribute node. The result of the addition link with the “Length” input of the Sample Curve node.
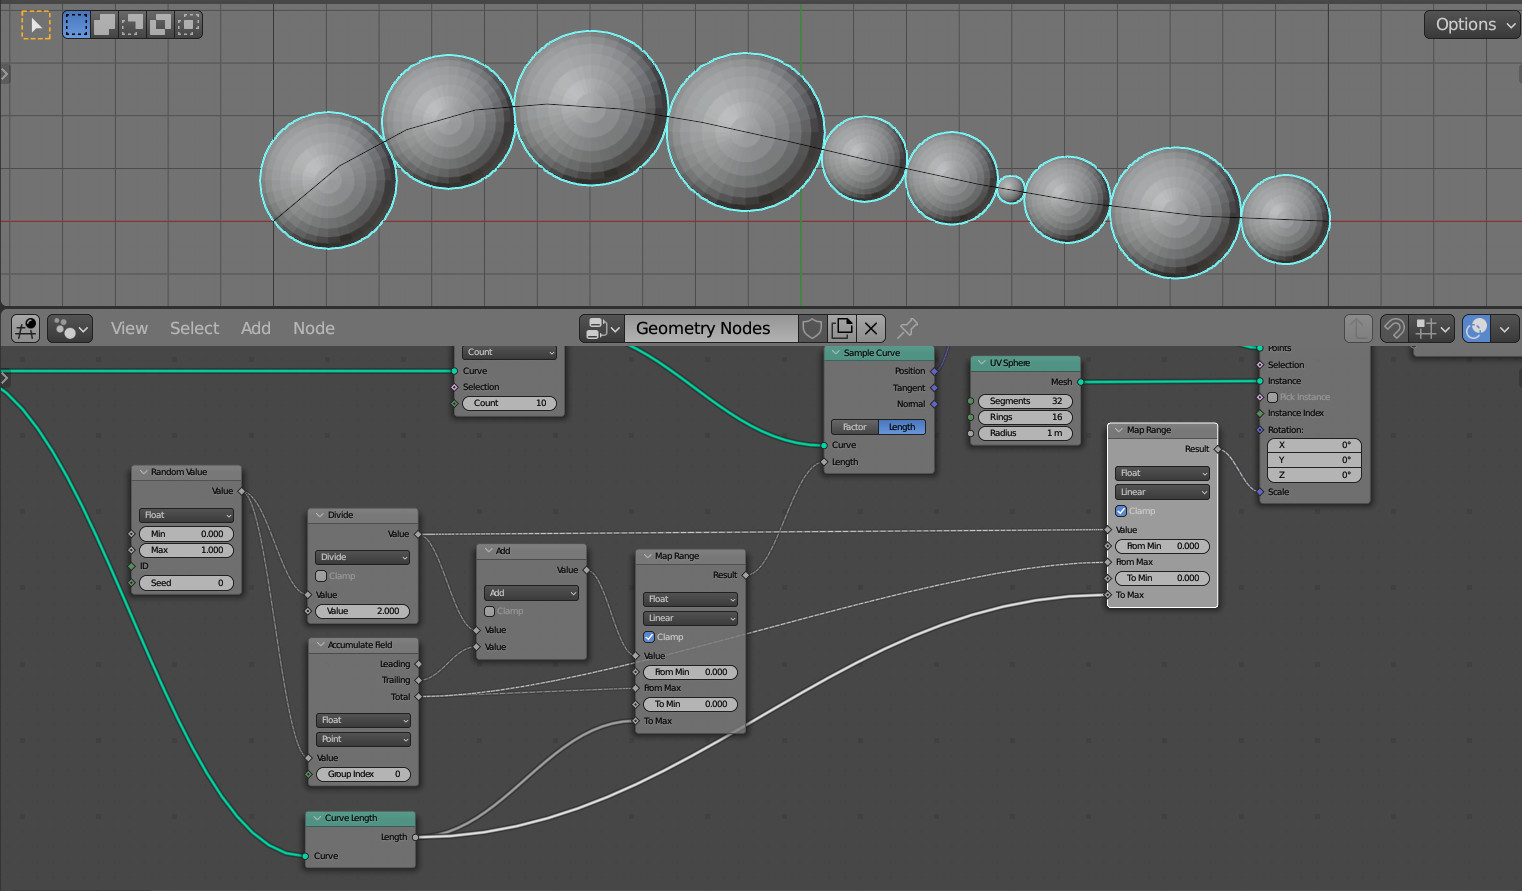
As we can see, the points to which the centers of the spheres are attached have shifted.
If we now change the “Max” value of the Random Value node, we will see that the entire set of spheres changes proportionally. This happens because with the help of Random Value and Trailing we got a fixed set of offsets for the points, independent of the length of the original curve.
To make the resulting set correspond to the length of the curve, we will translate it from the current range of values - from 0 to the sum of offsets, into the range of the curve length.
Add the Map Range node (shift + a – Utilities – Map Range) and paste it before the Sample Curve node. Connect the “From Max” input with the “Total” output of the Accumulate Attribute node. From the “Total” output, we get the total sum of all offsets of the points.
Add the Curve Length node (shift + a – Curve – Curve Length) to the main branch of the node tree to get the length of the curve. Link the “Length” output with the “To Max” input of the Map Range node.
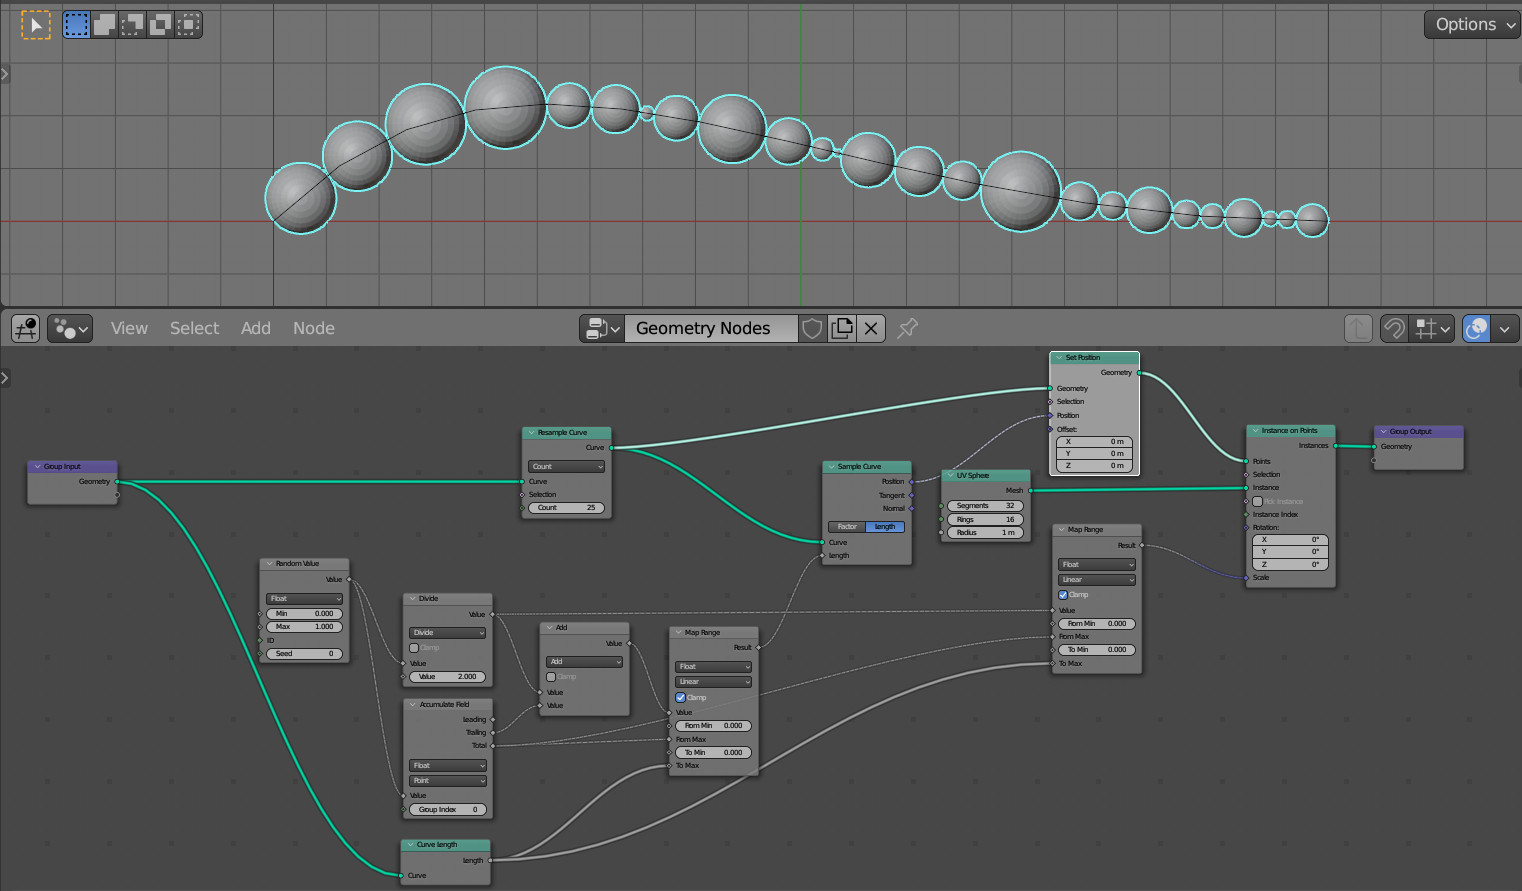
Now we can freely change the “Max” value of the Random Value node and the number of points in the Resample Curve node – the set of spheres will always fill the entire length of the curve.
It remains to bind the scaling of the spheres to the same coefficient.
Add another Map Range node (shift + a – Utilities – Map Range) and paste it before the Instance On Points node. Link the “Value” input with the “Value” output of the Divide node, link the “From Max” input, as before, with the “Total” output of the Accumulate Attribute node, and link the “To Max” input with the “Length” output of the Curve Length node. Link the “Result” output with the “Scale” input of the Instance On Points node.
Thus, we have bound the scale of the spheres to the length of the curve.
Now changing the values in the Random Value node will not have any effect, and when changing the number of points in the Resample Curve node, the entire set of spheres will be correctly recalculated.
For example, let’s set the number of points to 25.
By changing the “Seed” field in the Random Value node, we can get different random sets of spheres.
This tutorial is exactly what I want to know!
Thank you very much!
Thank you very much for this tutorial. I have been struggling with a related geometry node concept for weeks and this helped me complete it. I had been trying to scale instances within a fixed length, and your map range trick of scaling back down at the end simplified everything substantially
I notice that this only works with an instanced object of the default blender unit. I can’t figure out where/how one would add the math for this to work for any sized object for instancing. Any thoughts?
Maybe use Bounding Boxes? But this would not be very accurate.