Blender scripting system provides lots of opportunities to simplify and accelerate the workflow, allowing to outsource routine operations to the system and expanding work opportunities through access to the scripting language. However, writing a good script which can be used frequently in various projects, uncomfortable each time to reconnect it to each new project. In addition, this script can be improved with some windows and editable parameters fields. Making complete add-on from the script, you can expand it with additional functionality and connect to the Blender add-ons system.

To start lets write a simple script addign tube mesh to scene:
|
1 2 3 4 5 6 7 8 9 10 11 12 13 14 15 16 17 18 19 20 21 22 23 24 25 26 27 28 29 30 31 32 33 34 35 36 37 38 39 40 41 42 43 44 45 |
import math import bpy n = 8 r1 = 1 r2 = 0.5 h = 1 verts = [] ring1 = [] ring2 = [] ring3 = [] ring4 = [] faces = [] for i in range(n): grad = (360 * i / n) * math.pi / 180 ring1.append([r1 * math.cos(grad), r1 * math.sin(grad), 0]) ring2.append([r2 * math.cos(grad), r2 * math.sin(grad), 0]) ring3.append([r1 * math.cos(grad), r1 * math.sin(grad), h]) ring4.append([r2 * math.cos(grad), r2 * math.sin(grad), h]) if i == 0: faces.append([i - 1 + n, i, i + 2 * n, i - 1 + 3 * n]) faces.append([i - 1 + 2 * n, i - 1 + 4 * n, i + 3 * n, i + n]) faces.append([i - 1 + n, i - 1 + 2 * n, i + n, i]) faces.append([i - 1 + 3 * n, i + 2 * n, i + 3 * n, i - 1 + 4 * n]) else: faces.append([i - 1, i, i + 2 * n, i - 1 + 2 * n]) faces.append([i - 1 + n, i - 1 + 3 * n, i + 3 * n, i + n]) faces.append([i - 1, i - 1 + n, i + n, i]) faces.append([i - 1 + 2 * n, i + 2 * n, i + 3 * n, i - 1 + 3 * n]) verts.extend(ring1) verts.extend(ring2) verts.extend(ring3) verts.extend(ring4) tubeMesh = bpy.data.meshes.new("Tube") tubeMesh.from_pydata(verts, [], faces) tubeMesh.update() tube = bpy.data.objects.new("Tube", tubeMesh) bpy.context.scene.objects.link(tube) bpy.ops.object.select_all(action="DESELECT") tube.select = True bpy.context.scene.objects.active = tube |
Now lets expand its functionality to a full add-on.
To convert a script into Blender add-on it needs to perform 4 Blender API requirements:
- At first all the code, which currently is a simple command sequence, needs to be wraped in class. API requires to inherit users classes from several predefined classes:
|
1 2 3 4 5 6 |
bpy.types.Panel bpy.types.Menu bpy.types.Operator bpy.types.PropertyGroup bpy.types.KeyingSet bpy.types.RenderEngine |
API requires to declare all user classes as static, so they do not need to define __init__ constructor and __del__ destructor.
In our add-on example we perform an action to create a mesh. The function execute is declared in bpy.types.Operator class. It performes some action when its container class calls via the Blender API – just what we need. Therefore lets wrap our script code in a class and inherit it from bpy.types.Operator. Override function execute and puts all executable code of the script to it. Execute function should returns successful completion expression { ‘FINISHED’}:
|
1 2 3 4 5 6 7 8 9 10 11 12 13 14 15 16 17 18 19 20 21 22 23 24 25 26 27 28 29 30 31 32 33 34 35 36 37 38 39 40 41 42 43 44 45 46 47 48 49 |
import math import bpy class createTube(bpy.types.Operator): def execute(self, context): n = 8 r1 = 1 r2 = 0.5 h = 1 verts = [] ring1 = [] ring2 = [] ring3 = [] ring4 = [] faces = [] for i in range(n): grad = (360 * i / n) * math.pi / 180 ring1.append([r1 * math.cos(grad), r1 * math.sin(grad), 0]) ring2.append([r2 * math.cos(grad), r2 * math.sin(grad), 0]) ring3.append([r1 * math.cos(grad), r1 * math.sin(grad), h]) ring4.append([r2 * math.cos(grad), r2 * math.sin(grad), h]) if i == 0: faces.append([i - 1 + n, i, i + 2 * n, i - 1 + 3 * n]) faces.append([i - 1 + 2 * n, i - 1 + 4 * n, i + 3 * n, i + n]) faces.append([i - 1 + n, i - 1 + 2 * n, i + n, i]) faces.append([i - 1 + 3 * n, i + 2 * n, i + 3 * n, i - 1 + 4 * n]) else: faces.append([i - 1, i, i + 2 * n, i - 1 + 2 * n]) faces.append([i - 1 + n, i - 1 + 3 * n, i + 3 * n, i + n]) faces.append([i - 1, i - 1 + n, i + n, i]) faces.append([i - 1 + 2 * n, i + 2 * n, i + 3 * n, i - 1 + 3 * n]) verts.extend(ring1) verts.extend(ring2) verts.extend(ring3) verts.extend(ring4) tubeMesh = bpy.data.meshes.new("Tube") tubeMesh.from_pydata(verts, [], faces) tubeMesh.update() tube = bpy.data.objects.new("Tube", tubeMesh) bpy.context.scene.objects.link(tube) bpy.ops.object.select_all(action="DESELECT") tube.select = True bpy.context.scene.objects.active = tube return {'FINISHED'} |
A class that inherits bpy.types.Operator becomes a full Blender API operator.
Blender API operators have some other predefined functions to override by user:
- poll – performes before executing the operator, and in case of its execution error – the operator is not further performed;
- invoke – for interactive operations, such as drag and drop items;
- draw – for creation of graphic elements, panels;
- modal – used in operators, which require periodic call, for example by cutting edges. Do not interrupt after { ‘FINISH’} returns;
- cancel – called while operator cancel
- To include created class into the Blender API, we need to register it by calling bpy.utils.register_class() function, specify in its parameters name of the class:
|
1 |
bpy.utils.register_class(createTube) |
Before workflow finishing class needs to be unregistered:
|
1 |
bpy.utils.unregister_class(createTube) |
It is necessary to perform registration of our class during add-on initialization, and unregistration of it – at the time of add-on closing. To do this Blender API provides the following condition: if the add-on code defines functions register and unregister, they will be called: the first when initializing add-on, the second – when it is turned off.
|
1 2 3 |
def register(): def unregister(): |
Append these functions to add-on code, and fill them with registering and unregistering our class instructions:
|
1 2 3 4 5 6 7 8 9 10 11 12 13 14 15 16 17 18 19 20 21 22 23 24 25 26 27 28 29 30 31 32 33 34 35 36 37 38 39 40 41 42 43 44 45 46 47 48 49 50 51 52 53 54 55 |
import math import bpy class createTube(bpy.types.Operator): def execute(self, context): n = 8 r1 = 1 r2 = 0.5 h = 1 verts = [] ring1 = [] ring2 = [] ring3 = [] ring4 = [] faces = [] for i in range(n): grad = (360 * i / n) * math.pi / 180 ring1.append([r1 * math.cos(grad), r1 * math.sin(grad), 0]) ring2.append([r2 * math.cos(grad), r2 * math.sin(grad), 0]) ring3.append([r1 * math.cos(grad), r1 * math.sin(grad), h]) ring4.append([r2 * math.cos(grad), r2 * math.sin(grad), h]) if i == 0: faces.append([i - 1 + n, i, i + 2 * n, i - 1 + 3 * n]) faces.append([i - 1 + 2 * n, i - 1 + 4 * n, i + 3 * n, i + n]) faces.append([i - 1 + n, i - 1 + 2 * n, i + n, i]) faces.append([i - 1 + 3 * n, i + 2 * n, i + 3 * n, i - 1 + 4 * n]) else: faces.append([i - 1, i, i + 2 * n, i - 1 + 2 * n]) faces.append([i - 1 + n, i - 1 + 3 * n, i + 3 * n, i + n]) faces.append([i - 1, i - 1 + n, i + n, i]) faces.append([i - 1 + 2 * n, i + 2 * n, i + 3 * n, i - 1 + 3 * n]) verts.extend(ring1) verts.extend(ring2) verts.extend(ring3) verts.extend(ring4) tubeMesh = bpy.data.meshes.new("Tube") tubeMesh.from_pydata(verts, [], faces) tubeMesh.update() tube = bpy.data.objects.new("Tube", tubeMesh) bpy.context.scene.objects.link(tube) bpy.ops.object.select_all(action="DESELECT") tube.select = True bpy.context.scene.objects.active = tube return {'FINISHED'} def register(): bpy.utils.register_class(createTube) def unregister(): bpy.utils.unregister_class(createTube) |
- Any class registered in the Blender API, must have a unique identifier to refer it by ID.
As an identifier it is necessary to use a string constant with predetermined name bl_idname. This constant is required in any connnected to the Blender API class. Another class identifier requirement – its value should contains a point. Most likely for a more convenient grouping classes identifiers within the API.
To determine our class identifier lets create that variable and assign it a value of ‘mesh.create_tube’:
|
1 |
bl_idname = 'mesh.create_tube' |
Then our class functional (execute function) which, after registration in the Blender API, becomes the operator, can be called by:
|
1 |
bpy.ops.mesh.create_tube() |
Another text constant bl_label, containing the label of our class, must be declared in the scope of it. This text will be used in panel headers or menu items featuring our class.
|
1 |
bl_label = 'Create Tube' |
Lets define the necessary constants in our add-on class:
|
1 2 3 4 5 6 7 8 9 10 11 12 13 14 15 16 17 18 19 20 21 22 23 24 25 26 27 28 29 30 31 32 33 34 35 36 37 38 39 40 41 42 43 44 45 46 47 48 49 50 51 52 53 54 55 56 57 |
import math import bpy class createTube(bpy.types.Operator): bl_idname = 'mesh.create_tube' bl_label = 'Create Tube' def execute(self, context): n = 8 r1 = 1 r2 = 0.5 h = 1 verts = [] ring1 = [] ring2 = [] ring3 = [] ring4 = [] faces = [] for i in range(n): grad = (360 * i / n) * math.pi / 180 ring1.append([r1 * math.cos(grad), r1 * math.sin(grad), 0]) ring2.append([r2 * math.cos(grad), r2 * math.sin(grad), 0]) ring3.append([r1 * math.cos(grad), r1 * math.sin(grad), h]) ring4.append([r2 * math.cos(grad), r2 * math.sin(grad), h]) if i == 0: faces.append([i - 1 + n, i, i + 2 * n, i - 1 + 3 * n]) faces.append([i - 1 + 2 * n, i - 1 + 4 * n, i + 3 * n, i + n]) faces.append([i - 1 + n, i - 1 + 2 * n, i + n, i]) faces.append([i - 1 + 3 * n, i + 2 * n, i + 3 * n, i - 1 + 4 * n]) else: faces.append([i - 1, i, i + 2 * n, i - 1 + 2 * n]) faces.append([i - 1 + n, i - 1 + 3 * n, i + 3 * n, i + n]) faces.append([i - 1, i - 1 + n, i + n, i]) faces.append([i - 1 + 2 * n, i + 2 * n, i + 3 * n, i - 1 + 3 * n]) verts.extend(ring1) verts.extend(ring2) verts.extend(ring3) verts.extend(ring4) tubeMesh = bpy.data.meshes.new("Tube") tubeMesh.from_pydata(verts, [], faces) tubeMesh.update() tube = bpy.data.objects.new("Tube", tubeMesh) bpy.context.scene.objects.link(tube) bpy.ops.object.select_all(action="DESELECT") tube.select = True bpy.context.scene.objects.active = tube return {'FINISHED'} def register(): bpy.utils.register_class(createTube) def unregister(): bpy.utils.unregister_class(createTube) |
If you need to define other constants or variables in add-on class scope, it is recommended to provide them all with bl_ prefix.
- To finalize add-on lets make its description. This requirement is not fully binding, but it is still worth carrying out of it. After writing a few add-ons without any descriptions, even their author is very difficult to understand their purpose. To make add-on description fill a dictionary with predefined name bl_info with required texts. bl_info dictionary has the following predefined items:
- name – the name of the add-on
- author – its author
- version – version of the add-on
- blender – Blender version for which add-on developed
- category – category for placing add-on in add-ons list
- location – where to look for add-on using
- url – link to the source code of the add-on
- description – more detailed description of the add-on
At a minimum it needs to fill the name, category, and blender items.
Add description to the beginning of our add-on :
|
1 2 3 4 5 6 7 8 |
bl_info = { 'name': 'Create Tube Addon', 'author': 'Nikita', 'version': (0, 0, 1), 'blender': (2, 77, 0), 'category': 'Add Mesh', 'description': 'This addon adds tube mesh to scene' } |
The full source code of our add-on now looks like this:
|
1 2 3 4 5 6 7 8 9 10 11 12 13 14 15 16 17 18 19 20 21 22 23 24 25 26 27 28 29 30 31 32 33 34 35 36 37 38 39 40 41 42 43 44 45 46 47 48 49 50 51 52 53 54 55 56 57 58 59 60 61 62 63 64 65 66 |
bl_info = { 'name': 'Create Tube Addon', 'author': 'Nikita', 'version': (0, 0, 1), 'blender': (2, 77, 0), 'category': 'Add Mesh', 'description': 'This addon adds tube mesh to scene' } import math import bpy class createTube(bpy.types.Operator): bl_idname = 'mesh.create_tube' bl_label = 'Create Tube' def execute(self, context): n = 8 r1 = 1 r2 = 0.5 h = 1 verts = [] ring1 = [] ring2 = [] ring3 = [] ring4 = [] faces = [] for i in range(n): grad = (360 * i / n) * math.pi / 180 ring1.append([r1 * math.cos(grad), r1 * math.sin(grad), 0]) ring2.append([r2 * math.cos(grad), r2 * math.sin(grad), 0]) ring3.append([r1 * math.cos(grad), r1 * math.sin(grad), h]) ring4.append([r2 * math.cos(grad), r2 * math.sin(grad), h]) if i == 0: faces.append([i - 1 + n, i, i + 2 * n, i - 1 + 3 * n]) faces.append([i - 1 + 2 * n, i - 1 + 4 * n, i + 3 * n, i + n]) faces.append([i - 1 + n, i - 1 + 2 * n, i + n, i]) faces.append([i - 1 + 3 * n, i + 2 * n, i + 3 * n, i - 1 + 4 * n]) else: faces.append([i - 1, i, i + 2 * n, i - 1 + 2 * n]) faces.append([i - 1 + n, i - 1 + 3 * n, i + 3 * n, i + n]) faces.append([i - 1, i - 1 + n, i + n, i]) faces.append([i - 1 + 2 * n, i + 2 * n, i + 3 * n, i - 1 + 3 * n]) verts.extend(ring1) verts.extend(ring2) verts.extend(ring3) verts.extend(ring4) tubeMesh = bpy.data.meshes.new("Tube") tubeMesh.from_pydata(verts, [], faces) tubeMesh.update() tube = bpy.data.objects.new("Tube", tubeMesh) bpy.context.scene.objects.link(tube) bpy.ops.object.select_all(action="DESELECT") tube.select = True bpy.context.scene.objects.active = tube return {'FINISHED'} def register(): bpy.utils.register_class(createTube) def unregister(): bpy.utils.unregister_class(createTube) |
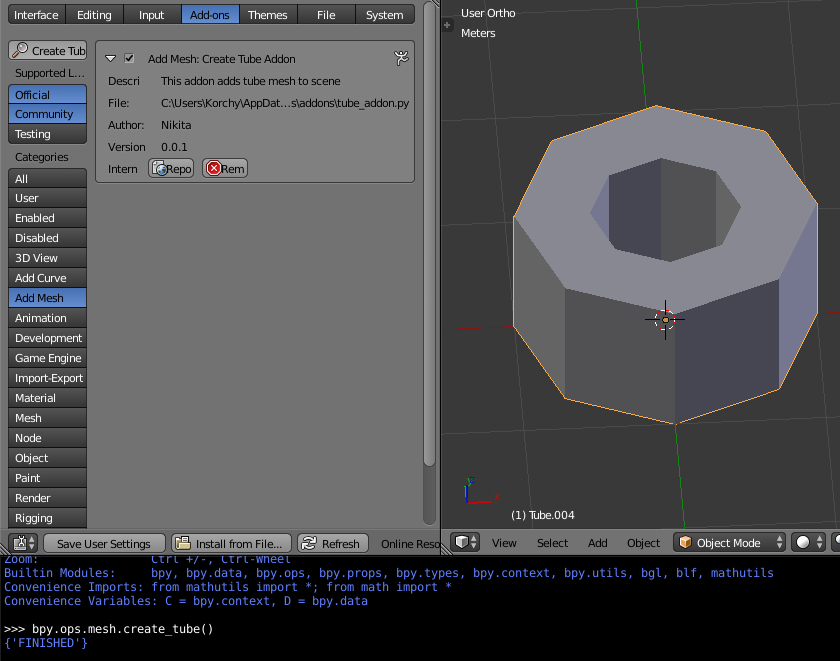
The addon is finished in a minimum performance. You can install it to the Blender, open Python Console window and call the operator with bpy.ops.mesh.create_tube() command.
Call add-on functionality through Python Console is very inconvenient. Lets modify our add-on – add to the mesh creating menu (Shift + a – Mesh) new item to call our operator – creating a tube.
Append to our source code the definition of the function forms the structure of the desired menu. In our case – one button with “plugin” icon and text label taken from bl_label constant. Functionality of our operator will bind to this button.
|
1 2 |
def addToAddMeshMenu(self, context): self.layout.operator("mesh.create_tube", icon="PLUGIN") |
layout object contains a structure that defines the menu. We added to it one item, associated with our operator through its bl_idname.
To appedn and remove this item to Blender menu during add-on registration and unregistration, add the following commands to the register and unregister functions:
|
1 2 3 4 5 |
# adding item to menu bpy.types.INFO_MT_mesh_add.append(addToAddMeshMenu) # removing it from menu bpy.types.INFO_MT_mesh_add.remove(addToAddMeshMenu) |
Full add-on souce code:
|
1 2 3 4 5 6 7 8 9 10 11 12 13 14 15 16 17 18 19 20 21 22 23 24 25 26 27 28 29 30 31 32 33 34 35 36 37 38 39 40 41 42 43 44 45 46 47 48 49 50 51 52 53 54 55 56 57 58 59 60 61 62 63 64 65 66 67 68 69 70 71 |
bl_info = { 'name': 'Create Tube Addon', 'author': 'Nikita', 'version': (0, 0, 1), 'blender': (2, 77, 0), 'category': 'Add Mesh', 'description': 'This addon adds tube mesh to scene' } import math import bpy class createTube(bpy.types.Operator): bl_idname = 'mesh.create_tube' bl_label = 'Create Tube' def execute(self, context): n = 8 r1 = 1 r2 = 0.5 h = 1 verts = [] ring1 = [] ring2 = [] ring3 = [] ring4 = [] faces = [] for i in range(n): grad = (360 * i / n) * math.pi / 180 ring1.append([r1 * math.cos(grad), r1 * math.sin(grad), 0]) ring2.append([r2 * math.cos(grad), r2 * math.sin(grad), 0]) ring3.append([r1 * math.cos(grad), r1 * math.sin(grad), h]) ring4.append([r2 * math.cos(grad), r2 * math.sin(grad), h]) if i == 0: faces.append([i - 1 + n, i, i + 2 * n, i - 1 + 3 * n]) faces.append([i - 1 + 2 * n, i - 1 + 4 * n, i + 3 * n, i + n]) faces.append([i - 1 + n, i - 1 + 2 * n, i + n, i]) faces.append([i - 1 + 3 * n, i + 2 * n, i + 3 * n, i - 1 + 4 * n]) else: faces.append([i - 1, i, i + 2 * n, i - 1 + 2 * n]) faces.append([i - 1 + n, i - 1 + 3 * n, i + 3 * n, i + n]) faces.append([i - 1, i - 1 + n, i + n, i]) faces.append([i - 1 + 2 * n, i + 2 * n, i + 3 * n, i - 1 + 3 * n]) verts.extend(ring1) verts.extend(ring2) verts.extend(ring3) verts.extend(ring4) tubeMesh = bpy.data.meshes.new("Tube") tubeMesh.from_pydata(verts, [], faces) tubeMesh.update() tube = bpy.data.objects.new("Tube", tubeMesh) bpy.context.scene.objects.link(tube) bpy.ops.object.select_all(action="DESELECT") tube.select = True bpy.context.scene.objects.active = tube return {'FINISHED'} def addToAddMeshMenu(self, context): self.layout.operator("mesh.create_tube", icon="PLUGIN") def register(): bpy.utils.register_class(createTube) bpy.types.INFO_MT_mesh_add.append(addToAddMeshMenu) def unregister(): bpy.utils.unregister_class(createTube) bpy.types.INFO_MT_mesh_add.remove(addToAddMeshMenu) |
If you have already installed the add-on, reinstall it – remove by clicking the Remove button in the User Preferences – Add-ons – Add Mesh: Create Tube Addon window and install it again from the file with modified source code.
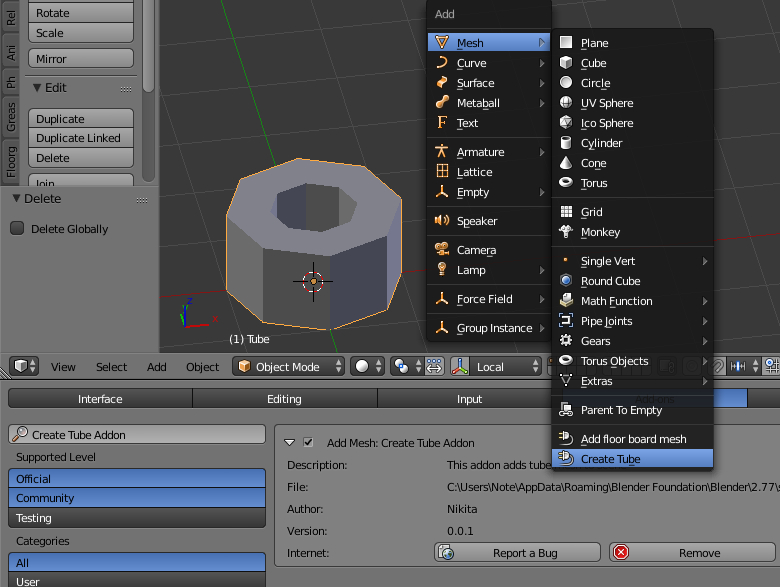
After reinstalling add-on and its activation, a new item “Create Tube” appears in Add Mesh Menu.
When meshes added to scene, N-bar draws standart panel, with parameters set to assign initial values to newly created mesh. Lets add the same panel with initial parameters to our create tube add-on.
To create such panel in the N-bar, in the description of our class we need to add the variable with a predefined name bl_options. This variable – numbered set, the content of which depends on options we want to be available for the operator. Default value is “REGISTER” – only registration of the options (the single value when a variable is not explicitly defined). Add “UNDO” value to bl_options for the operator to include it in a cancellation stack (undo – redo) and make it possible to create a panel in the N-bar.
|
1 |
bl_options = {"REGISTER", "UNDO"} |
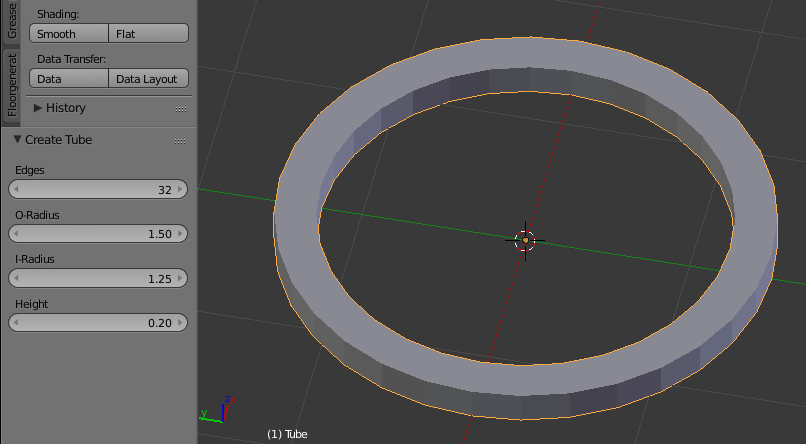
After adding this constant to our class, empty panel will be created in the N-bar with tube adding to scene.
The default parameters of tube generation specified in our execute function:
|
1 2 3 4 |
n = 8 r1 = 1 r2 = 0.5 h = 1 |
- n – number of edges
- r1 – outer tube radius
- r2 – inner tube radius
- h – tube height
We need to convert them from simple variables to the real operator properties. Operator properties represent bpy.props._property_type_ structure:
|
1 2 3 4 5 |
property = bpy.props.IntProperty( name = "Name", description = "Description", default = 0 ) |
This example declares integer operator property with a default value of 0. To treat it in class functions self pointer is used:
|
1 |
a = self.property |
Let’s convert the initial parameters of our operator to properties:
|
1 2 3 4 5 6 7 8 9 10 11 12 13 14 15 16 17 18 19 20 21 |
n = bpy.props.IntProperty( name = "Edges", description = "Edges count", default = 8, min = 3 ) r1 = bpy.props.FloatProperty( name = "O-Radius", description = "Outer radius", default = 1.0 ) r2 = bpy.props.FloatProperty( name = "I-Radius", description = "Inner radius", default = 0.5 ) h = bpy.props.FloatProperty( name = "Height", description = "Height", default = 1.0 ) |
Remove direct set of these parameters in the begining of execute function. Inside the function treat properties with self pointer.
Since the initial tube parameters set by real bpy.props properties, creating a mesh, they will be automatically added to the initial mesh properties panel in the N-bar and can be tuned.
Full and final addon code:
|
1 2 3 4 5 6 7 8 9 10 11 12 13 14 15 16 17 18 19 20 21 22 23 24 25 26 27 28 29 30 31 32 33 34 35 36 37 38 39 40 41 42 43 44 45 46 47 48 49 50 51 52 53 54 55 56 57 58 59 60 61 62 63 64 65 66 67 68 69 70 71 72 73 74 75 76 77 78 79 80 81 82 83 84 85 86 87 88 89 |
bl_info = { 'name': 'Create Tube Addon', 'author': 'Nikita', 'version': (0, 0, 1), 'blender': (2, 77, 0), 'category': 'Add Mesh', 'description': 'This addon adds tube mesh to scene' } import math import bpy class createTube(bpy.types.Operator): bl_idname = 'mesh.create_tube' bl_label = 'Create Tube' bl_options = {"REGISTER", "UNDO"} n = bpy.props.IntProperty( name = "Edges", description = "Edges count", default = 8, min = 3 ) r1 = bpy.props.FloatProperty( name = "O-Radius", description = "Outer radius", default = 1 ) r2 = bpy.props.FloatProperty( name = "I-Radius", description = "Inner radius", default = 0.5 ) h = bpy.props.FloatProperty( name = "Height", description = "Height", default = 1.0 ) def execute(self, context): verts = [] ring1 = [] ring2 = [] ring3 = [] ring4 = [] faces = [] for i in range(self.n): grad = (360 * i / self.n) * math.pi / 180 ring1.append([self.r1 * math.cos(grad), self.r1 * math.sin(grad), 0]) ring2.append([self.r2 * math.cos(grad), self.r2 * math.sin(grad), 0]) ring3.append([self.r1 * math.cos(grad), self.r1 * math.sin(grad), self.h]) ring4.append([self.r2 * math.cos(grad), self.r2 * math.sin(grad), self.h]) if i == 0: faces.append([i - 1 + self.n, i, i + 2 * self.n, i - 1 + 3 * self.n]) faces.append([i - 1 + 2 * self.n, i - 1 + 4 * self.n, i + 3 * self.n, i + self.n]) faces.append([i - 1 + self.n, i - 1 + 2 * self.n, i + self.n, i]) faces.append([i - 1 + 3 * self.n, i + 2 * self.n, i + 3 * self.n, i - 1 + 4 * self.n]) else: faces.append([i - 1, i, i + 2 * self.n, i - 1 + 2 * self.n]) faces.append([i - 1 + self.n, i - 1 + 3 * self.n, i + 3 * self.n, i + self.n]) faces.append([i - 1, i - 1 + self.n, i + self.n, i]) faces.append([i - 1 + 2 * self.n, i + 2 * self.n, i + 3 * self.n, i - 1 + 3 * self.n]) verts.extend(ring1) verts.extend(ring2) verts.extend(ring3) verts.extend(ring4) tubeMesh = bpy.data.meshes.new("Tube") tubeMesh.from_pydata(verts, [], faces) tubeMesh.update() tube = bpy.data.objects.new("Tube", tubeMesh) bpy.context.scene.objects.link(tube) bpy.ops.object.select_all(action="DESELECT") tube.select = True bpy.context.scene.objects.active = tube return {'FINISHED'} def addToAddMeshMenu(self, context): self.layout.operator("mesh.create_tube", icon="PLUGIN") def register(): bpy.utils.register_class(createTube) bpy.types.INFO_MT_mesh_add.append(addToAddMeshMenu) def unregister(): bpy.utils.unregister_class(createTube) bpy.types.INFO_MT_mesh_add.remove(addToAddMeshMenu) |
Add-on completed. It could be installed and activated for quick creation of tube objects.
Mini bonus:
Lots of addons have this piece of code at the end:
|
1 2 |
if __name__ == "__main__" : register() |
This code is used only during the developing add-on process. Having add-on code or the IDE link to it in the Text Editor window – clicking Run Script button immediately runs the add-on (executes it registrations in Blender API with calling register function) allows immediately testing its work. This piece of code is absolutely not necessary in released add-on.
Hi,
your article are really good ! Have you a licence about your topic ? I want write a french translate on the blenderlouge.fr (http://blenderlounge.fr/). What di you think ? With your quote and agree of course 🙂 .
Hi! Thanks! Yes, you can, it’s nice for me. Of course with the reference to the original article.
Yes of course ! I send you a mail when the topic as write ! Thanks !!