BlendPyBridge is the Visual Studio Code extension, designed to simplify the development of Blender add-ons. For those developers who use the “Blender Development” VSC extension, it can be an interesting alternative.

Necessary remark: Although this review was written at the suggestion of the extension’s author, it is not an advertisement, call or recommendation to use it when writing Blender add-ons. This review is my personal impression, as a Blender add-ons developer, with my first look on the extension. Current extension version: v2402.7.0.
Installing the extension
The extension is installed in the common way for Microsoft Visual Studio Code:
- open the Visual Studio Code editor;
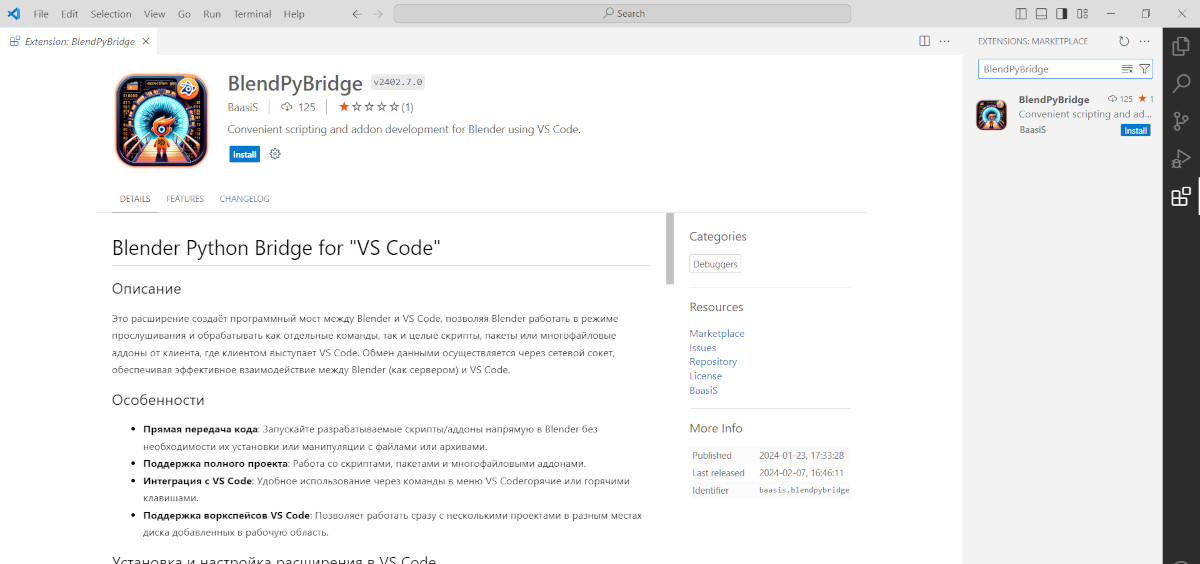
- open Extensions Marketplace;
- Enter the name of the extension and click the “Install” button.
Extension configuration
In order for the extension to interact directly with Blender, you must specify the location where Blender is installed on your computer.
Press F1 (or Ctrl + Shift + p) and type the “Select Blender Executable”. Click on the item in the menu, find and select the blender.exe file in the Blender installation directory on your computer.
Here the extension has a certain drawback: the settings are not written to the general configuration file of Visual Studio Code, but are stored in the configuration of the extension itself. This makes it difficult to synchronize Visual Studio Code settings if the user is working on different computers.
You can check whether the path to Blender is specified by pressing F1 (or Ctrl + Shift + p) and typing the “Print path Blender command”. A pop-up window will show the specified path.
Trying the extension with Blender
First we need to start listening for commands:
Press F1 (or Ctrl + Shift + p) and type “Start Blender with socket server”. A quick launch is also possible by pressing Shift+F7.
Blender opens in a separate window, and Visual Studio Code enables listening it on 3264 port.
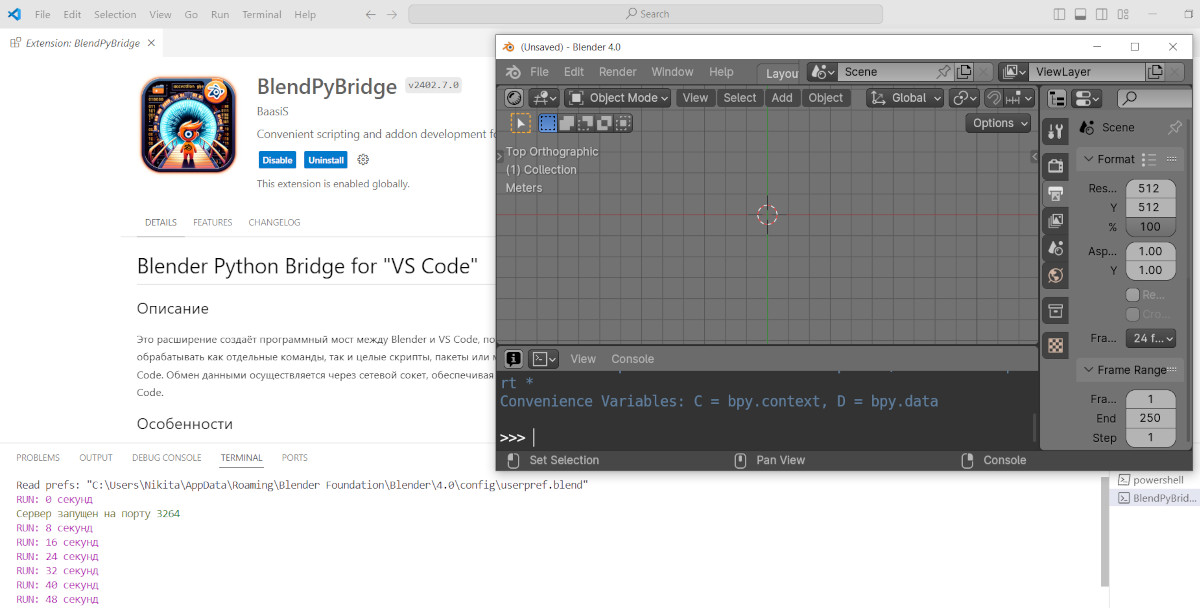
To exit the listening mode, you can simply close the Blender window.
This action must be executed every time to start listening session with Blender. Without this, nothing will no work.
Executing commands
Unfortunately, the extension in the current version, does not provide functionality for directly passing commands from Visual Studio Code to Blender with receiving replies. So, we cannot write something like:
|
1 |
print(bpy.context.object) |
And get a response from Blender, somethin like:
|
1 |
bpy.data.objects['Suzanne'] |
To work with direct commands, you need to switch to the Blender window.
Executing scripts
The extension allows you to run separate script blocks of code. To execute the script, it is necessary to:
- save the file with code with a “.py” extension in a specific directory,
- open this directory in the Visual Studio Code editor’s Workspace.
For example, create a new file (Ctrl + n), type the simplest code that adds the “Suzanne” mesh to the scene, name the file “simple.php”, and save it to the “d:/BlendPyBridge” directory.
Open the Explorer in Visual Studio Code and open this directory, or simply drag the “BlendPyBridge” folder into the editor’s workspace.
Press F1 (or Ctrl + Shift + p) and type “Run the current script in Blender”, or, which is faster, call this command by pressing Shift + F9 shortcode.
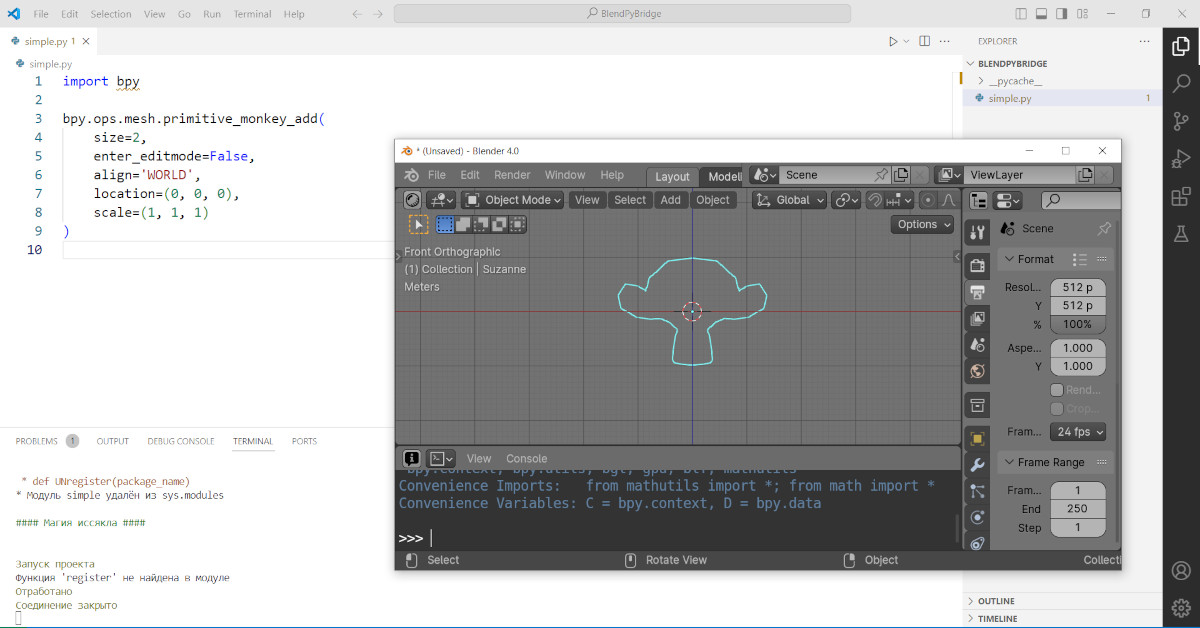
The script code will be forwarded and executed in Blender.
Unfortunately, the mesh is drawn with a single outline. This happens because the viewport in Blender is not updated externally. You can zoom in or out, or perform any other action in the Blender window that causes the viewport to be redrawn, and the mesh will begin to be displayed in the usual way.
It should be noted that the extension, in its current implementation, does not allow code to be passed into Blender and executed from an unsaved file or if the file is not opened in the Visual Studio Code Workspace.
If we simply create a new file (Ctrl + n), type the code into it, and try to send it to Blender by pressing Shift + F9, we will get an error
Not a *.py file selected
We will get the same error if we try to execute code from a saved py-file, but if the directory with this file is not open in Workspace.
It should also be noted that the extension works only with saved code. If you’ve made changes to your code but haven’t saved it yet, pressing Shift + F9 will forward and execute the saved (old), uncorrected version of the code to Blender.
Developing add-ons
Now let’s look on the main feature of the BlendPyBridge extension, with which it reveals all its capabilities – fast forwarding developing add-ons to Blender.
For example, create a minimum set of files for the Blender add-on in the “d:/BlendPyBridge” directory:
__init__.py – start file for the add-on initialization
|
1 2 3 4 5 6 7 8 9 10 11 12 13 14 15 16 17 18 19 20 21 22 23 24 25 |
from . import test_ops from . import test_panel bl_info = { 'name': 'TEST', 'category': 'All', 'author': '', 'version': (1, 0, 0), 'blender': (4, 0, 0), 'location': '3D Viewport - N-Panel - TEST', 'wiki_url': '', 'tracker_url': '', 'description': 'Our test add-on' } def register(): test_ops.register() test_panel.register() def unregister(): test_panel.unregister() test_ops.unregister() if __name__ == '__main__': register() |
test_ops.py – in this file we will place the main operator of the add-on. In the simplest case, let it be adding the “Suzanne” mesh to the scene againg.
|
1 2 3 4 5 6 7 8 9 10 11 12 13 14 15 16 17 18 19 20 21 22 23 24 25 |
import bpy from bpy.types import Operator from bpy.utils import register_class, unregister_class class TEST_OT_main(Operator): bl_idname = 'test.main' bl_label = 'Test - main' bl_description = 'Test Main Operator' bl_options = {'REGISTER', 'UNDO'} def execute(self, context): bpy.ops.mesh.primitive_monkey_add( size=2, enter_editmode=False, align='WORLD', location=(0, 0, 0), scale=(1, 1, 1) ) return {'FINISHED'} def register(): register_class(TEST_OT_main) def unregister(): unregister_class(TEST_OT_main) |
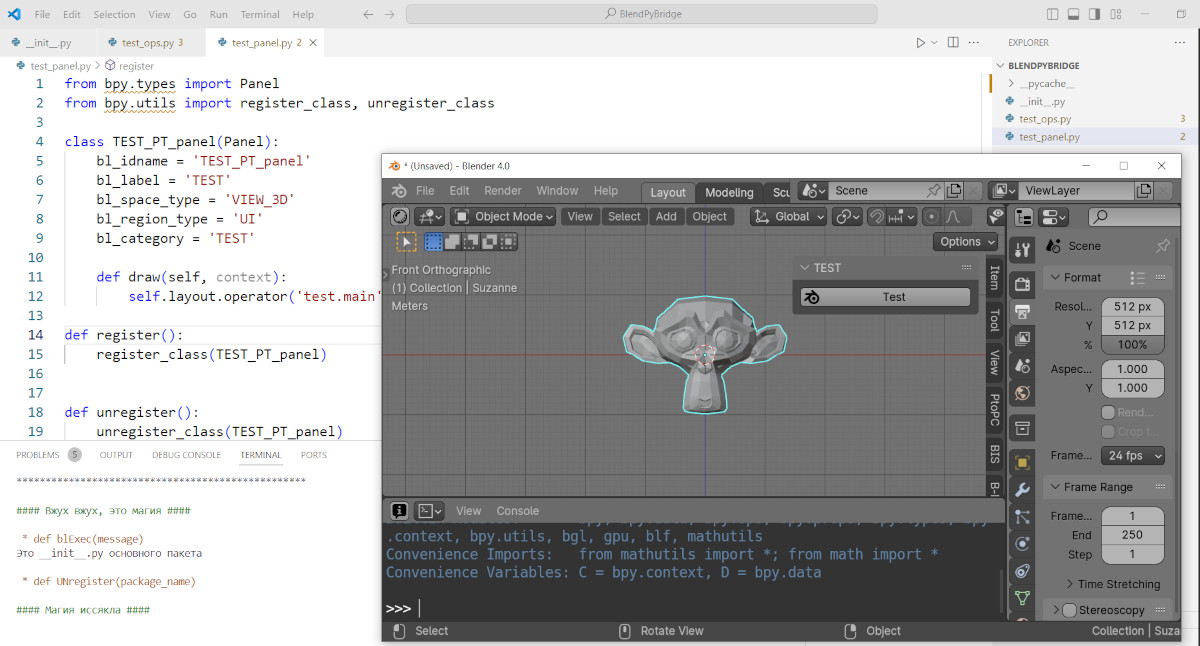
And the test_panel.py – here we will place the UI of our test add-on: a panel with a button to call an operator.
|
1 2 3 4 5 6 7 8 9 10 11 12 13 14 15 16 17 18 19 |
from bpy.types import Panel from bpy.utils import register_class, unregister_class class TEST_PT_panel(Panel): bl_idname = 'TEST_PT_panel' bl_label = 'TEST' bl_space_type = 'VIEW_3D' bl_region_type = 'UI' bl_category = 'TEST' def draw(self, context): self.layout.operator('test.main', icon='BLENDER', text='Test') def register(): register_class(TEST_PT_panel) def unregister(): unregister_class(TEST_PT_panel) |
Once again, check that the files are saved, the directory is open in the Visual Studio Code Workspace, and a session with Blender is started (Shift + F7).
Press F1 (or Ctrl + Shift + p) and type “Run the entrie package in Blender”. Or you can press the Shift + F8 shortcode. The extension forwards all add-on files to Blender.
Switching to the Blender window, we will see the “TEST” panel of our add-on with a button appearing. By pressing it, we will execute the operator and add “Suzanne” to the scene.
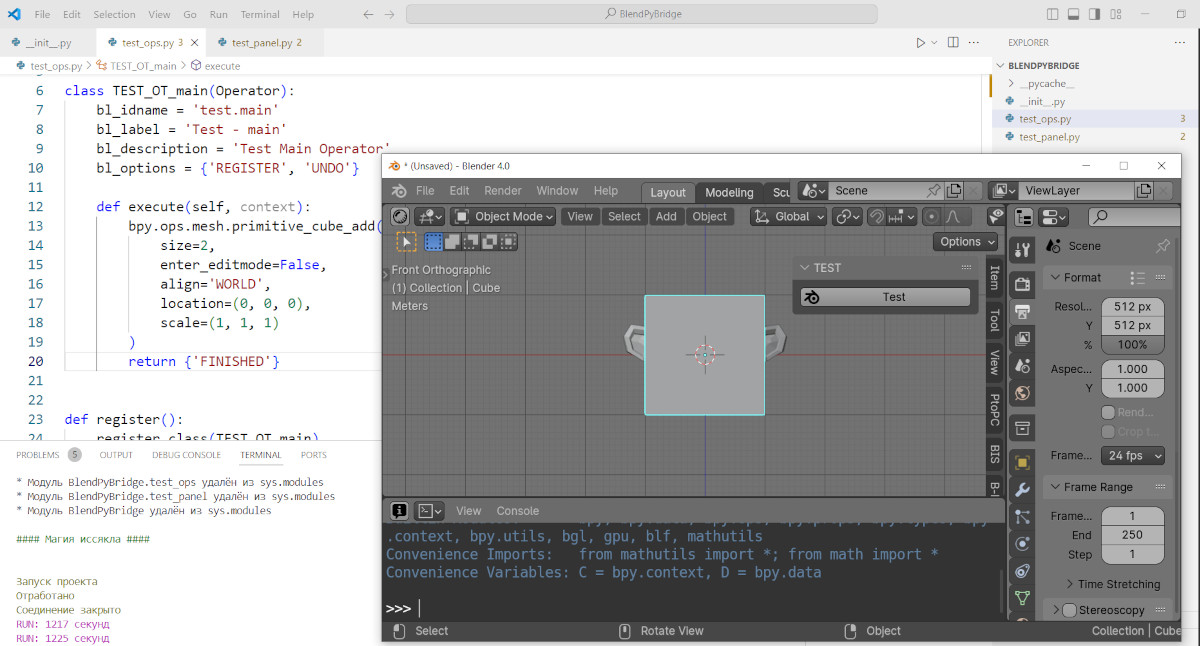
Let’s make changes to the test_ops.py file. Replace the addition of “Suzanne” with the addition of the default cube to the scene. To do this, change the body of the “execute” operator function with the following code:
|
1 2 3 4 5 6 7 |
bpy.ops.mesh.primitive_cube_add( size=2, enter_editmode=False, align='WORLD', location=(0, 0, 0), scale=(1, 1, 1) ) |
Save the changes and press Shift + F8 again. The extension will forward the code again, and by once again clicking on the button of our add-on, we will get a new result – a cube will be added to the scene instead of “Suzanne”.
Thus, the extension allows us to develop the add-on in Visual Studio Code, leave test it in Blender, and also, with the “one button press”, make changes and get the modified add-on working in Blender.
About the technical side and additional extension advantages
An interesting feature of the extension is that by passing the developed code into Blender, it does not simulate or perform a programmatically installation of the add-on into Blender.
Typically, similar tools operate as follows: the add-on code is packed into an archive using a zip archiver. After this, the add-on installer is called programmatically from Blender, and Blender installs the add-on into the standard directory in which all add-ons are installed. The add-on is activated programmatically, after which the developer can call and test the developing addon in Blender.
However, if we now open the directory where add-ons installed in Blender are placed,
|
1 |
c:\Users\_USER_\AppData\Roaming\Blender Foundation\Blender\4.0\scripts\addons\ |
we will not find the folder with our test add-on in it.
How does this happen? The add-on is there and working, but it is not in the Blender add-ons directory.
All the magic (black or white?) of the BlendPyBridge extension lies in manipulating with the “sys” module. This module in Python is responsible for the variables and paths that the interpreter works with.
If we type the following commands in the Python console in Blender:
|
1 2 3 4 5 6 7 8 9 10 11 12 13 14 |
import sys print(sys.path) # ... # c:\\Users\\_USER_\\.vscode\\extensions\\baasis.blendpybridge-2402.7.0\\scripts' # ... print(sys.modules) # ... # 'BlendPyBridge.test_ops': <module 'BlendPyBridge.test_ops' from 'd:\\BlendPyBridge\\test_ops.py'>, # 'BlendPyBridge.test_panel': <module 'BlendPyBridge.test_panel' from 'd:\\BlendPyBridge\\test_panel.py'>, # 'BlendPyBridge': <module 'BlendPyBridge' from 'd:\\BlendPyBridge\\__init__.py'> # ... |
We will see that the environment paths contain a pointer to the BlendPyBridge extension itself, and the “sys.modules” contain absolute paths to all add-on modules.
This trick allows the add-on to work without being physically installed in Blender.
And here the hugest advantage of using the BlendPyBridge extension appears.
If you are developing a big add-on and include a bunch of modules or provide a lot of built-in content, the standard way of installing add-ons in Blender will require constantly archiving, copying and unzipping all this volume of data. For example, if you are making an add-on in conjunction with some neural network weighing up to 10 GB, how long will it take to reinstall the add-on standardly to correct one or two syntax errors in the code?
This extension allows you to get rid of constant forwarding data from one place to another, simply by specifying the paths to the place where your add-on is developed.
It is necessary to note one more positive quality of the BlendPyBridge extension, which arises from the principle of its working.
When we include some third-party modules in the add-on we are developing, simply re-registering the add-on in Blender does not update them. The Python interpreter is designed in such a way that it updates only what is specified explicitly; the rest of the code is taken from the py-cache if the module is already there. As a result, it turns out that when an add-on is re-registered in Blender, only the main modules of the add-on are updated, and additional ones remain in the cache and are taken from the cache, unchanged, even if the developer has updated something in them. A complete update of the add-on with all modules occurs only with a completely restarting of Blender.
When using the extension, pointers to absolutely all modules of the developed add-on are cleared from the “sys.modules”, which forces the Python interpreter to load the modules anew each time, ignoring their possible presence in the cache. Therefore, changes made to any add-on module the next time you pass its code into Blender will be immediately reflected and restarting Blender in this case will not be required.
Conclusion
Overall, the BlendPyBridge extension for Visual Studio Code can be convenient and useful for developing add-ons for Blender.
Although its main goals and qualities are aimed at the work of experienced developers who write large amounts of code and use a lot of third-party code or large content, the advantages of living bridge from the editot to Blender will be useful at any level of work.
The disadvantages of the extension, as noted above, are the impossibility of passing separate commands into Blender; code that is not saved to a file, as well as code changes that are not saved to a file will not be passed to Blender. Also some unintuitive behavior of the extension, “until you studied it”.
At the same time, the advantages of the extension make it possible to conveniently work with large volumes of information and a complex branched tree of project modules.
Another disadvantage I can note is the ability to call shortcodes only if the focus of Visual Studio Code is on the window with the code (however, these could be features of the editor itself) and the blocking of the Blender system console (main menu – window – toggle system console) output – Blender responses are translating to the Visual Studio Code terminal but not at all.