It is convenient to use the following system for debugging developing multi-file Blender add-ons. But it has one drawback: modules imported in __init__.py file becomes available only after the file running (after the execution of the register() function). This means that any access to the imported modules before they are registered will cause an error. This is not critical in most cases, but it will cause a problem if, for example, in one imported module is used inheritance from the class, described in the other imported module, because the classes descriptions are processed before the add-on registration.
To get more freedom working with imported modules, we can use another way to debug the add-on – do not run the add-on directly from the development directory, but install it in Blender and check its “live” work. However, manual add-on reinstallation requires a set of routine actions, which complicates such sort of debugging. This issue can be solved by reinstalling the add-on in automatic mode.
Let’s consider add-on debugging with the previously created test “addCube” add-on, consisting of three modules:
- __init__.py
- addCube.py
- addCubePanel.py
“addCube” (adds a default cube to the scene) and “addCubePanel” (the panel with the button for adding a cube) modules will remain unchanged:
|
1 2 3 4 5 6 7 8 9 10 11 12 13 14 15 16 |
import bpy class addCubeSample(bpy.types.Operator): bl_idname = 'mesh.add_cube_sample' bl_label = 'Add Cube' bl_options = {"REGISTER", "UNDO"} def execute(self, context): bpy.ops.mesh.primitive_cube_add() return {"FINISHED"} def register() : bpy.utils.register_class(addCubeSample) def unregister() : bpy.utils.unregister_class(addCubeSample) |
|
1 2 3 4 5 6 7 8 9 10 11 12 13 14 15 16 17 |
import bpy class addCubePanel(bpy.types.Panel): bl_idname = "panel.add_cube_panel" bl_label = "AddCube" bl_space_type = "VIEW_3D" bl_region_type = "TOOLS" bl_category = "Add Cube" def draw(self, context): self.layout.operator("mesh.add_cube_sample", icon='MESH_CUBE', text="Add Cube") def register() : bpy.utils.register_class(addCubePanel) def unregister() : bpy.utils.unregister_class(addCubePanel) |
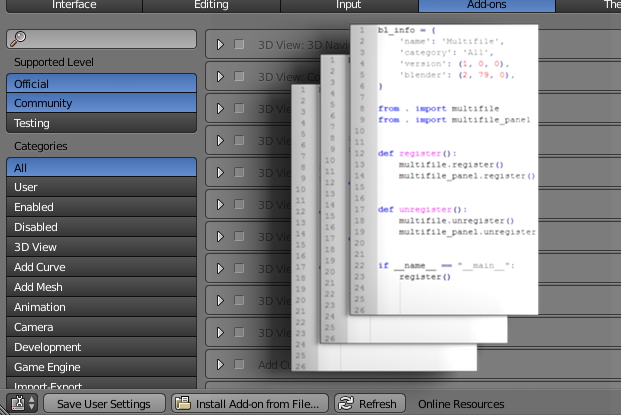
But the main __init__.py module becomes much simpler.
Now the package with add-on modules is always located in the same place – in the Blender add-ons directory, so we can import required modules any place with the single command:
|
1 |
from . import module_name |
and there is no need to pre-import all the package modules.
Now in the __init__.py file we need to import only the main modules “addCube” and “addCubePanel”.
|
1 2 |
from . import addCube from . import addCubePanel |
If (in more complex add-ons) somewhere in modules we need to import some other modules, no pre-import in the __init__.py file is necessary. The same command “from . import module_name” is enough.
Except main modules import only the “register” and “unregister” functions remain in the __init__.py file (to initialize those modules) and the dictionary with the add-0n description.
The complete __init__.py file looks like the following:
|
1 2 3 4 5 6 7 8 9 10 11 12 13 14 15 16 17 18 19 20 21 22 23 |
bl_info = { 'name': 'Test Multifile Addon', 'category': 'All', 'version': (0, 0, 1), 'blender': (2, 79, 0) } from . import addCube from . import addCubePanel def register(): addCube.register() addCubePanel.register() def unregister(): addCube.unregister() addCubePanel.unregister() if __name__ == "__main__": register() |
The add-on modules are finished, it remains to modify the debugging script in Blender.
Open Blender, switch to the “Text Editor” window and create a new script.
To start, let’s define the input parameters: the name of the add-on directory (its package name), the full path to the add-on directory, and the mask describes add-on modules – all files with the “.py” extension. To include some additional add-on files, for example, “README.md” and “LICENSE”, let’s specify them in a separate list.
|
1 2 3 4 5 6 |
addon_folder = 'addCube' source_path = 'c:/dev' files_mask = '*.py' add_files_names = ['README.md', 'LICENSE'] |
Collect all necessary files with their full paths in the “files” list:
|
1 2 3 4 5 6 |
import glob import os addon_path = os.path.join(source_path, addon_folder) files = glob.glob(os.path.join(addon_path, files_mask)) + [os.path.join(addon_path, file) for file in add_files_names] |
In the system temporary directory, let’s create our temporary folder to prepare add-on files for the installation into Blender. Using the “with” construction will automatically clean up all temporary files and directories after the script execution.
|
1 2 3 |
import tempfile with tempfile.TemporaryDirectory() as temp_dir: |
Copy all the add-on files to the created temporary folder. It is necessary to copy them to the package – in a subdirectory with the same name as the name of the add-on.
|
1 2 3 4 5 6 7 8 |
import shutil addon_folder_to_files = os.path.join(temp_dir, addon_folder, addon_folder) os.makedirs(addon_folder_to_files) for file in files: shutil.copy(file, addon_folder_to_files) |
Zip the package folder with the files in the archive:
|
1 2 3 4 5 |
addon_folder_to_zip = os.path.join(temp_dir, addon_folder) shutil.make_archive(addon_folder_to_zip, 'zip', addon_folder_to_zip) addon_zip_path = addon_folder_to_zip + '.zip' |
The full path to the created zip-archive saved in the “addon_zip_path” variable. The further add-on installation will be carried out from this path.
The code of the developing add-on is constantly updated. Therefore, each script launch must first remove the old add-on version (installed at the previous launch).
|
1 2 3 4 |
import bpy bpy.ops.wm.addon_disable(module = addon_folder) bpy.ops.wm.addon_remove(module = addon_folder) |
First string deactivates the add-on, and the second removes it from Blender. However, imported add-on modules still remain in the memory. To update all the code, they also need to be removed. We need to remove only modules loaded from the package of our add-on.
|
1 2 3 4 |
for module in list(sys.modules.keys()): if hasattr(sys.modules[module], '__package__'): if(sys.modules[module].__package__ == addon_folder): del sys.modules[module] |
Now we can reinstall the add-on from our temporary directory:
|
1 2 |
bpy.ops.wm.addon_install(filepath = addon_zip_path, overwrite = True) bpy.ops.wm.addon_enable(module = addon_folder) |
The complete script code that reinstalls the add-on:
|
1 2 3 4 5 6 7 8 9 10 11 12 13 14 15 16 17 18 19 20 21 22 23 24 25 26 27 28 29 30 31 32 33 34 35 36 37 38 39 40 41 42 43 |
import tempfile import os import shutil import glob import bpy import sys addon_folder = 'addCube' source_path = 'd:/dev' files_mask = '*.py' add_files_names = ['README.md', '.gitignore', 'LICENSE'] addon_path = os.path.join(source_path, addon_folder) files = glob.glob(os.path.join(addon_path, files_mask)) + [os.path.join(addon_path, file) for file in add_files_names] with tempfile.TemporaryDirectory() as temp_dir: addon_folder_to_files = os.path.join(temp_dir, addon_folder, addon_folder) os.makedirs(addon_folder_to_files) for file in files: shutil.copy(file, addon_folder_to_files) addon_folder_to_zip = os.path.join(temp_dir, addon_folder) shutil.make_archive(addon_folder_to_zip, 'zip', addon_folder_to_zip) addon_zip_path = addon_folder_to_zip + '.zip' bpy.ops.wm.addon_disable(module = addon_folder) bpy.ops.wm.addon_remove(module = addon_folder) for module in list(sys.modules.keys()): if hasattr(sys.modules[module], '__package__'): if(sys.modules[module].__package__ == addon_folder): del sys.modules[module] bpy.ops.wm.addon_install(filepath = addon_zip_path, overwrite = True) bpy.ops.wm.addon_enable(module = addon_folder) |
In order to fully update the add-on code in Blender, it’s enough just to press the “Run Script” button.
Now it is simple and convenient to make changes into developing code, switch to Blender, press “Run Script” and have updated add-on installed and ready for the test run.
This debugging script is universal, it can be used to develop any multi-file add-ons. You just need to change the add-on directory and the path to the development directory in the corresponding variables to new ones.