One of the essential conditions of comfortable work is the convenience and speed of accessing add-ons functional. It is not enough to write an add-on and register it in Blender API system. Be sure to give the easy call add-on functions ability to the user. So, any add-on should determine a place to put interface buttons that provide access to its functionality.
All available Blender user interface located on panels. Three panels are the most used: T-bar – opens/hides by pressing the t keyboard button, N-bar – opens/hides by pressing the n button, and the Properties panel – called in the main menu of any window, typed it as Properties.
Blender API allows defining users panels to place add-on functional buttons on any of these three main panels.
Consider the placement of add-ons buttons with a simple demonstration add-on that adds a cube to the scene. That default cube, maybe it is useful at least? ).
The code of this add-on:
|
1 2 3 4 5 6 7 8 9 10 11 12 13 14 15 16 17 18 19 20 21 |
bl_info = { 'name': 'Creating panels demonstation', 'category': 'All' } import bpy class addCubeSample(bpy.types.Operator): bl_idname = 'mesh.add_cube_sample' bl_label = 'Add Cube' bl_options = {"REGISTER", "UNDO"} def execute(self, context): bpy.ops.mesh.primitive_cube_add() return {"FINISHED"} def register() : bpy.utils.register_class(addCubeSample) def unregister() : bpy.utils.unregister_class(addCubeSample) |
In this example, the system operator bpy.ops.mesh.primitive_cube_add() is wrapped into a user defined class to call it through a specified identifier. There may be any other content in execute function, we just created our personal operator.
Our operator functionality can be called by opening the Python Console window and typing bpy.ops.mesh.add_cube_sample() command. But, of course, it is very inconvenient.
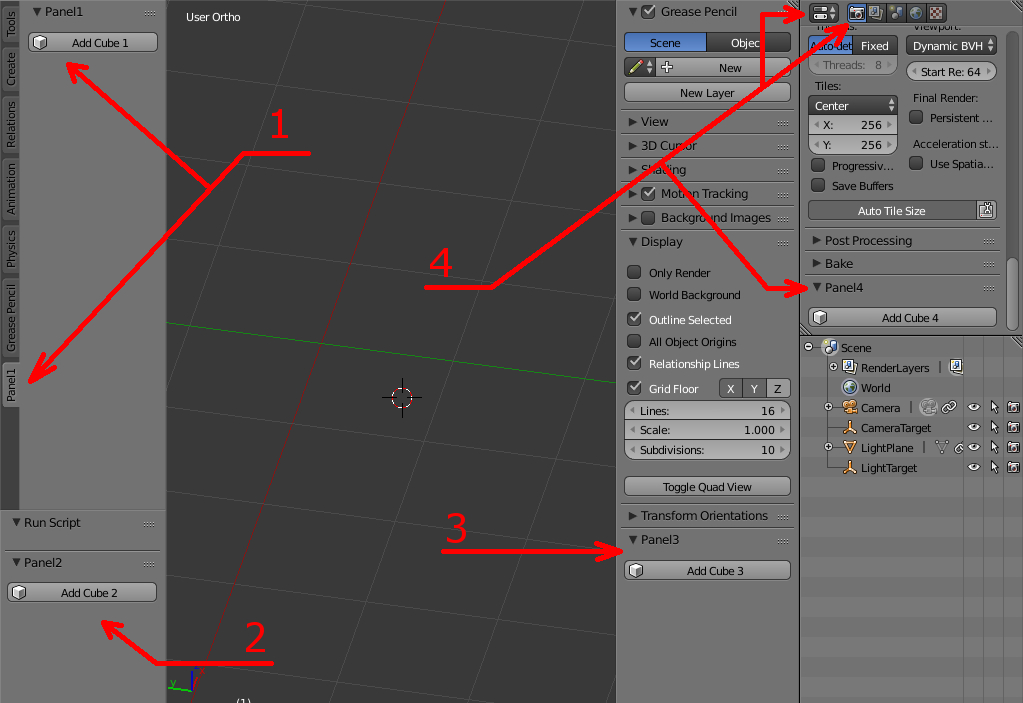
Let’s append our own panels to each of the main Blender interface panel and place our add-on call buttons on them. Totally we will create 4 panels – two on different areas of T-bar, one on the N-bar and one on the Render tab of Properties window.
Like user defined operators, Blender API panels define as classes. Panel classes need to inherit from bpy.types.Panel.
In the panel class is necessary to override the parent function draw, which responsible for the panel output. This function is executed during panel class registration through register_class function. Inside the draw function is necessary to fill the layout object with displayed on the panel structure: buttons, input fields, checkboxes, all that add-on functionality requires.
When add-on powers off, registered panel classes, as well as operators, should be removed from the Blender API with the unregister_class function.
As for operators, in the panel class is necessary to define a constant – the class identifier with a predefined name bl_idname. Text variable bl_label used to store the panel header text.
There are several variables with predefined names need to define in panel class to determine the location point of panel in Blender interface:
- bl_space_type
- Specifies the space (in fact – the window), where the panel will be located. It can take the following values: EMPTY, VIEW_3D, TIMELINE, GRAPH_EDITOR, DOPESHEET_EDITOR, NLA_EDITOR, IMAGE_EDITOR, SEQUENCE_EDITOR, CLIP_EDITOR, TEXT_EDITOR, NODE_EDITOR, LOGIC_EDITOR, PROPERTIES, OUTLINER, USER_PREFERENCES, INFO, FILE_BROWSER, CONSOLE.
- bl_region_type
- Specifies the region in space to place the panel. It can take the following values: WINDOW, HEADER, CHANNELS, TEMPORARY, UI, TOOLS, TOOL_PROPS, PREVIEW.
- bl_context
- Specifies the panel placement context.
- bl_category
- Specifies the panel placement group.
Using this rules lets create 4 classes to accommodate 4 custom panels in the right places. In all panels, lets create single button to call previously created operator with add_cube_sample identifier.
- T-bar, the “Toos” region:
Set bl_space_type to ‘VIEW_3D’ – to indicate 3D-View window. The region is T-bar – the Tools panel, so set bl_region_type to ‘TOOLS’. If we want to place our panel on one of the existing tabs, we need to specify the category of the tab, for example ‘Tools’ – top Tools tab with basic modeling tools buttons. Or we can create a new tab to specify a non-existent category.
The required panel class code:
|
1 2 3 4 5 6 7 8 9 10 |
class panel1(bpy.types.Panel): bl_idname = "panel.panel1" bl_label = "Panel1" bl_space_type = "VIEW_3D" bl_region_type = "TOOLS" # bl_category = "Tools" bl_category = "Panel1" def draw(self, context): self.layout.operator("mesh.add_cube_sample", icon='MESH_CUBE', text="Add Cube 1") |
- T-bar, properties region:
All the same as for Tools region of the T-bar, but the region needs to specify as ‘TOOLS_PROPS’. Categories are not necessary.
|
1 2 3 4 5 6 7 8 |
class panel2(bpy.types.Panel): bl_idname = "panel.panel2" bl_label = "Panel2" bl_space_type = "VIEW_3D" bl_region_type = "TOOL_PROPS" def draw(self, context): self.layout.operator("mesh.add_cube_sample", icon='MESH_CUBE', text="Add Cube 2") |
- N-bar:
Region – ‘UI’.
|
1 2 3 4 5 6 7 8 |
class panel3(bpy.types.Panel): bl_idname = "panel.panel3" bl_label = "Panel3" bl_space_type = "VIEW_3D" bl_region_type = "UI" def draw(self, context): self.layout.operator("mesh.add_cube_sample", icon='MESH_CUBE', text="Add Cube 3") |
- Properties window, place our panel on Render tab:
Set space to ‘PROPERTIES’, region to ‘WINDOW’, and to determine the tab, specify the context – ‘render’ (lowercase).
|
1 2 3 4 5 6 7 8 9 |
class panel4(bpy.types.Panel): bl_idname = "panel.panel4" bl_label = "Panel4" bl_space_type = "PROPERTIES" bl_region_type = "WINDOW" bl_context = "render" def draw(self, context): self.layout.operator("mesh.add_cube_sample", icon='MESH_CUBE', text="Add Cube 4") |
Panel classes are finished. To correctly panel creation and deletion during add-on initialization and completion, fill register and unregister add-on functions.
|
1 2 3 4 5 6 7 8 9 10 11 |
def register() : bpy.utils.register_class(panel1) bpy.utils.register_class(panel2) bpy.utils.register_class(panel3) bpy.utils.register_class(panel4) def unregister() : bpy.utils.unregister_class(panel1) bpy.utils.unregister_class(panel2) bpy.utils.unregister_class(panel3) bpy.utils.unregister_class(panel4) |
Demonstration add-on completed. After its installation and activation, in certain areas the panels with the cube creation button appear.
The demonstration add-on full code:
|
1 2 3 4 5 6 7 8 9 10 11 12 13 14 15 16 17 18 19 20 21 22 23 24 25 26 27 28 29 30 31 32 33 34 35 36 37 38 39 40 41 42 43 44 45 46 47 48 49 50 51 52 53 54 55 56 57 58 59 60 61 62 63 64 65 66 67 68 69 70 71 |
bl_info = { 'name': 'Creating panels demonstation', 'category': 'All' } import bpy class addCubeSample(bpy.types.Operator): bl_idname = 'mesh.add_cube_sample' bl_label = 'Add Cube' bl_options = {"REGISTER", "UNDO"} def execute(self, context): bpy.ops.mesh.primitive_cube_add() return {"FINISHED"} class panel1(bpy.types.Panel): bl_idname = "panel.panel1" bl_label = "Panel1" bl_space_type = "VIEW_3D" bl_region_type = "TOOLS" # bl_category = "Tools" bl_category = "Panel1" def draw(self, context): self.layout.operator("mesh.add_cube_sample", icon='MESH_CUBE', text="Add Cube 1") class panel2(bpy.types.Panel): bl_idname = "panel.panel2" bl_label = "Panel2" bl_space_type = "VIEW_3D" bl_region_type = "TOOL_PROPS" def draw(self, context): self.layout.operator("mesh.add_cube_sample", icon='MESH_CUBE', text="Add Cube 2") class panel3(bpy.types.Panel): bl_idname = "panel.panel3" bl_label = "Panel3" bl_space_type = "VIEW_3D" bl_region_type = "UI" def draw(self, context): self.layout.operator("mesh.add_cube_sample", icon='MESH_CUBE', text="Add Cube 3") class panel4(bpy.types.Panel): bl_idname = "panel.panel4" bl_label = "Panel4" bl_space_type = "PROPERTIES" bl_region_type = "WINDOW" bl_context = "render" def draw(self, context): self.layout.operator("mesh.add_cube_sample", icon='MESH_CUBE', text="Add Cube 4") def register() : bpy.utils.register_class(addCubeSample) bpy.utils.register_class(panel1) bpy.utils.register_class(panel2) bpy.utils.register_class(panel3) bpy.utils.register_class(panel4) def unregister() : bpy.utils.unregister_class(addCubeSample) bpy.utils.unregister_class(panel1) bpy.utils.unregister_class(panel2) bpy.utils.unregister_class(panel3) bpy.utils.unregister_class(panel4) if __name__ == "__main__" : register() |
Hello, I tried the final script but the console gives the following error:
Read prefs: C:\Users\fine\AppData\Roaming\Blender Foundation\Blender\2.93\config\userpref.blend
Traceback (most recent call last):
File “\addcubebutton1.py”, line 71, in <module>
File “\addcubebutton1.py”, line 58, in register
RuntimeError: Error: Registering panel class: ‘panel.panel1’ has category ‘Panel1’
Error: Python script failed, check the message in the system console
any idea what could be the issue?
Hello!
This tutorial is for 2.7x versions of Blender. In 2.9 there is no T-panel (available for users interface) more and the N-panel changed its bl_region_type to the ‘UI’.
To make this script work with 2.9 – remove the part about T-panel and change the bl_region_type = ‘UI’ to the N-panel.
Apologies I just saw this now. Thank you for the reply.