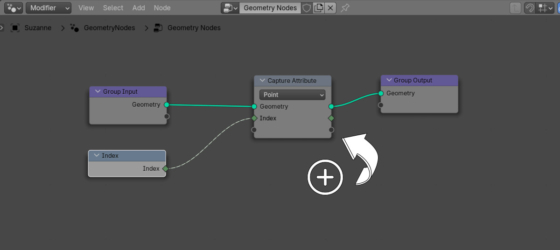
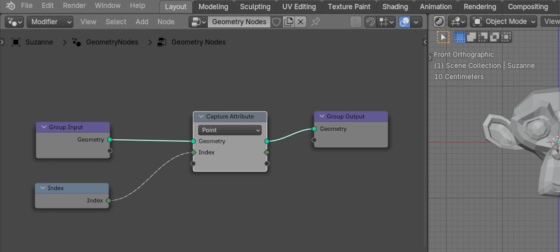
Starting with Blender 4.2, the Capture Attribute node has changed in functionality. If earlier this node always had only one “Value” input and only one “Attribute” output, intended for recording attributes, in addition to the standard geometry socket, then starting with version 4.2, the number of inputs/outputs for recording attributes has been made dynamic.
Now, inputs/outputs on this node are created similarly, according to the same principle as in the Group, Group Input, and Group Output nodes.
However, there are certain differences. If in group nodes inputs/outputs are created using the built-in “interface” object, there is no such object for the Capture Attribute node. Inputs and outputs in the Capture Attribute node are created using the “capture_items” object.
Let’s add a mesh to the scene and assign it a Geometry Nodes modifier. Add the Capture Attribute node and link it to the node tree.
Now let’s look at working with the Capture Attribute node using the Blender Python API.
First, get a pointer to the Capture Attribute node itself in the Geometry Nodes node tree.
Pointer to Geometry Nodes and to the GN node tree:
|
1 2 3 4 5 |
gn = bpy.context.object.modifiers['GeometryNodes'] # bpy.data.objects['Suzanne'].modifiers["GeometryNodes"] node_tree = gn.node_group # bpy.data.node_groups['Geometry Nodes'] |
Pointer to the Capture Attribute node:
|
1 2 3 |
capture_attribute_node = next((node for node in node_tree.nodes if node.type=='CAPTURE_ATTRIBUTE'), None) # <bpy_struct, GeometryNodeCaptureAttribute("Capture Attribute") at 0x0000019B447F0820> |
List of elements for capturing attributes, it actually forms the necessary inputs and outputs, we can get it through the “capture_items” object:
|
1 2 3 |
capture_attribute_node.capture_items[:] # [bpy.data.node_groups['Geometry Nodes']...NodeGeometryCaptureAttributeItem] |
We can get the existing items:
|
1 2 3 4 |
for item in capture_attribute_node.capture_items: print(item, item.name, item.data_type) # <bpy_struct, NodeGeometryCaptureAttributeItem("Index") at 0x0000019B447F6010> Index INT |
We have one item named “Index” with the integer data type INT.
At the same time we have three inputs and outputs (sockets):
|
1 2 3 4 5 6 |
for input in capture_attribute_node.inputs: print(input, input.type) # <bpy_struct, NodeSocketGeometry("Geometry") at 0x0000019B47923120> GEOMETRY # <bpy_struct, NodeSocketInt("Index") at 0x0000019B47922EA0> INT # <bpy_struct, NodeSocketVirtual("") at 0x0000019B47922C20> CUSTOM |
The node has a common “Geometry” socket for passing mesh geometry, an “Index” socket for the attribute entry element we created in advance, and a “CUSTOM” type socket, the same as on group nodes, which is intended for the user to create new sockets manually.
To create a new item through the Blender Python API, we can use the new() method of the “capture_items” object, specifying the required type and name in the parameters.
For example, let’s create a new item to store the color attribute.
|
1 2 3 4 |
new_item = capture_attribute_node.capture_items.new(socket_type='RGBA', name='Color') print(new_item, new_item.name, new_item.data_type) # <bpy_struct, NodeGeometryCaptureAttributeItem("Color") at 0x0000019B47EA9978> Color FLOAT_COLOR |
Note that we specified the “socket_type” parameter value as the type of the required socket – “RGBA”, but not the item type itself (“Color”).
To remove an item, we can use the remove() method of the same “capture_items” object. In the item parameter of the method, we need to pass a pointer to the item to be removed.
|
1 |
capture_attribute_node.capture_items.remove(capture_attribute_node.capture_items[0]) |
Here we removed the element with index number of 0, the one that we created manually in advance.
- ВКонтакте
- LiveJournal
- РћРТвЂВВВВВВВВнокласснРСвЂВВВВВВВВРєРСвЂВВВВВВВВ
- Telegram
- Viber
- Evernote
- Skype

 .blend file on Patreon