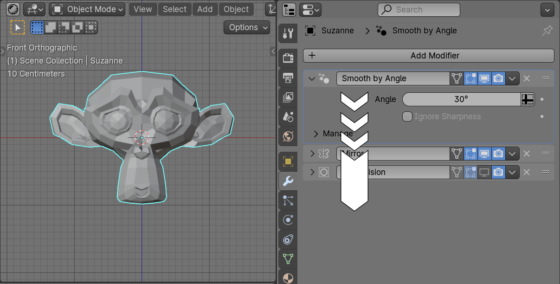
Since version 4.1, the normal smoothing operator in Blender has been completely replaced by a modifier implemented on the Geometry Nodes mechanism. This is convenient for solving a number of problems, but if the Auto Smooth modifier is not located on the last place in the modifier stack, before other modifiers that change the mesh geometry, this leads to the appearance of artifacts. To quickly move the Auto Smooth modifier to the end of the stack, we can use a simple script.
Script author – Alexey Maslov.
Let’s also optionally add the ability to set the required smoothing angle value for processing Auto Smooth modifiers. To do this, at the beginning of the script, define a variable in which we will type the value of the angle we need (18 degrees, for example) or None if the value of the angle in the modifier does not need to be changed.
|
1 |
set_angle = 18 # in degrees, None to skip |
Loop through all the selected objects in the scene.
|
1 |
for obj in bpy.context.selected_objects: |
And for each object, loop through a list of its modifiers. The loop goes through the copy of the list, which we create with a slice [:], to avoid possible cycling.
|
1 |
for modifier in obj.modifiers[:]: |
We can find the modifier we need (Auto Smooth) by type, it refers to the node type, and by a part of the name.
|
1 |
if modifier.type == 'NODES' and 'Smooth' in modifier.node_group.name: |
If the desired modifier exists on the mesh, first we will change the smoothing angle (if we set it in advance).
|
1 2 |
if set_angle is not None: modifier["Input_1"] = math.radians(set_angle) |
Now we need to move the modifier to the end of the stack. For this, we will use the “modifier_move_to_index” operator, which places the modifier according to the numeric index.
To work correctly, we need to make the current mesh active before calling the operator.
|
1 |
bpy.context.view_layer.objects.active = obj |
Now, call the operator, specifying the name of the modifier and the index to 1 less than the total number of modifiers in the stack in its parameters.
|
1 2 3 4 |
bpy.ops.object.modifier_move_to_index( modifier=modifier.name, index=len(obj.modifiers) - 1 ) |
The modifier will be moved to the end of the stack.
Full script code:
|
1 2 3 4 5 6 7 8 9 10 11 12 13 14 15 16 17 |
import math import bpy set_angle = 18 # in degrees, None to skip for obj in bpy.context.selected_objects: for modifier in obj.modifiers[:]: if modifier.type == 'NODES' and 'Smooth' in modifier.node_group.name: # set angle if set_angle is not None: modifier["Input_1"] = math.radians(set_angle) # move modifier to the bottom of the modifiers stack bpy.context.view_layer.objects.active = obj bpy.ops.object.modifier_move_to_index( modifier=modifier.name, index=len(obj.modifiers) - 1 ) |

 .blend file on Patreon