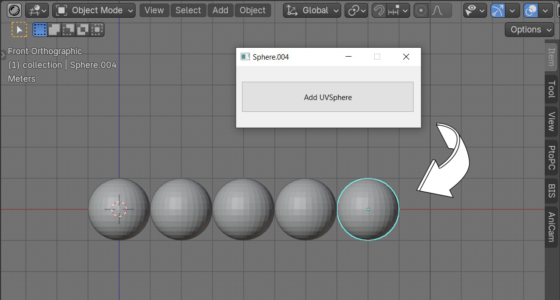
The Blender Python API provides add-on developers with quite a wide range of options for designing a user interface. However, sometimes the built-in capabilities of the Blender API may not be enough. We can create a window with a UI that is completely independent of the built-in API by connecting and using the PySide module.
PySide is not included in the default Blender distribution, so first we need to install the PySide module to Blender.
After successfully installing PySide, let’s create a separate UI window with a button, for example, which will add a default UVSpehere mesh to the scene when pressed.
Open a Text Editor area in Blender, and define a class responsible for creating and operating such a window.
|
1 2 3 4 |
class MainWindow(QMainWindow): def __init__(self): super().__init__() |
We have defined the MainWindow class, and the common __init__() function inside it. This function will be called first when creating our UI window.
Let’s fill the __init__() function with some additional code:
|
1 2 |
self.setWindowFlags(self.windowFlags() | Qt.WindowStaysOnTopHint) self.setFixedWidth(300) |
Here we set the “always on top” display mode for our window and set the window width to 300 pixels.
Add a widget to our window form and define a layout for it, on which we can then place various interface elements (buttons, etc.).
|
1 2 3 4 |
widget = QWidget() layout = QVBoxLayout() widget.setLayout(layout) self.setCentralWidget(widget) |
Now define the button for adding the mesh to the scene.
|
1 2 3 4 |
button = QPushButton('Add UVSphere') button.setFixedSize(280, 50) button.clicked.connect(self.button_pressed) layout.addWidget(button) |
Here we create a button with the label “Add UVSphere”, set its dimensions to 280 by 50 pixels and place it on the previously created layout.
On the third line we assign a handler to the button press and connect it to the call to the button_pressed() function. We will define this function later a bit.
Let’s also add an example of feedback from a Blender scene to our window – we’ll make it so that the name of the current active scene object is always displayed in the title of our window.
The easiest way to organize feedback is to set a timer.
|
1 2 3 |
self.timer = QTimer() self.timer.timeout.connect(self.update) self.timer.start(100) |
Here we define a timer that will fire every 100 milliseconds and call the update() function.
The full code of our __init__() function:
|
1 2 3 4 5 6 7 8 9 10 11 12 13 14 15 16 17 18 19 20 |
def __init__(self): super().__init__() self.setWindowFlags(self.windowFlags() | Qt.WindowStaysOnTopHint) self.setFixedWidth(300) widget = QWidget() layout = QVBoxLayout() widget.setLayout(layout) self.setCentralWidget(widget) button = QPushButton('Add UVSphere') button.setFixedSize(280, 50) button.clicked.connect(self.button_pressed) layout.addWidget(button) self.timer = QTimer() self.timer.timeout.connect(self.update) self.timer.start(100) |
Now let’s define the function that will be called when the button is pressed.
|
1 2 3 4 5 |
def button_pressed(self): self.num = self.num if hasattr(self, 'num') else 0 with bpy.context.temp_override(window=bpy.context.window_manager.windows[0]): bpy.ops.mesh.primitive_uv_sphere_add(location=(2.0 * self.num, 0, 0,)) self.num += 1 |
In the first line, we define a simple counter that we will use to shift each new object added to the scene along the X axis.
Next, we call the primitive_uv_sphere_add() operator from the Blender API, which adds a UV sphere to the scene. In the location parameter, we set the offset to 2 units along the X axis, based on the current value of the counter.
Since the operator is called from an external window that is not associated with the active 3D viewport, it must be called with context override using the temp_override(), passing a pointer to the active 3D viewport window in the parameters.
In the last line, we simply increase the mesh shift counter for the next pressing the button by the user.
We still have to define the update() function, which is called according to the timer and copies the name of the active scene object to our window title.
|
1 2 3 4 |
def update(self): with bpy.context.temp_override(window=bpy.context.window_manager.windows[0]): title = bpy.context.active_object.name if bpy.context.active_object else 'NONE' self.setWindowTitle(title) |
To get the name of the active object from the bpy.context.active_object.name, we still need to use temp_override() to point to the 3D viewport context.
The last function of our class is:
|
1 2 3 |
def closeEvent(self, event): self.timer.stop() event.accept() |
It will be responsible for handling the window closing – removing the timer created at the beginning, and clearing the event stack.
After we have fully defined the class for our custom window, we can create an instance of this window and display it on the screen.
|
1 2 3 4 |
if QApplication.instance() is None: QApplication(["blender"]) window = MainWindow() window.show() |
The window instance is created using a singleton, so the binding to the Blender process only needs to be specified the first time the window is created.
Now the window will be displayed on the screen, and when we click the “Add UVSphere” button, a UVSphere object will be added to the Blender scene, shifting each subsequent sphere 2 units to the right.

 .blend file on Patreon