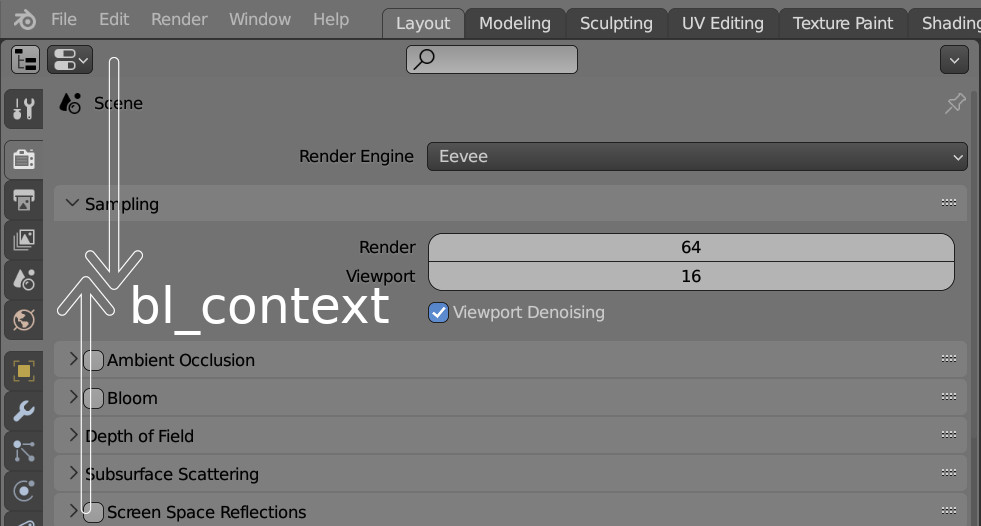
Add-on PartitionRender v.0.0.3 update.
- Added “Reset” and “Clear” buttons:
- “Reset” – resets current partition to the first.
- “Clear” – reset with all saved partitions deletion.
- Checking “Use Range” checkbox resets partition to the first.

Blender 3D: tutorials, articles, tips, notes
Add-on PartitionRender v.0.0.3 update.
Add-on PartitionRender v. 0.0.2 update.
Blender add-on allowing to interrupt the rendering process and resume it from the interrupted place. For those who are not able to have the powered-on computer for render for a long time.
For example, the whole image render takes 12 hours. And there is no way to have the computer powered on all the time, but it is possible to power it on for 5 hours with breaks. If you interrupt the standard rendering process to turn off the computer – next time render starts from the beginning, and all progress is lost. PartitionRender add-on allows dividing the image into several blocks – partitions, each of them is rendered separately. Choosing division by X and Y in 2 parts, the image is divided into 4 blocks. Each of them will be rendered about 3 hours that fit in the time to work. Each partition after rendering saves to file. The next time (after rebooting the computer) PartitionRender automatically continues with the partition on which the break occurred. After finishing all partitions renders, partitions automatically compile to the whole image in compositing.
Add-on is a free and open source. If you want to support it – you can buy the add-on for a convenient price, or set the price to 0 to download it for free.
To clear compositing window (completely remove all nodes from it), run the following code:
1 2 3 4 |
import bpy nodesField = bpy.context.scene.node_tree for currentNode in nodesField.nodes: nodesField.nodes.remove(currentNode) |
In the development of add-ons, their modules should be abstracted as much as possible. For a very simple reason – functional, created for a current add-on, will likely need in the next add-on, and possibly not even in one. In the add-on release, the problem of accessing to such common functionality modules is easily solved – all the necessary modules are included in a single package and distributed together. However, during the add-ons development, such modules are much easier to store separately, in one instance, without associating them with any particular package, and import if necessary the desired modules to the desired add-on.
In accordance with the packages import rules, Python allows to refer modules in the following ways:
Continue reading “Blender add-ons development code reuse with symbolic links”
Blender add-on for easy wireframe render.
DownloadAdd-on is a free and open source. If you want to support it – you can buy the add-on for a convenient price, or set the price to 0 to download it for free.
In the development of complex add-ons with large code volume storing all the code in a single file is inappropriate. When a single file contains logically unrelated classes, functions, and datasets, it is difficult to read, debug, find the necessary code pieces, reuse code. Such code layout is considered as very bad programming tone.
Blender Python supports modular system that allows subdividing logical code parts of the add-on into different files, and then connect them to use. Even if you have never thought about modules, creating scripts or add-ons, you have already used them – any code stored in the *.py file is a separate independent module. Just your addon consists of only one module. Complex add-ons may consist of several tens of modules.
Sometimes when debugging scripts or add-ons, errors not only interrupt the code execution but also causes the complete closure of Blender together with its system console. This case its impossible to check errors and view errors messages.
To find a failure, Blender can be started from the command line interpreter cmd. In this case, Blender output log is redirected to the cmd window which, when the program falls due to errors, not closed. If Blender closes all error messages stay available to check in the cmd window.
To start Blender from a command line interpreter:
Part of the way contains spaces must be enclosed in double quotes – like “Programm Files” in this example.
We create spherical surfaces often in the modeling workflow. It would seem that the sphere is the simplest object to model and any three-dimension editors, including the Blender, provides a default sphere in a set of basic primitives – just add it to the scene. However, is it really so easy to create a beautiful sphere?
2.78 release update.
Fixed 69 important bugs.
Add-on Accurate Render Border v. 0.0.2 update.
Checkbox “Width/Height” added. It allows to switch input mode between “left-top border corner coordinates – right-bottom border corner coordinates” and “left-top border corner coordinates – border width and height”.
Blender add-on allows setting accurate coordinates for render border.
After add-on installation in T-bar additional “ARB” tab appears. On this tab, its possible to set accurate values for left-top and right-bottom render border corners coordinates in pixels. Coordinates establish relative to the render size (Properties — Render — Dimensions — Resolution). After pressing “Set Accurate Render Border” button render border determines in accordance with the entered values.
DownloadAdd-on is a free and open source. If you want to support it – you can buy the add-on for a convenient price, or set the price to 0 to download it for free.
Blender has the ability to limit the scope of rendering – outlining a region the special render border and checking the Border checkbox on the Render – Dimensions tab in Properties window. If such frame is set – Blender render only a limited area of the image.
There are two ways to set render border via the Blender API:
All user-defined classes (panels, operators), registered in Blender API, exists only during Blender runs. After program close they are deleted from memory. Therefore, if some variables are defined in user classes, all of them will be reset after Blender restart.
However, sometimes it is necessary to use in Blender add-on variables with values that not be lost in the process of program restarting. To retain variables values, it needs to wrap them into special class – property, and attach to any object whose properties are stored in * .blend file.
Continue reading “Creating Blender Add-ons variables with values saved in blend-files”
User defined operator classes, inherited from bpy.types.Operator, are static. Accordingly, only static variables can be defined in them.
Static variable sampleVar definition in SampleClass class:
1 2 3 4 5 6 7 8 9 10 11 12 13 14 |
class SampleClass(bpy.types.Operator): bl_idname = "sample.sample_class" sampleVar = 5 def execute(self, context): print(self.sampleVar) self.__class__.sampleVar += 1 print(self.sampleVar) print(self.__class__.sampleVar) def sampleFunc(): SampleClass.sampleVar += 1 print(SampleClass.sampleVar) |
Continue reading “Variables in Blender API operator classes”
One of the essential conditions of comfortable work is the convenience and speed of accessing add-ons functional. It is not enough to write add-on and register it in Blender API system. Be sure to give the easily call add-on functions ability to user. So, any addon should determine a place to put interface buttons that provide access to its functionality.
All available Blender user interface located on panels. Three panels are the most used: T-bar – opens/hides by pressing the t keyboard button, N-bar – opens/hides by pressing the n button, and the Properties panel – called in the main menu of any window typed it as Properties.
Blender API allows to define users panels to place add-on functional buttons on any of this three main panels.
Continue reading “Creating panels for placing Blender add-ons user interface (UI)”
Blender scripting system provides lots of opportunities to simplify and accelerate the workflow, allowing to outsource routine operations to the system and expanding work opportunities through access to the scripting language. However, writing a good script which can be used frequently in various projects, uncomfortable each time to reconnect it to each new project. In addition, this script can be improved with some windows and editable parameters fields. Making complete add-on from the script, you can expand it with additional functionality and connect to the Blender add-ons system.
From a certain time to improve work speed and convenience it is necessary to have some functionality that does not exist in the base Blender. To improve its capabilities Blender community users wrote a lot of extras – add-ons. The required add-ons can be purchased or free downloaded from specialized Internet sites. After receiving the necessary add-on, it needs to make a few steps to install it to the Blender program.
For example, let’s install to the Blender add-on allowing to make wireframe render by pressing a certain key combination.
Blender has an internal text editor to write scripts on Python language. However, this editor is much inferior to specially designed for writing code IDEs. There is no satisfactory autocomplete, comfortable syntax lighting, possibility to organize projects in Blender internal text editor – all those things that determine the speed and ease of code writing. However, it is not difficult to connect and use an external IDE for writing Blender scripts.
Continue reading “Using external IDE PyCharm for writing Blender scripts”
To create screws in Blender the easiest way is to use plugin, like Bolt Factory, which comes in standart complectation. But the plugin features are not always enough, and the result of using Subdivision Surface modifier on the screw created by plugin is not very beautiful. However, it is not difficult to create screw manually.
Lets create high poly screw suitable to render in any major plans.
Some times during the modelling process the problem of filling some volume with number of items occurs. For example it may be a jar with coffee grains, sugar bowl with pieces of sugar, bag of jewels, box with screws and nuts, a bowl of candy, and many others.
All this can be made manually. Creating some copys of items and filling voulume with arranging them in a random order. However this approach much time and efforts to control that the items do not overlap with each other and with the walls of the filled object. To simplify our work we can use the Rigid Body tool – solid-state simulation in Blender.
There is one moment in node tree, created to separate the sides of the planet model by “day” and “night” – when the position of light source changes its new coordinates every time needs to re-specify manually in Value nodes. It is very inconvenient while setting the scene. To eliminate this fault Blender “drivers” system can be used.
Each planet in “from space” view has two sides: “day” – illuminated by Sun, and the opposite – “night”, with no Sun lighting.
While modeling a scene with planet, it is not difficult to achieve this effect by lighting setup. Leave only one lighting source in scene and place it in the right place. However, the result is not so good as real space photographs. To achieve a greater similarity, the proper texture with a darkened face and bright lights – night lights of big cities, mast be mapped to the “night” side of modelling planet.
Continue reading “Planet sides separation by “day” and “night””